On this page
- Tools I will use:
- Step-by-step
- Figure out how Drupal wants to receive the data structure
- Build the data structure
- POST the data structure
- Verify if it worked
- Figure out how Drupal wants to receive the data structure
- Build the data structure
- POST the data structure
- Verify if it worked
- Add on for Field Collection
Services 3 - POST node.create with custom fields
Using the module Services to create a node with required custom fields may be challenging. Most of the problems fall on formatting the data to be sent.
Here are three examples of how to figure out how format the data. The first example is the easiest, it will show how to post a Text field. The second example will use a fivestar field. Finally, the third example will show how to use a node reference field with auto complete widget.
I will send the data in JSON format, but this tutorial can be used for any format your web service accepts.
Tools I will use:
- The Services module
- Devel module - to use
dpm() - Firefox Poster add-on - to do tests and debugging.
- To help editing and validating the JSON data:
- Edit the JSON data using http://braincast.nl/samples/jsoneditor/
- Validate the JSON data using http://jsonformatter.curiousconcept.com/
Step-by-step
-
Figure out how Drupal wants to receive the data structure
-
Build the data structure
-
POST the data structure
-
Verify if it worked
-
Figure out how Drupal wants to receive the data structure
-
Build the data structure
-
POST the data structure
-
Verify if it worked
For all examples, the first step is to figure out how Drupal handles the data object of that node. An easy way to do it is to use add a custom block to the page which has the form used to create the node. Use PHP format and input this code:
<?php
dpm($_POST);
?>
This code will output the data object right after you create a new node.
Then, try it once to see this structured data. You will see something like:
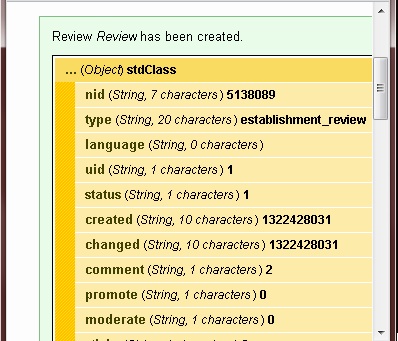
The important parts are:
The Text field
The fivestar field
The node reference field
The Text field is the easiest. You have to build the same structure you see on the dpm():
{
   "field_review":[
      {
         "value":"The user comments"
      }
   ]
}
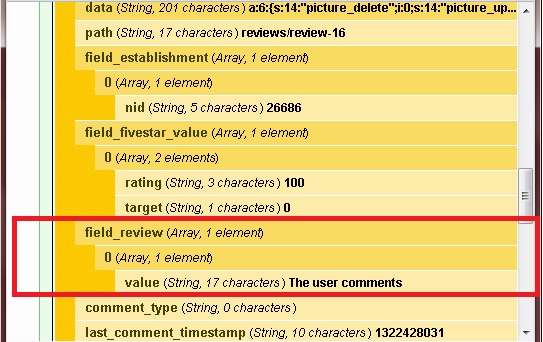
Compare with the dpm() data:

If you use http://braincast.nl/samples/jsoneditor/ to build your JSON tree, you can see the path as json['field_review'][0]['value'], which matches the Text field structure on the dpm(). The value "The user comments" is the text value sent for the Text field.
Note that there is no "0" (zero) in the structure. In this very specific case, it would work. However, in other cases, such as the node review field with auto complete, it may lead errors!
It works without the zero because JSON already put it on the path as the first index of arrays.
The structure for the fivestar field is the following:
{
   "field_fivestar_value":[
      {
         "rating":"100",
         "target":"0"
      }
   ]
}
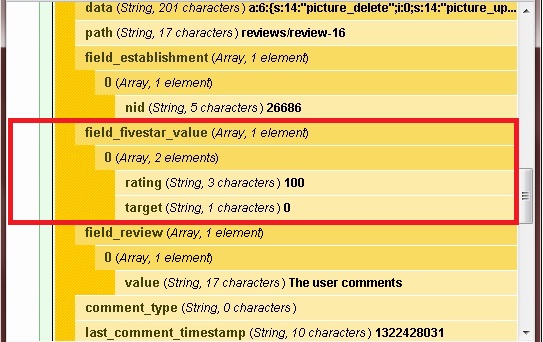
Compare to:
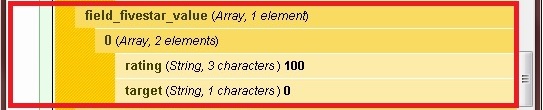
Note again I did not use "0", even knowing it would work. Moreover, in this specific example, I'm not targeting the fivestar rating. In my case, the only allowed values for "rating" were "20", "40", "60", "80", or "100".
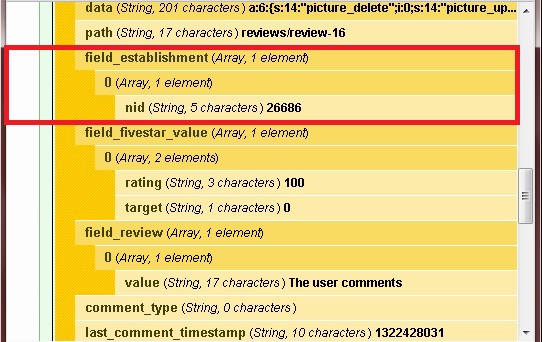
The tricky part is the node reference field, when it is set to use the auto complete widget. You have to query "[nid:xxxx]" to avoid errors such as "found no valid post with that title".
This field on JSON format looks like:
{
   "field_establishment":[
      {
         "nid":{
            "nid":"[nid:26686]"
         }
      }
   ]
}
Compare to:

The first thing you should know before posting is that a node requires a title field. In addition, to create the node, you have to specify the node type you are creating. Then, include this data:
{
   "title":"Review",
   "type":"establishment_review"
}
Now, get everything together:
{
   "title":"Review",
   "type":"establishment_review",
   "field_establishment":[
      {
         "nid":{
            "nid":"[nid:26686]"
         }
      }
   ],
   "field_fivestar_value":[
      {
         "rating":"20",
         "target":"0"
      }
   ],
   "field_review":[
      {
         "value":"comments about the restaurant"
      }
   ]
}
Note that there is no curly brackets ({ nor }) surrounding each field. This is very important, and it will not work if you leave them there.
Your data is ready to be POSTed.
Use the firefox add-on Poster to test it:
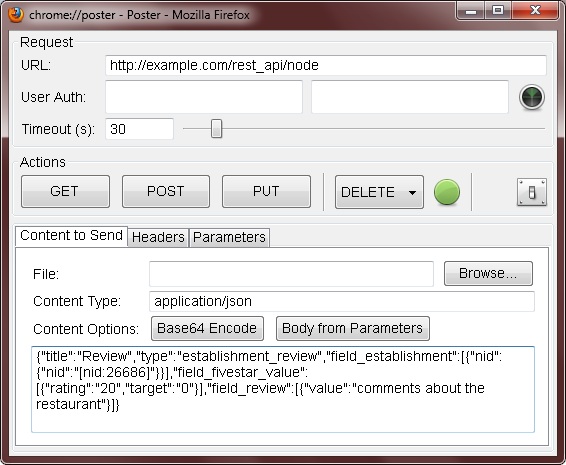
Note that the data is not indented and I am not using multiple lines to organize the data. This is to avoid errors. It happened once when I copied the code to OneNote, and later pasted again in Poster. The format changed with some extra unwanted spaces and it messed the data. It may lead to false errors!. Again, use a single line of data when using Poster.
The URL is your Drupal web address + your Services endpoint + requested resource. In this case:
Drupal address: http://example.com
Services endpoint: /rest_api
Requested resource: /node
Also change the Content Type to application/json
You should get a response like:
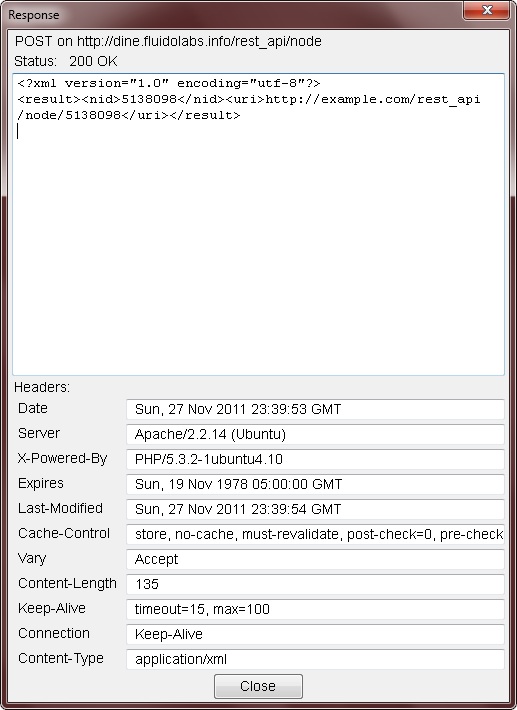 Note the HTTP 200 OK status. It means the web service processed your request.
If you want the response also in JSON, change the URL to http://example.com/rest_api/node.json
A you can see on the response:
<?xml version="1.0" encoding="utf-8"?>
<result><nid>5138098</nid><uri>http://example.com/rest_api/node/5138098</uri></result>
Just put write on your browser address bar: http://example.com/node/5138098. The browser should open your new node.
Add on for Field Collection
In case you are using Field Collection in your node here is example how to deal with such type of fields.
Example:
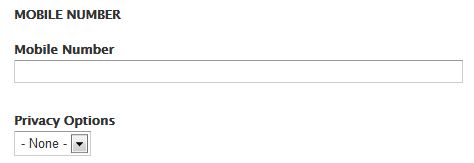
You have Field Collection for mobile number having two fields:
1. Mobile Number (Text Field)
2. Privacy Options (List Dropdown): Dropdown Values(1 => 'Private', 2 => 'Public')
Here is JSON Structure for this:
"field_mobile_number_collection": {
  "und": [
   {
    "field_mobile_number": {
	"und": [
	  {
	     "value": "123456789"
	  }
	]
     },
     "field_privacy_options": {
	"und": "1"
     }
   }
 ]
}
Help improve this page
You can:
- Log in, click Edit, and edit this page
- Log in, click Discuss, update the Page status value, and suggest an improvement
- Log in and create a Documentation issue with your suggestion
