On this page
- Creating nodes
- Editing nodes and managing revisions
- Other node settings
- View modes for nodes
- Node types and node administration
- Default settings for node types
- Node administration
- Node comments
- Try your skills
- Create an article
- Creating revisions
- Editing article summary
- Nice URL for a page
- Writing articles without publishing them
- Publishing and updating post date
- Mass update nodes
- Change node default settings
- Comment administration
1: Nodes
Drupal 7 will no longer be supported after January 5, 2025. Learn more and find resources for Drupal 7 sites
It is a strange but never-failing effect that people who know a lot about a subject start building their own language; they create words that are obvious to everyone initiated in the language, but sheer nonsense for those who aren't.
Surgeons may use stents, carpenters have sharpening jigs and sailors know how to raise and lower a jib. Drupalistas, too, have their share of strange terms – some of which you will learn in this book. The most important of them is probably node.
A node is a piece of content on a Drupal site. It can be an information page, a blog post or a press release. Content you don't usually read as separate web pages can also be nodes, such as images, videos, or containers to collect pages with restricted access for certain users.
As a Drupal developer, one of the most important things you will learn is how to use nodes to build the information structure on a website. This chapter explains how to use the basic features of nodes.
TIP: In Drupal 7, the term node has almost completely been replaced with content. But the term node is still widely used by many modules (plugins) and in documentation. This makes it important to know and recognize. In this book, the terms node and content are used interchangeably if not otherwise stated.
The initial version of this section of the Community Documentation came from the book Drupal 7: The Essentials, courtesy of NodeOne and Johan Falk.
Creating nodes
On the first page you see as an administrator on a new Drupal site, there are no less than three links to add new content – one in the sidebar, one in the shortcuts at the top of the page, and one right in the middle of the page. (See figure 1.1) They all open the administrative overlay, allowing you to create either an Article or a Basic page. (See figure 1.2)

Figure 1.1: A Drupal standard installation without any content – click add content to create your first node!
Articles and Basic pages are two node types or types of content. Clicking on any of the type names will give you a form used to build a content of that type. This is called the node form. The forms used for Articles and Basic pages are different, but they work the same way. You get a number of fields where you can input information, and you have buttons for previewing or saving the piece of content. (See figure 1.3)

Figure 1.2: By default, nodes – content – come in two flavors: Articles and Basic pages.
Below is a description for the fields available in the Article node form.
- Title: This is the headline for the article, and will be shown at the top of the article's page on the website (it will also be used for the HTML title shown in the web browser's top bar).
- Tags: This is an opportunity to assign your article one or more keywords, which are used to categorize the content. Drupal will suggest any matching existing keywords while you write, but you can also provide new ones. If you want several keywords, separate them with commas. Keywords are usually displayed as links to lists of all nodes with the same keyword.
- Edit summary/hide summary: When clicking edit summary, you get a box where you can write a summary of the article. Summaries are often used when articles are listed, as a so-called teaser (see separate section). The link hide summary hides the box again. If no explicit summary is written, Drupal will create one from the first part of the body.
- Body: This field is used for the main text of the article.
- Text format: Usually the body field only contains plain text, but it can interpret some HTML markup. The settings in the text format field decide which markup should be allowed, which is important from a security point of view. These will be described in more detail in a separate section.
- Image: This gives you the opportunity to upload an image to be displayed along with the article. Uploaded images can by default be provided with alt texts – text shown if the image isn't loaded (this is important for screen readers used by the visually impaired, as well as for search engine robots).
- At the bottom of the node form, there are a number of settings for menus, comments, and some other things. These will be described later.
- Finally, there are buttons to save or preview the article. Clicking the save button takes you to a new web page that shows the article you just created. (See figure 1.4)
TIP: Node types are also called content types.
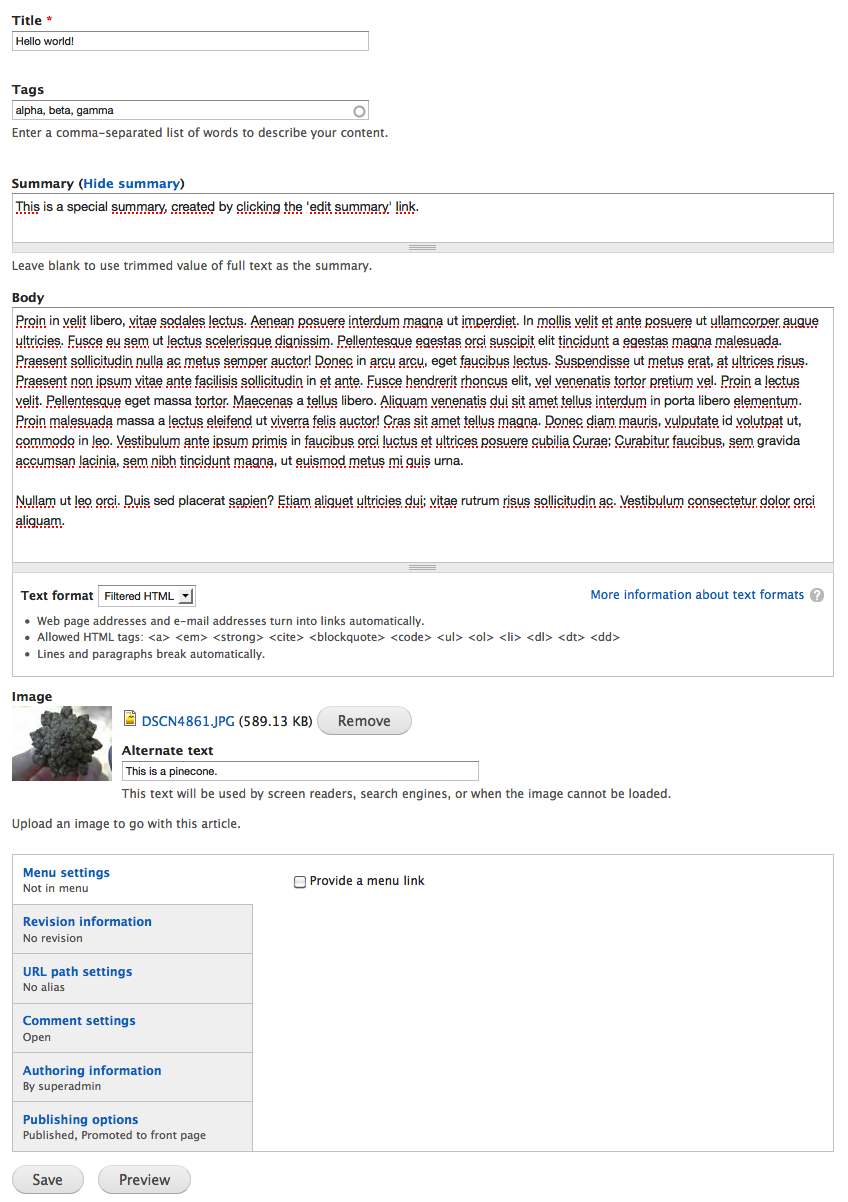
Figure 1.3: The form used to create new articles has room for different types of information.
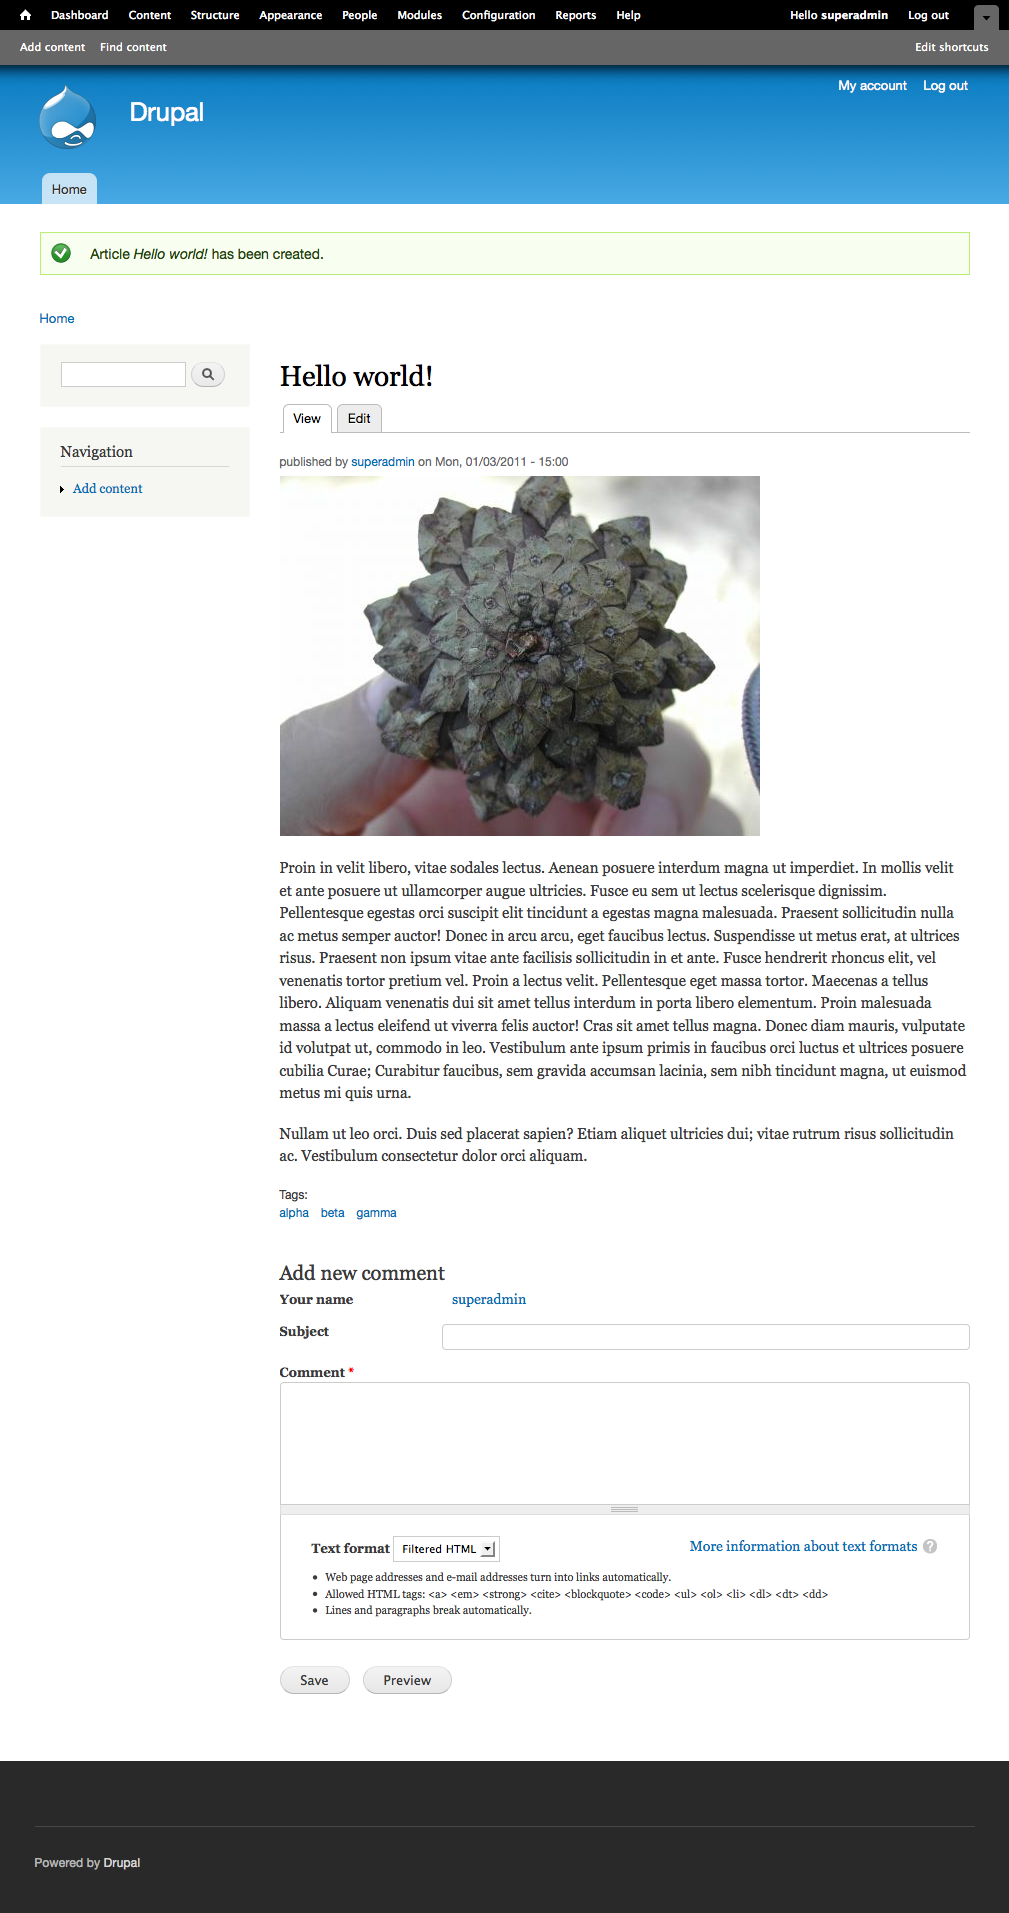
Figure 1.4: A saved article page, in its default layout.
Editing nodes and managing revisions
An article page, like other node pages, has two tabs: view and edit. By clicking the edit tab, you will reopen the node edit form, which is identical to the one you just used, except for two things. The form is prepopulated with the content of your article, and there is a button to delete the node next to the save and preview buttons.
Among the settings at the bottom of the node form, you will find revision information. (See figure 1.5) Checking the option create new revision tells Drupal to archive the present version of the node when a new version is created – a pretty useful feature if you want version control of your content. A node that has archived revisions will be displayed with an additional tab – revisions. A click on the tab gives you an overview of all available revisions, with links to view them, to revert the node to a selected revision, and also to delete revisions, if necessary. (See figure 1.6) Reverting a node doesn't delete any revisions – it merely places a copy of the selected revision on top as the current revision.
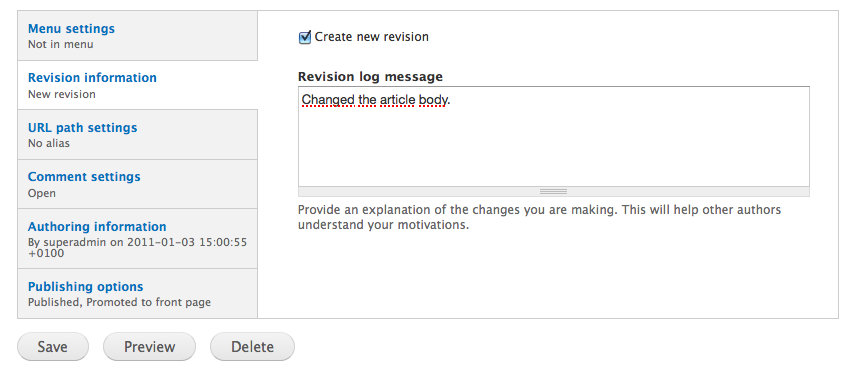
Figure 1.5: Drupal has built-in functionality for node revisions.
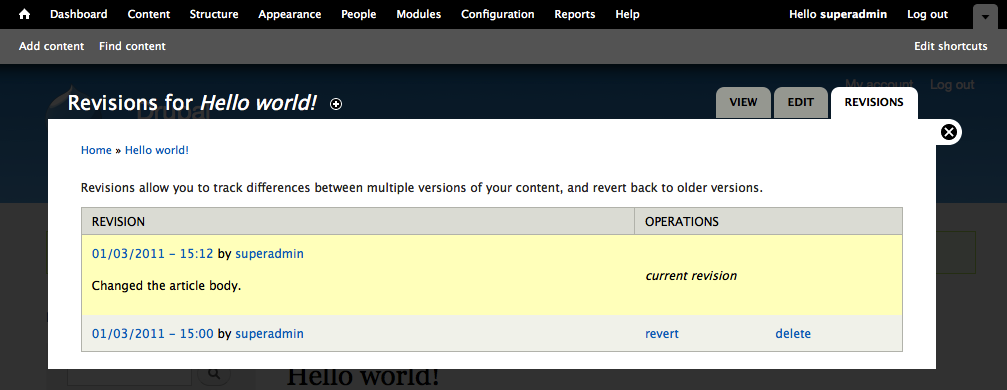
Figure 1.6: The tab revisions shows all previous versions of a node, along with any log messages for the revisions.
TIP: As a rule, links and settings are only visible if you are allowed to use them. Thus, the tab for editing a node is only displayed for users who are allowed to edit it. The option for changing text formats is only displayed if you are allowed to switch formats. When logged in with user account 1 (the administrator account), you will usually see all settings, for better or for worse.
TIP: The Diff module allows you to compare node revisions to see what has changed between them. It also allows you to preview changes in a node before saving.
Other node settings
Apart from revision information, the bottom of the node form also usually contains five other tabs with settings.
- Menu settings: This gives you the chance to add a menu item linking to the node. Read more about menu management in Chapter 4.
- URL path settings: This allows you to give the node a URL path in parallel to the path used internally by Drupal. The internal path for nodes is always in the form 'node/NN', where NN is a unique ID number for the node.
- Comment settings: This allows you to turn commenting on or off on each node. If the node already has comments, you can choose to hide them.
- Authoring information: This shows which user account was used to create the node, and when it was created. Both fields can be changed if necessary.
- Publishing options: This gives you three settings controlling how and where the node should be displayed on the site.
- Published: By default, only administrators may view unpublished content, while published content is accessible for anyone.
- Promoted to front page: With this option checked, the node will be included in the list that is used by default as Drupal's home page. (Most larger sites have customized home pages on which this option is hidden.)
- Sticky at top of lists: This option makes the node show up above other nodes on the front page, as well as above some other lists.
TIP: The Pathauto module will give your nodes (and some other pages on your site) automatically created URL aliases. These are based on customizable patterns, such as 'news/2011/may/title-of-article'.
View modes for nodes
When visiting the page for a node, you will usually see all of its content. When the node is listed on the front page, only parts of it are displayed. With articles, the body is replaced by a summary, and any images are displayed in a smaller format. This represents two view modes for nodes: full node and teaser.
Nodes may be configured to be displayed in different ways in each display mode. More details about this can be found in Chapter 8.
Node types and node administration
Articles and basic pages are two different node types – two different templates used to create and manage the nodes. These differences are reflected in certain ways. For example:
- There are separate links for creating each node type.
- Each node type has room for different sets of information. Details about this can be found in Chapter 6 about fields.
- You may set separate permissions for which users may create, edit and delete each node type. More details about permissions can be found in Chapter 2.
- Each node type may have different default settings for comment handling, publishing options, menu links, and more. More details can be found below.
Default settings for node types
In the administration toolbar – the black list at the top of the page in a standard Drupal installation – there is an item called Structure. It leads to a page with some of the most interesting settings when building a Drupal site – such as Content Types. Clicking this link leads to an overview of all node types available on the website, along with links to manage each content type. Above the list, there is also a link to create new content types. (See figure 1.7)
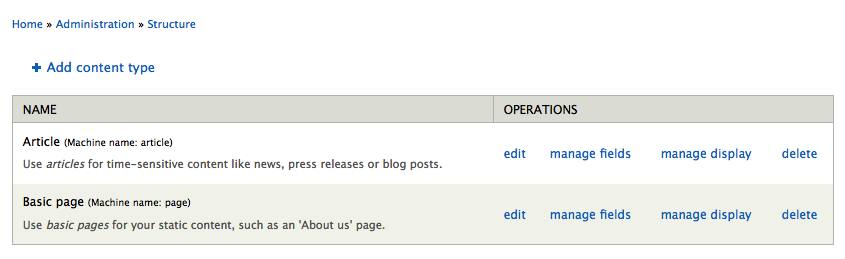
Figure 1.7: The administration link structure: content types in the administration toolbar provide an overview of all node types on your website.
The links named Manage Fields and Manage Display are so interesting that they have their very own chapters, and are not discussed further here. (See Chapter 6 on fields and view modes, and Chapter 8 on field display.) You won't be surprised to learn that the delete link is used to delete the node type. The edit link is used to set the most basic properties for a node type (see figure 1.8). These properties are:
- Name: This is the name of the node type. Based on its plain-text name, Drupal suggests a machine name which is used to identify the node type in Drupal's database.
- Description: This text is shown in some lists of node types, such as the list provided when you click add content.
- Submission form settings: This gives you the opportunity to change the label used for the title of the node type – for example, if you have a node type for contacts, setting the label to 'name' makes more sense than 'title'. There are also options for changing the node preview settings, and for providing the node form with help text.
- Publishing options: This is used to change the default settings for the nodes' publishing states. This includes the option to create new revisions by default when editing content. Changing these settings will not affect any existing nodes (with the exception of revisioning, which is returned to default every time a node is edited).
- Display settings: This gives you the opportunity to show or hide information about who created the node and when.
- Comment settings: This allows a number of settings for comments, such as whether or not commenting is allowed by default, and whether comments are listed as a straight list or in a tree structure.
- Menu settings: These options dictate which menus should be able to link to nodes of this type, and whether nodes should be placed under a particular menu item by default. More details about menus can be found in Chapter 4.
More modules – plugins – may provide new options on the page for editing node-type settings.
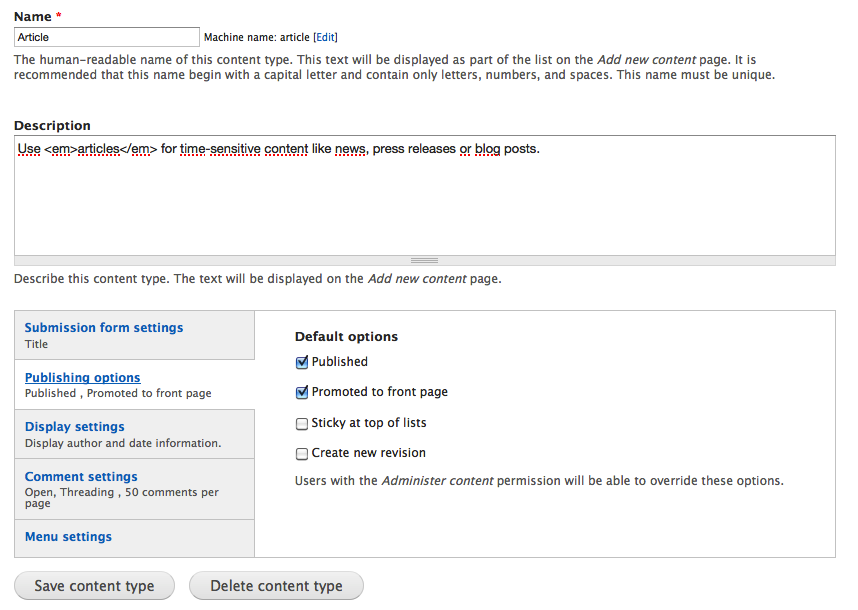
Figure 1.8: It is possible to set a number of default settings per content type, such as node revisioning.
Node administration
Nodes may be scattered all over a Drupal site; it is not always easy to find the exact node you are looking for. The administration toolbar's Content option provides a list of all nodes on a website, along with some useful tools (see figure 1.9) including:
- Filters to limit the node list to only selected content types or nodes, with selected publishing options.
- Links to see, edit, and delete each node.
- Options for performing mass updates on nodes - for example, publishing, unpublishing, or deleting several nodes at once.

Figure 1.9: The administration page to manage content has tools for performing mass updates on nodes.
TIP: Larger Drupal sites usually have custom tailored administration pages that manage content according to workflows relevant to that site. The Views Bulk Operations module offers an alternative administration page for content, with more options and greater flexibility.
Node comments
When the Comment module is enabled, which is the case for a standard installation, users may post comments to nodes. (See figure 1.10) As previously mentioned, it is possible to turn the comment settings on and off for each node, and it is also possible to change the default setting for each node type.
Administrators can manage comments in two different ways:
- Each comment has an edit link, allowing administrators to edit the content of each comment, including changing posting information and optionally publishing/unpublishing the comment. (See figure 1.11)
- On the content overview page there is a Comments tab that leads to a list of all published comments on the website. There are also subtabs available to switch between viewing published and unpublished comments. Each list has tools for publishing, unpublishing and deleting comments. (See figure 1.12 and 1.13)
Comments are similar to nodes in their structure, but from a technical point of view, they are not nodes.
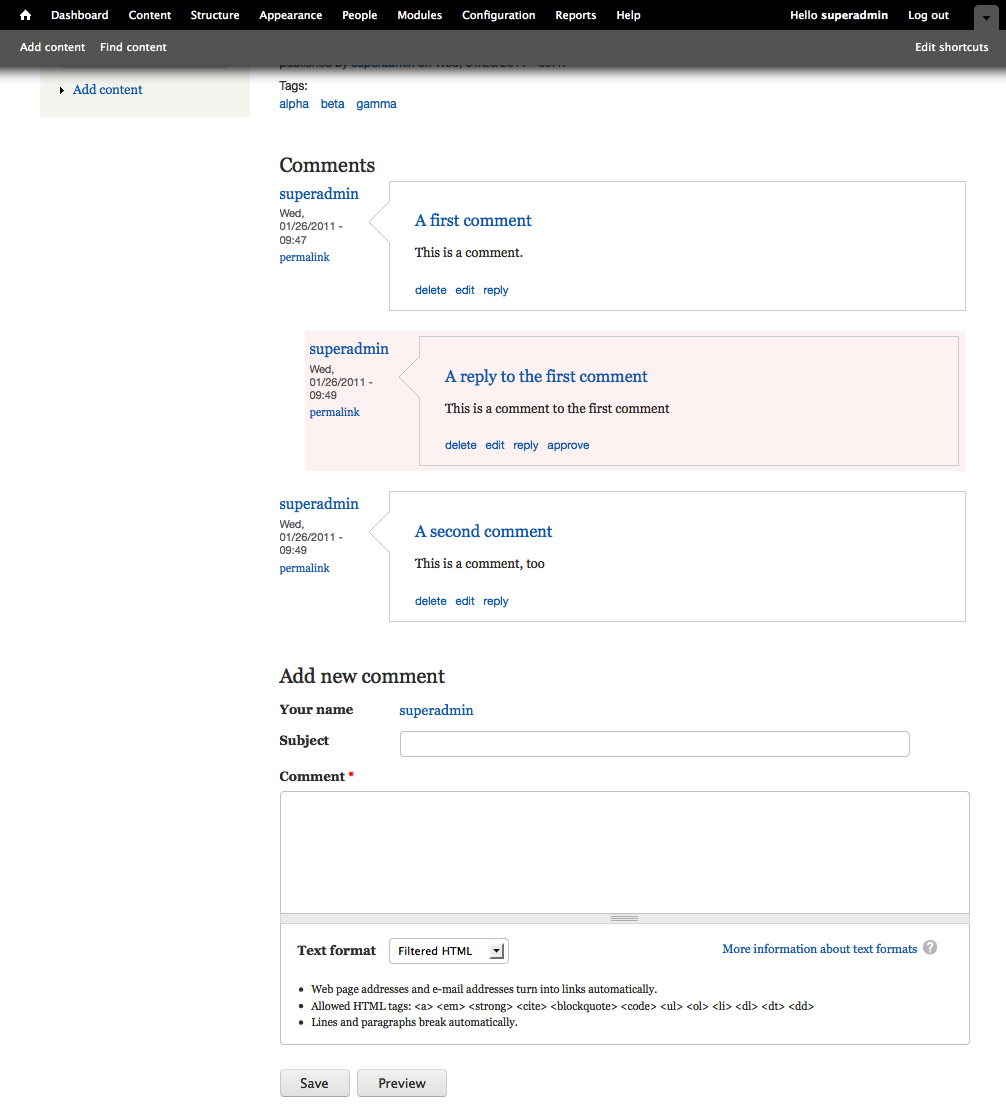
Figure 1.10: Nodes may have comments, and comments may be ordered in a tree structure.

Figure 1.11: Administrators can, if necessary, edit each individual comment.
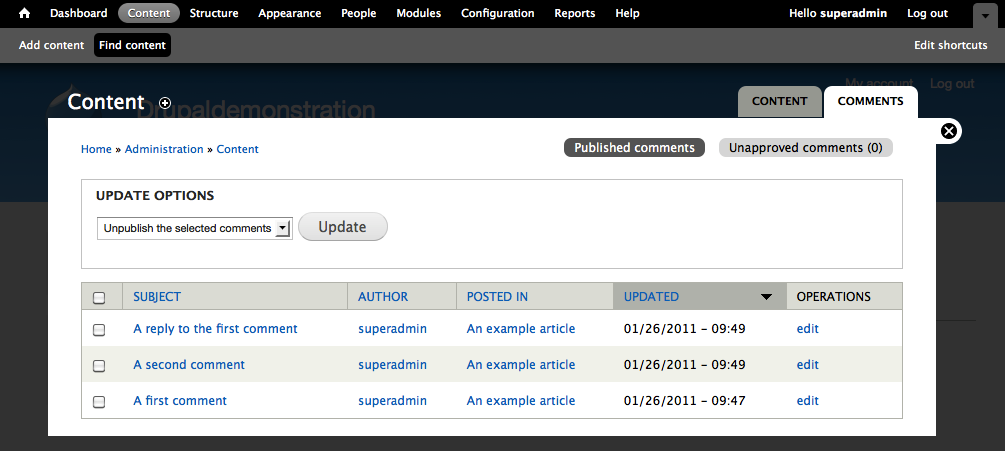
Figure 1.12: The administration list for published comments has tools to unpublish several comments at once.
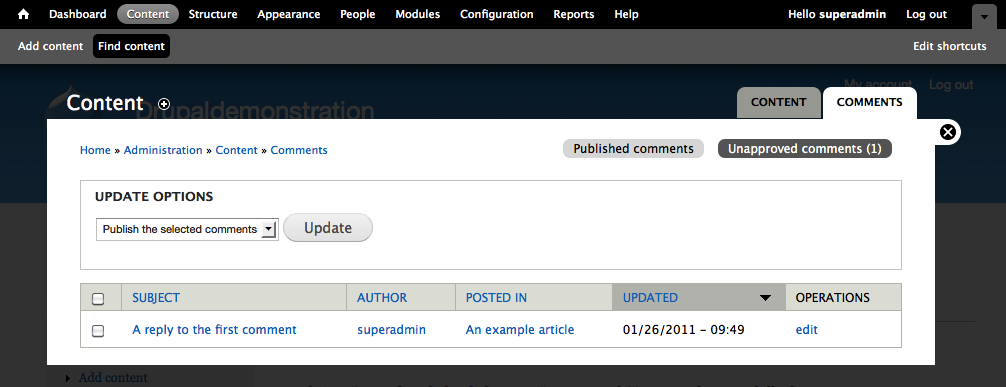
Figure 1.13: The list of unpublished comments has tools similar to the list of published comments.
Try your skills
The tasks described below are the first in a set of tasks being issued by a fictional Boss, and later also involving an intern. They are not full user stories, as used in exercises in parts B and C in this book, but rather quick tasks with a clear goal.
Create an article
Hi, it’s Boss.
I’ve written a news story that I would like to have published on our new website. I called our web consultants, but they say we can post news to the site ourselves now, and that they have shown you how to do it.
The story I've written can be found at lipsum.com. Will you put that up on our site? I’d like it to be right at the top of our front page. Thanks.
Creating revisions
Hi, it's boss again.
It seems the Lorem Ipsum guy has changed his name, and now wants to spell it Lorem Epsum. Could you update the article? I'd like to have the old version available in some kind of log, in case Lorem changes his mind again. Thanks.
//Boss
Editing article summary
Hi, it’s Boss.
I’ve been thinking more about the Lorem article, and it doesn’t look excellent on our front page. I called our web consultants to ask them to use special text for the front page only – and, apparently, this is something we are able to do ourselves.
I prepared an introduction text at lipsum.com for the front page. Will you put it in? Thanks.
//Boss
Hint: It is near the top, next to Body.
Nice URL for a page
It’s Boss.
The website is coming together nicely, but I think we should have an about us page available at example.com/about-us. I called our web consultants, and they say you can fix this. Unfortunately I have no time to write up the text myself, so you’ll have to do it. Thanks.
//Boss
Writing articles without publishing them
Hi, it’s me again.
You know the news story we’ve been working on for a few days? I know it’s finished, but I’d like to think a bit more before we publish it. I called the web consultants, and they say that we can actually put it on our website, but make it so that visitors can’t see the article. Can you do this? I might get back to you during the weekend with some more changes to the article. Thanks.
//Boss
Publishing and updating post date
Hi, it’s Boss.
I had a great weekend golfing and then taking a small tour with the boat in the archipelago. I hope yours was good too. About that article – I have no further changes, so you can publish it now. By the way: the web provider said that you have to do something to the post date to make it look as though it was written today. Thanks.
//Boss
Mass update nodes
Before starting this task, you should create a number of basic pages and publish them to the site's front page.
Hi, it’s Boss.
I know I said that I wanted a number of basic pages published on our front page, but some things have changed now. Could you remove all of them from the front page? OK, thanks.
//Boss
TIP: A swift tool for mass generating test content is the Devel generate module, found in the Devel project – see the chapter on installing and enabling modules in Appendix 1. Once enabled, test content can be created by clicking configuration in the toolbar and selecting generate content.
Change node default settings
Hi, it’s Boss.
This revisioning thing is actually quite useful, but I’m getting irritated by having to check the ”create new revision” checkbox every time. I called our web consultants, and they say that you can fix this too. (I’m beginning to wonder if we really need the consultants.) Can you make it so that all the articles and basic pages are revision controlled by default? Thanks.
//Boss
Hint: Admin / Structure / Content Types
Comment administration
Before starting this task, you should post a number of comments on the site. (Use Devel generate if you have it installed!)
Hi, it’s Boss.
I noticed there are some weird comments on our site. I called our web consultants, and they say you know how to hide or delete comments. (I was this close to telling them that they can’t just direct every task back at us, but then I realized you’re much cheaper labor than those consultants.) They also said that it’s possible to add ”shortcut links” to administration pages that you use often, but I don’t know. Anyway – can you have a look at the comments and remove any that look bad? Thanks.
//Boss
Help improve this page
You can:
- Log in, click Edit, and edit this page
- Log in, click Discuss, update the Page status value, and suggest an improvement
- Log in and create a Documentation issue with your suggestion
