 Come together with the global Drupal community in Rotterdam, 28 Sept – 1 Oct 2026. Sessions, contribution, connection, and Early Bird savings until 8 June.
2: Users and permissions
Drupal 7 will no longer be supported after January 5, 2025. Learn more and find resources for Drupal 7 sites
Next to content, users are probably the most important component of a website; they might even be more important than content. This chapter will show you how to manage users, divide them into groups, and decide the things that each group of users will be allowed to do on your website.
The initial version of this section of the Community Documentation came from the book Drupal 7: The Essentials, courtesy of NodeOne and Johan Falk.
Adding and managing users
The administration toolbar's people link provides you with a list of all user accounts registered on your website. (See figure 2.1) The list of users shares many features with the content list. There are links to view and edit each account, and there are tools for filtering and mass updating accounts.
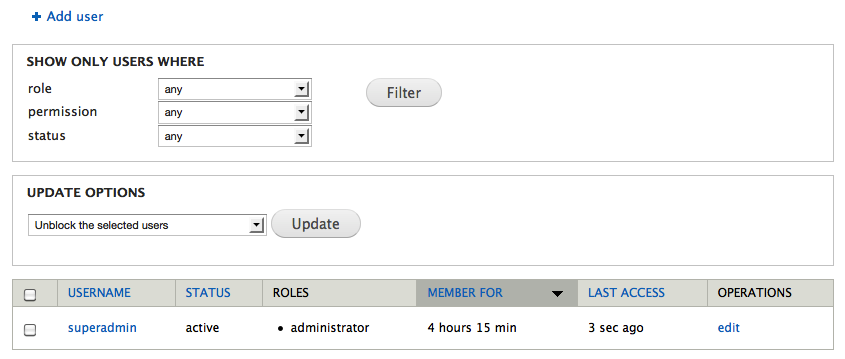
Figure 02.1: The list of user accounts contains shortcuts to edit each account, as well as tools for mass updates.
On top of the list is a link add user, used to add new accounts to the site. The form for adding new accounts is very similar to the form you get when editing an existing account. (See figure 2.2) Below is a description of the settings in the forms.
- Username: This is the user's name on the website, used when logging in. It must be unique.
- Current password (only when editing your own account): To change your e-mail address or password, you must usually give your current password.
- E-mail address: Like the username, the e-mail address must be unique. The reason for this is that the e-mail address should be available to use if the password or username are forgotten.
- Password/confirm password: This is the user's password, repeated to avoid misspellings. Note that Drupal cannot show the current password. All passwords are encrypted before they are stored and Drupal has no way of decrypting them. If you enter a short or simple password, you will get a warning, but Drupal won't prevent you from using it.
- Status: User accounts that are blocked cannot be used for logging in.
- Roles: This shows or sets which permission roles the user has. (See next section for details.) All users automatically have the role of authenticated user as soon as they log in.
- Picture (only on editing): This allows users to upload an image and associate it with their account.
- Administrative overlay (only on editing): This setting makes it possible to disable the administrative overlay for selected users, displaying the administration pages without the overlay.
- Locale settings (only on editing): This setting is used to change the time zone for a user.
- Notify user of new account (only on creation): This option makes Drupal send out an e-mail to the new user with the account information. This is the only time Drupal sends out a password – if users lose their passwords, they will get a one-time login, rather than their existing password.
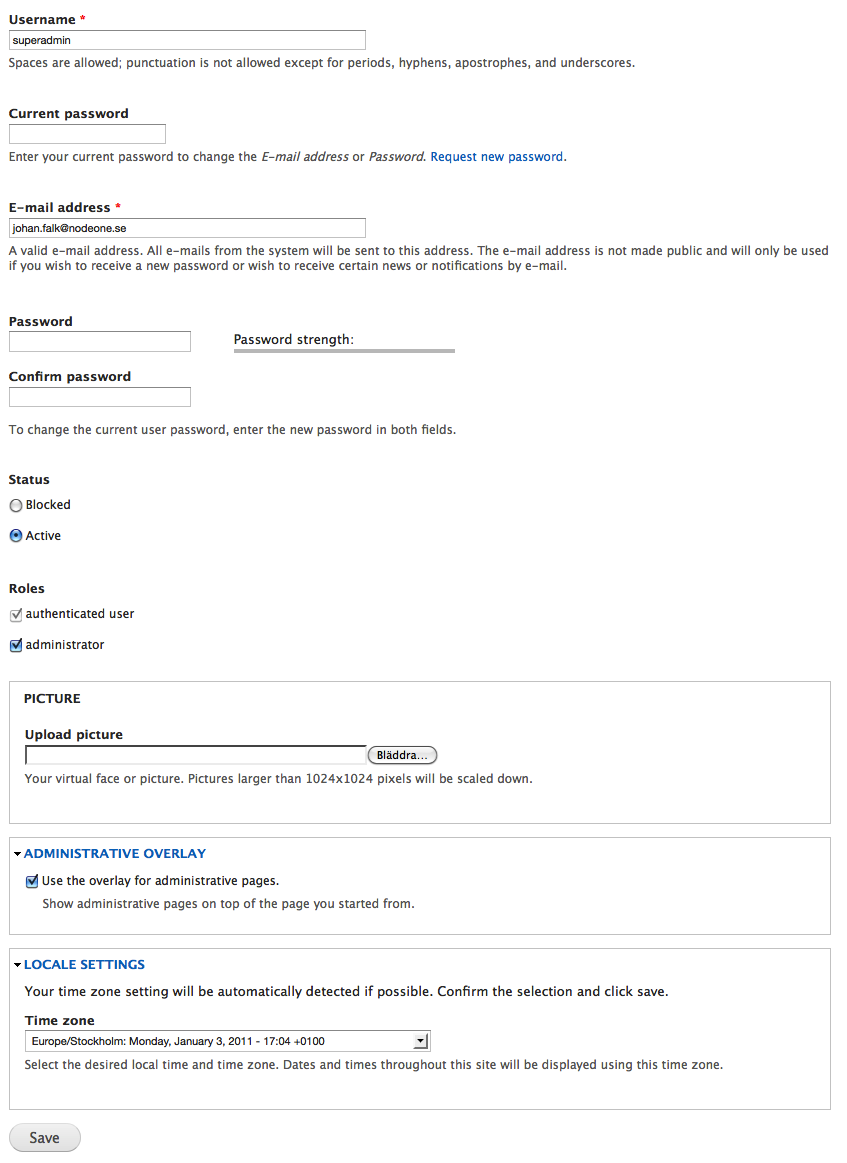
Figure 2.2: The page used to edit user accounts contains a number of settings, such as which permissions/roles the user has.
TIP: Best practice dictates that you should not use the first user account as a personal account. The first user account bypasses all access controls in Drupal, and should be available to pass on to new site managers.
TIP: The picture upload in a standard Drupal installation is a remnant of previous Drupal versions. Images are handled much better as fields in Drupal 7. (See Chapter 8 for more information.) You can turn off the obsolete picture functionality using the Account Settings, which can be found in the Configuration toolbar.
Permissions and roles
The first account created on a Drupal site, user 1, has permission to do everything on the site. But what about other users?
To see which permissions different types of users have – and to change these settings – you use the tab Permissions under the People link in the toolbar. The resulting page contains a long list of permissions, and there is one column for each permission role on your site – anonymous users, authenticated users and administrators. (See figure 2.3)
By checking or unchecking the different permissions, it is possible to do things like give authenticated users permission to create articles or allow anonymous users to search the site. The permissions are grouped by the module that is responsible for them, and the more modules that are installed, the more permissions are sure to turn up. (See Appendix 1 for details about how to add modules.)
.png)
Figure 2.3: The permissions list contains a large matrix of settings.
The Roles subtab, visible on the permissions list, shows you a list of all permission roles available on the website. (See figure 2.4) If your site needs more permission levels than the three included in a standard installation, which is very likely, this is the place to add more. Each new role will be represented by a new column in the permissions matrix, and you may set permissions for each role independent of the others. (See figure 2.5) Quick and slick!
Assigning roles to users is done in one of two ways – you can either edit each user account you want to change, or you can make mass updates from the user list.
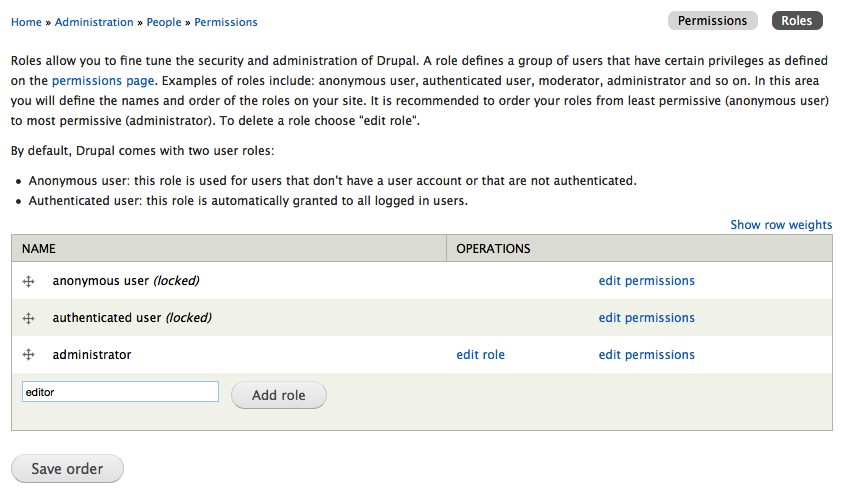
Figure 2.4: You may add more permission roles in the roles list.

Figure 2.5: Each new role can have separate permission settings.
TIP: If a user has more than one role, which is quite possible, she will get permissions based on all these roles. The rule is that roles decide what you can do, not what you can't.
TIP: The permissions matrix is one of the busiest settings pages in Drupal, but fortunately, each permission is more or less self-explanatory. Since new modules often add new permissions, it is common to wait until a project is nearly finished before setting all permissions. This avoids having to go through the whole list more times than is necessary.
Other user account settings
Selecting the Configuration link from the toolbar and then Account Settings in the People block on the Configuration Page will show you a few more user settings that a Drupal developer should know. The most important are described below.
- Administrator role: The role set here will automatically have all permissions set in the permissions matrix.
- Registration and cancellation: This setting determines how new accounts should be created - for example, if visitors should be allowed to sign up, and also how content and accounts should be treated when an account is cancelled.
- Personalization – signatures: If signatures are enabled, users will be allowed to set a signature that will be added to all their comments (but not to other content). If a user changes her signature, signatures on existing comments are also affected.
- E-mails: This setting contains a number of e-mail templates that are used when users register, if they lose their passwords, and in some other cases. Note that there are some token replacement patterns available for dynamic replacements, such as [user:name] and [user:one-time-login-url].
TIP: Like the user pictures, signatures are a remnant of old Drupal versions. By using our wits and a few tricks, it is also possible to replace them with fields.
Try your skills
The tasks described below continue the suite in the previous chapter, with Boss issuing orders about changes to a standard Drupal installation. The tasks are not full user stories, but quick tasks with a clear goal.
Create user accounts
Hi, it's Boss.
Our company is getting an intern today, and she's going to stay a few weeks. I thought she should have a user account on our website, but I don't know if she can handle all this technology stuff. Could you create an account for her? The username “Intern” should do. Thanks.
//Boss
Update user account information
Before starting this task, you should create a few user accounts on your site, and at least one should have the username “Dries Buytaert”. (Use the Devel generate module to mass generate users, if you have it installed!)
Hi, it’s Boss.
I got a call from one of our site members who had forgotten his password. I called our web provider, who says that passwords can’t be recovered – only new ones can be set. Apparently it is some kind of security thing. Anyway, the fellow who phoned called himself "Dries Buytaert," and wants his password to be "drupal123." The web guys said that Dries could order a one-time login and do this himself, but I thought it just as well that you go in and update his information to save him the trouble. OK, thanks.
//Boss
Creating and assigning roles
Hi, it’s Boss.
I know you’ve had a lot to do with the website, working weekends and such, so I thought you should get some help. Our intern will help you for the two weeks she is here. I called the web provider to give her an administration account, but apparently you can do this. (It turns out you can use her ordinary account on the site for this – I had no idea the site was administered through the online interface!)
When talking to our consultants, they said it is possible to introduce new levels of permissions somehow – they particularly stressed that it would be a bad idea to give an intern access to settings on the site.
Anyways – if you could create an editor permission level and make our intern an editor, it'd be great. (I trust your judgement when it comes to what editors should and shouldn't be allowed to do.) I hope you enjoy getting some help!
//Boss
Help improve this page
You can:
- Log in, click Edit, and edit this page
- Log in, click Discuss, update the Page status value, and suggest an improvement
- Log in and create a Documentation issue with your suggestion
