 Come together with the global Drupal community in Rotterdam, 28 Sept – 1 Oct 2026. Sessions, contribution, connection, and Early Bird savings until 8 June.
On this page
- Installing Rules
- Configuring reaction rules
- Managing triggering events, conditions and actions
- Managing actions
- Managing conditions
- Replacement patterns and data selection
- Action loops
- Other reaction rule settings
- Loading and managing objects
- Rules components
- Rule sets
- Scheduling actions with Rules Scheduler
- Scheduling tasks
- Evaluation time for scheduled tasks
- ID for scheduled tasks
- More information about scheduled tasks
- Bug tracking in Rules
- Exercises: documentation site
- Comment notifications
- How to demo
- Preparation
- Suggested solution
- Comments
- Reminders for inactive users
- How to demo
- Suggested solution
- Comments
- Exercises: News site
- Unpublish comments at the third spam flag
- How to demo
- Preparation
- Comments
- Repeated reminders for unpublished articles
- How to demo
- Preparation
- Comments
12: Basic Rules configuration
Drupal 7 will no longer be supported after January 5, 2025. Learn more and find resources for Drupal 7 sites
The Rules module is used to configure automated actions on your website, such as sending out e-mails, updating nodes or displaying messages to users. The actions could either be triggered by selected events on your site, or called by other tools and modules. One of the powers with Rules is the flexible ways of evaluating conditions before any actions are executed.
You could for example use Rules to:
- assign all new users a selected role;
- unpublish all comments flagged as spam by at least three users;
- set entity field values based on complex conditions;
- allow users to subscribe to comments on selected content;
- send e-mail reminders to users who have not logged in for three weeks; or
- schedule publishing, unpublishing and deletion of content.
When you become skilled in Rules configuration, you will be able to use Rules to replace quite a few small modules, both contributed to drupal.org and custom-written. This chapter only covers the basic configuration of Rules.
TIP: Combined with the RESTful Web Services module, Rules can be used to connect triggers and actions across different Drupal sites. These functions are still under development and are not discussed further in this book.
The initial version of this section of the Community Documentation came from the book Drupal 7: The Essentials, courtesy of NodeOne and Johan Falk.
Author's note: This chapter was written while Rules for Drupal 7 was still in very early stages. Though some parts of this chapter are still quite useful (imho), there are better places to learn Rules, such as: Rules' own online docs or the Tiny Book of Rules (pdf).
Installing Rules
Rules follows the standard procedures for installation. The Rules project include three modules:
- Rules: This is the basic engine used for executing and evaluating rules configuration. It has no graphical interface of its own.
- Rules Scheduler: This module is used to schedule actions on your website. Rules Scheduler is described in a separate chapter.
- Rules UI: This module provides a user interface to Rules. You will need it while configuring Rules settings, but it can usually be disabled once a website is live.
To enable Rules you must also have the Entity API and Entity tokens modules available (both being parts of the Entity API project).
Configuring reaction rules
The administration pages for Rules are found at the toolbar, Configuration, Workflow, Rules. The landing page is used to manage reaction rules, a good starting point when learning how Rules are used. (See figure 12.1)
The overview page shows a list of all reaction rules on your site – in total zero in a default installation. There is also a link add new rule, leading to a form for basic data about the new reaction rule (see figure 12.2):
- Label: This is the administrative title for the reaction rule. A machine name will be suggested based on this name.
- React on event: This select list contains a number of events on your site. Select the one you want to trigger your reaction rule.
The resulting page contains an overview of the configuration for the reaction rule. (See figure 12.3) The page is divided into events triggering the reaction rule, conditions that must be met for it to do anything and the actions that will be performed. There are also a number of settings for the reaction rule as a whole collected in the settings fieldset.
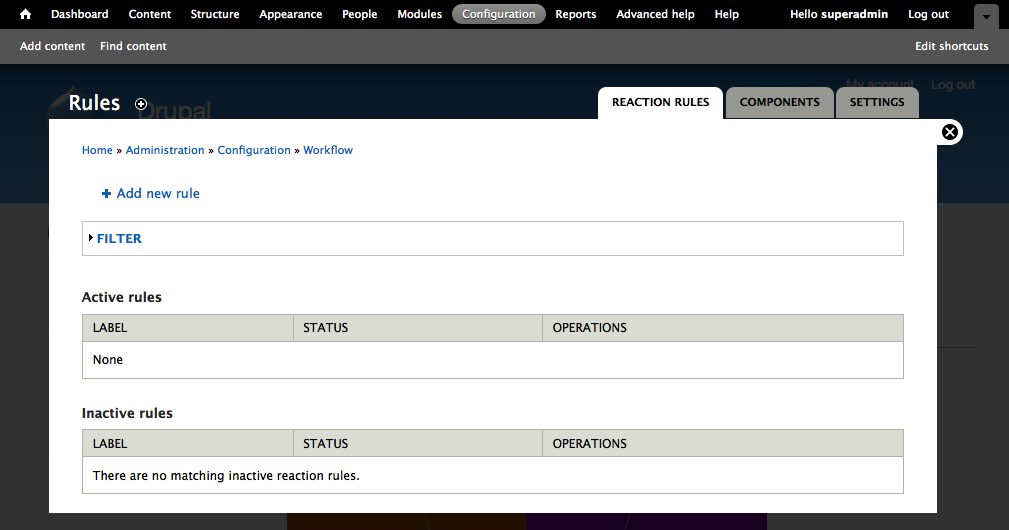
Figure 12.1: The landing page for Rules lists all reaction rules on your site. There are none to start with.
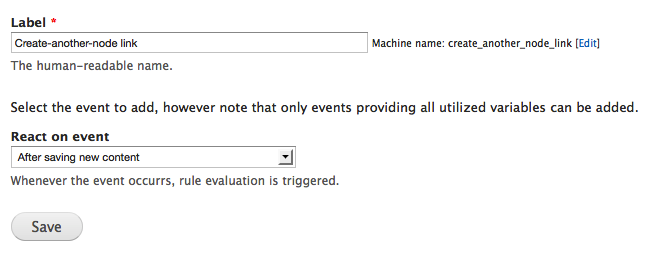
Figure 12.2: You create a new reaction rule by entering a name and selecting a triggering event.
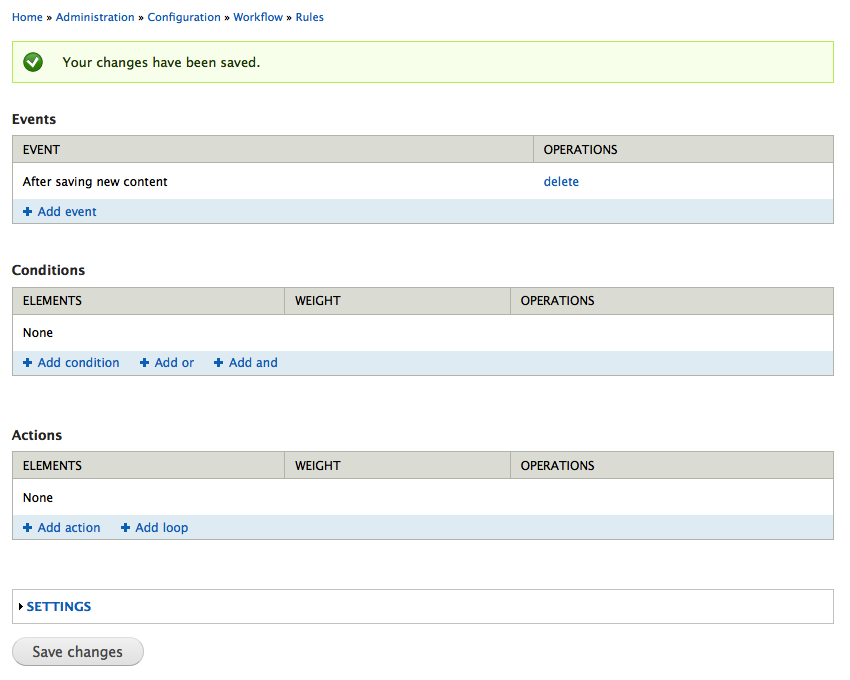
Figure 12.3: Each reaction rule contains triggering events, conditions and actions. You may add multiple triggering events for the same reaction rule.
Managing triggering events, conditions and actions
Managing triggering events (often just "events"), is a pretty straight-forward process. The link add event is used to add more triggering events to a reaction rule and the delete link removes the corresponding event.
How can this be used? A triggering rule used for scheduled deletions of nodes may be used for two separate events, new nodes being created and existing nodes being updated.
Managing actions
The add action link is used to provide new actions for a reaction rule. (See figure 12.5) It displays a list of all actions that may be carried out in the current context. See the section about loading and managing objects for more information on how to make more actions accessible.
.png)
Figure 12-5: You may add actions that affect any available nodes, other objects, or the website as a whole.
When choosing an action, a form appears to configure the action. Sometimes the settings consist of several forms.
The settings included in the configuration forms depend on which actions are being configured. They vary so widely that it is unreasonable to try to document them in a book. One of the most important ones is set data value, which serves as a good example of how a typical action is configured. The action is used to set just about any piece of data available to Rules including entity fields, node authors, publish state, or even your site name.
When you select the action to add to your rule, you first get to select what data you want to set. This is done using the data selector, something between an autocomplete textfield and a select list, used to browse through the data available to Rules. (See the next section for details.) Once your data is selected, you are prompted to select what information you want to store. This could be done using data selection, for example to set the acting user as a new node author – or by entering a data value manually, for example to set an article body. If entering data manually, you can still use variables available to Rules, by using replacement patterns as listed in a help box below the input field.
A reaction rule may contain multiple actions and there are also options available for using loops to iterate actions.
How can this be used? The action show a message on the site can be used for displaying a thank-you message every time a new comment is posted. The action create or delete any URL alias can be used to provide a view with the path user/%/comments with customized URL aliases for each new user account being created.
Managing conditions
Often you want to have conditional actions on your website. On a site where comments are normally queued for moderation it may be a good idea to publish the comment immediately if written by an editor.
You add new conditions with the add condition link, which shows a select list of all available condition types and a configuration page for the added condition. (See figure 12.4)
Each condition has a checkbox for negating its result. This activates the rule if the conditions are false rather than true. You may configure quite complex logics by adding AND and OR groups to your conditions. This is done by using the corresponding links and then dragging and dropping your conditions to rearrange them within the groups. If you're a really sophisticated Drupal developer you can also try adding logical groups within other logical groups.
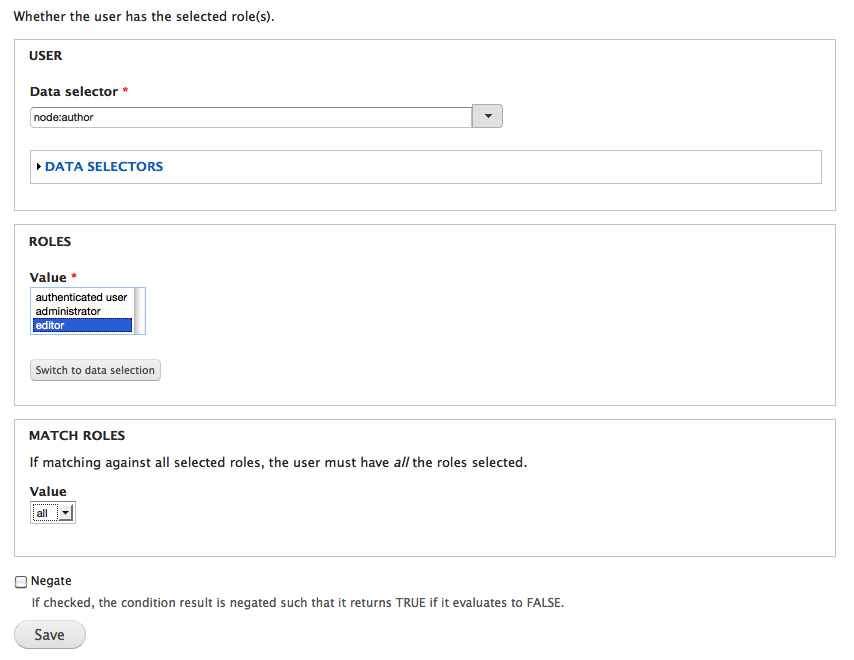
Figure 12.4: The settings for each condition vary depending on the data managed by the condition. Here is a condition used for evaluating a user's roles.
How can this be used? A rule redirecting users to their profile pages may kick into action only if the profile is lacking data for some selected entity fields. A rule placing articles in an approval workflow may be skipped if the writer has the administrator role.
TIP: Rules automatically creates labels for conditions and actions, based on their settings. It is currently not possible to set these labels manually, but this option is expected to be available soon.
Replacement patterns and data selection
To allow more flexibility when managing dynamic variables, Rules has two different user interfaces when :
- Direct input mode: This is used for text input, and allows you as administrator to insert normal tokens into the text. Next to the text field you will find a list of available tokens, based on the objects currently available in the reaction rule.
- Data selection: The data selection input is a type of auto-completing text field, where you are guided through the variables available to the reaction rule (See figure 12.6). When objects relate to each other, which is common, the resulting chain of token parts tells you how they are related. The token node:author:mail, for example, tells you that the resulting variable contains the e-mail address of the author of the node handled by the reaction rule.
.png)
Figure 12.6: The data selection input mode guides you through the available tokens.
Action loops
Next to the link for adding actions is a link with the title add loop. Loops may be used when an available variable has multiple values, to carry out one or more actions for each value in the variable. This could, for example, be used to send e-mail messages to all users listed in a user reference field. (For this to work, the multiple-value variables must be exposed in a way that Rules can interpret, which is not currently the case for user reference fields.)
Actions are added inside loops using the add action link at each loop. This works the same as other actions, with the exception that there is a token list item available, representing the currently active item in the list being looped. (See figure 12.7)
It is possible to add loops within loops.
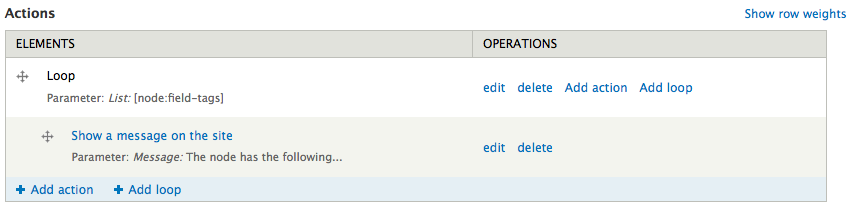
Figure 12.7: You can use multiple-value variables to create loops of actions – where actions are executed once for each value.
How can this be used? A loop based on a multiple-value user reference field may be used to send e-mail notifications to each referenced user. A loop based on a multiple-value node reference field may be used to update the node author for all referenced nodes.
Other reaction rule settings
The settings fieldset, at the bottom of the page when viewing a reaction rule, contains some general settings for the reaction rule (see figure 12.8):
- Label: This allows you to change the name (and also machine name) for a reaction rule.
- Provide variables: When several reaction rules are executed in sequence, there is sometimes a reason to pass on any loaded objects for further processing by other rules. This setting allows you to select which objects should be passed on.
- Active: If this option is deselected, the reaction rule will not have any effect on the site.
- Weight: This setting allows you to change the order in which reaction rules are executed. Lower weights will be processed earlier.
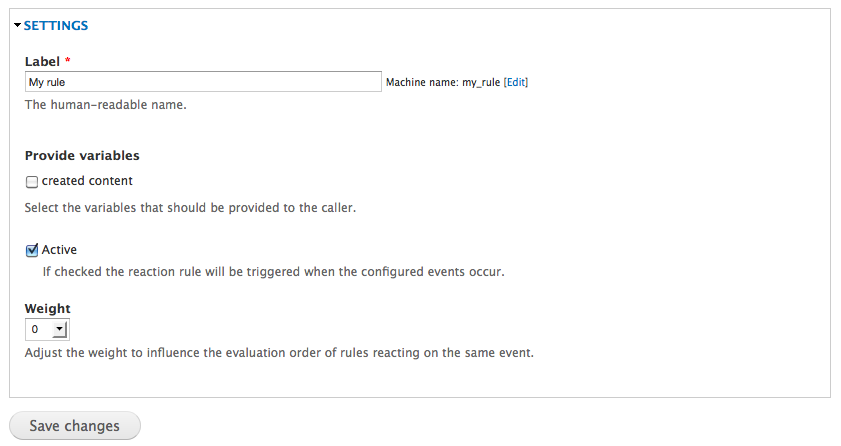
Figure 12.8: The settings fieldset contains more settings, for example allowing you to change the name of the reaction rule.
Loading and managing objects
When a reaction rule is triggered, it is handed a number of objects that the rule may use to evaluate conditions and carry out actions. The event before saving content, for example, provide four objects: the saved node, the node as it was before it was changed, the node author and the acting user.
There are actions loading new objects, and making them available to any subsequent actions. You cannot, however, load new objects and use them for conditions. If you need that kind of logic you should build a rule set (see separate section) or let a previously executed rule pass on the relevant object.
TIP: Saving an object is a potentially heavy operation for your website. Rules has built-in functionality for delaying any saving until all actions have been executed. If you need to save an object before the rule is finished, for example to provide a new node with an ID, you can use the action available to save entities.
Rules components
When configuring Rules for performing tasks on your website, it doesn't take very long before you feel that you want to use certain sets of conditions or actions over and over again. Luckily it is possible to save and reuse configurations.
Reusing Rules configuration is done by creating components. All your website's Rules components and a link to create new ones, are found at a separate tab in the Rules overview. (See figure 12.9) In a default installation you can create five different types of Rules components:
- Condition set (OR): This is a group of one or several conditions, where only one must be true for the group to be evaluated TRUE.
- Condition set (AND): This is a group of one or several conditions, where all must be true for the group to be evaluated TRUE.
- Action set: This is a group of actions.
- Rule: This creates a rule without any triggering event. Instead it must be called explicitly from other parts of Rules or the website in general.
- Rule set: This creates a group of rules, executed in sequence. Rule sets don't have any triggering events.
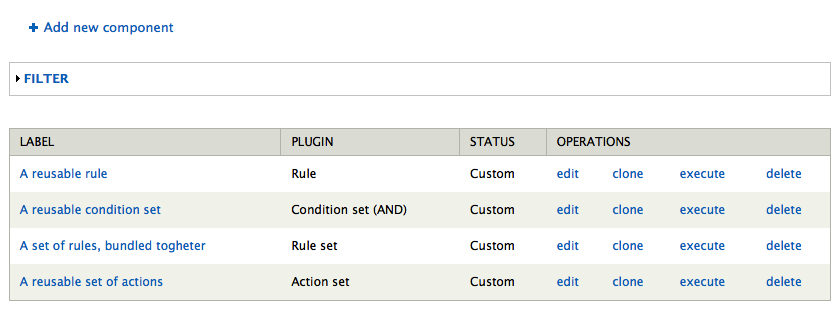
Figure 12.9: You can create isolated Rules components, for use and reuse on other parts of your site.
Every type of component is created and managed in way similar to their respective parts in reaction rules, with one important difference. Each component has settings for which objects/variables must be included when the component is called. (See figure 12.10) These objects are selected when calling the component and are then available for the component to work with.
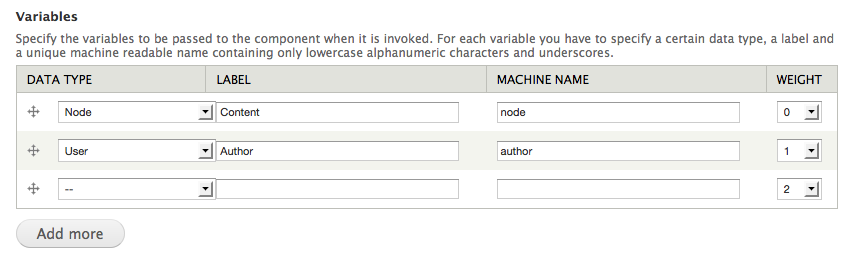
Figure 12.10: When creating components, you set which types of objects the component should work with. In order to call the component from other parts of Rules, you must have matching objects available.
Components are not only useful for reusing configurations, but also for exporting Rules configuration efficiently. See the section on configuration export in Appendix 1 for details about why configuration export is so useful.
The Views Bulk Operations module can be used to execute rules on nodes and other entities. This allows for creating highly customized actions, which site administrators can use to (for example) mark selected articles as reviewed, publish them, and send a message to the author.
Rule sets
Rule sets are, essentially, nothing but a number of stacked rules. It is useful to group rules together and keep your sanity when your site has many rules. The ability for one rule pass on loaded objects to subsequent rules makes rule sets particularly useful. This example explains why:
Imagine that you want to create an action that redirects a user to her last post on the site when she logs in, but only if that post is a forum post. You could use the action Load the first node in a Views list (found in Rules Bonus Pack) to load the most recent node by the logged in user, but once loaded you have passed the stage in the rule where conditions are executed – and there is no way to check whether the node is a forum post or not.
If using a rule set, you can use one rule for loading the user's most recent node and a subsequent rule for running conditions against that node, redirecting to the node page if appropriate. Easy as pie!
Scheduling actions with Rules Scheduler
Sometimes you don't want Rules to carry out the actions when a triggering event occurs, but at some later point in time. A site with events, for example, may find it useful to send reminders 24 hours before an event occurs.
Rules Scheduler (included in the Rules project) allows you to schedule actions at selected points in time. It is used like this:
- A number of actions, rules or rule sets are prepared as rule components.
- A reaction rule (or some other part of Drupal capable of using Rules actions) is configured to schedule the selected rule component.
- The scheduling involves setting an ID for the scheduled task, a time when it should be performed and selecting any objects that should be sent as variables to the component.
- Once the configured time has been reached, your site will load the scheduled task and execute it.
TIP: The scheduled tasks are not actually executed right at the scheduled time, but at the nearest following cron run. Depending on your server setup it may take a few minutes or up to an hour between the scheduled time and the actual execution.
Scheduling tasks
Scheduling tasks with Rules Scheduler is done by adding the action -schedule component evaluation, available as other actions in the Rules interface. (See figure 12.11) At the resulting page you choose a component of the type action set, rule or rule set. (See figure 12.12)
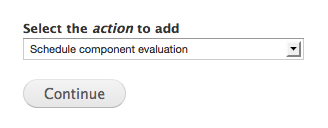
Figure 12.11: Rules Scheduler allows you to schedule tasks using the action schedule component evaluation.
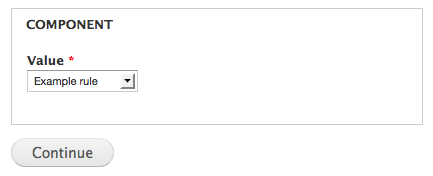
Figure 12.12: Only components that are action sets, rules or rule sets can be scheduled.
Evaluation time for scheduled tasks
The final configuration page for scheduled tasks allows you to set the time for the component evaluation. (See figure 12.13) There are three different ways of entering time:
- Static times, such as 2011-08-21 09:00:00.
- Times specified by entering tokens or using data selection, for example for fetching a time value from an entity field.
- Times specified by offsets. The offsets may be combined with tokens or static times (such as [comment:node:created] +2 days). There are many ways of specifying offsets – for example +1 Monday will give you the nearest following monday.
TIP: Rules Scheduler expects times in GMT without any compensation for time zones.
ID for scheduled tasks
Each task being scheduled must have a unique ID. If a new task with the same ID is scheduled, any previous task with the same ID will be replaced. It is common to use tokens and short texts in combination to build IDs, suchs as delete node [node:nid]. (See figure 12.13)
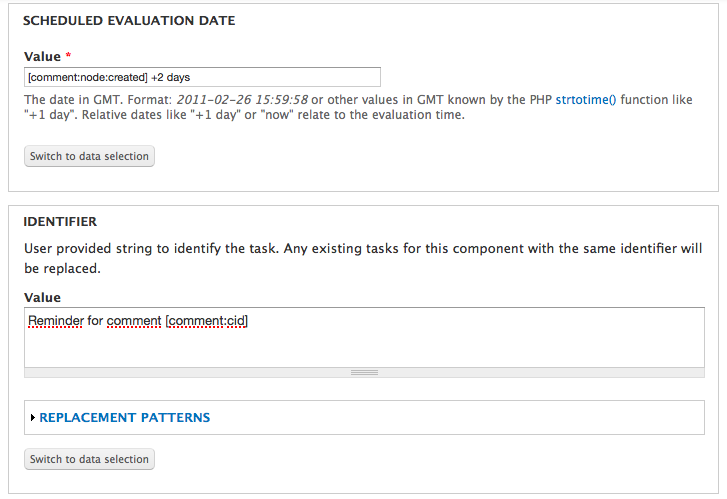
Figure 12.13: The time and ID for the scheduled task is set on the final configuration page.
On the same page used for setting the time and ID for the scheduled task, you can also decide which objects should be sent as variables to the rule component being scheduled.
More information about scheduled tasks
As administrator you can get an overview of all scheduled tasks on your site by visiting the Schedule tab found from the toolbar, Configuration, Rules. The same page also allows manual deleting of scheduled tasks. Inspecting and deleting scheduled tasks is useful while building a website, but is normally not used once the site is live.
It maybe necessary to automatically delete scheduled tasks. If you have a rule scheduling deletion of an article, for example, you would probably like the option to cancel the deletion too. Rules can delete a scheduled task with the action delete scheduled task, provided by Rules Scheduler. Task deletion is based on the ID of the scheduled task.
TIP: Scheduled tasks are available as a base table in Views, making it possible to create customized site administration pages displaying upcoming tasks.
Bug tracking in Rules
Even with plenty of Rules experience, you will probably find yourself scratching your head trying to understand why your configuration doesn't yield the result you expect. The Settings tab at the Rules administration pages has an option called debug rules evaluation. It logs each step in Rules evaluation and prints it to the screen. (See figure 12.14) You will have a much easier time finding your bugs using the Rules evaluation. Strange as it sounds, you will most likely find that it was you, and not Rules, that introduced the bug.
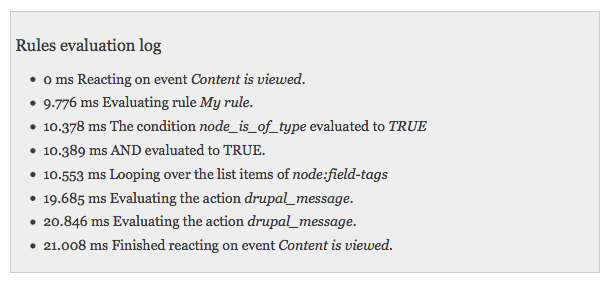
Figure 12.14: The bug tracking included with Rules will save you a lot of time.
TIP: The Rules debug information also shows a time stamp for each step in the evaluation. This information can help you spot unexpected heavy operations.
Exercises: documentation site
These exercises build on previous exercises in the documentation site suite. They can be carried out individually, with some preparation, or in sequence with the previous exercises. The exercises require using the concepts described in parts A and B of this book, as well as concepts from the Rules and Flag chapters.
Video recordings of the suggested solutions to these exercises can be found at nodeone.se/learn-drupal.
Comment notifications
As a site member, I would like to be notified when my content receives a comment. This is important since it helps me be aware of and respond to feedback.
View a video of this exercise and its suggested solution.

Figure 12.15: An example of how a comment notification may look.
How to demo
- Log in to the site. Verify that the user account has an e-mail you can access.
- Create a documentation page.
- Log out and log in as another user. Post a comment to the new documentation page.
- Verify that a notification is sent to the node author, with a link to the comment.
- Log out and log in as the first user again. Post a reply to the comment.
- Verify that no notification is sent to the user when commenting her own content.
Preparation
- The site should have a documentation page content type, as provided by the first exercise in this suite.
Suggested solution
- Create a new reaction rule with the name comment notification. Have it react on the event after saving a new comment.
- Add a condition data comparison, and use data selection to compare comment:author with comment:node:author. Check the negate option, to have this condition return true if the two objects are different.
- Add an action send mail. Set the to field to [comment:node:author:mail] (using data selection), the subject to new comment on [comment:node:title] and make sure to include the [comment:url] replacement pattern in the message to have a link to the comment. Leave the from field empty to use the site default e-mail address.
Comments
- This feature could be extended by using a checkbox field on the user page, where each user may select if she wants to receive comment notifications or not.
Reminders for inactive users
As the site owner, I would like members to get reminder e-mails if they have not logged in for a month. This is important since it helps catch some users who otherwise would leave the site permanently.
View a video of this exercise and its suggested solution.
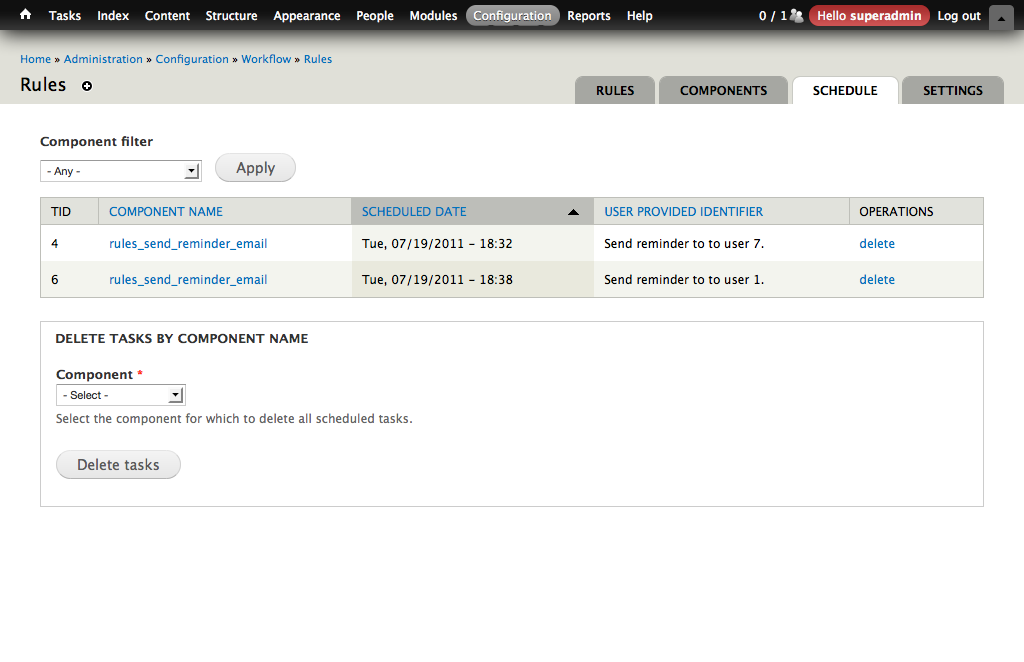
Figure 12.16: An example of how scheduled reminders may look in the Rules interface.
How to demo
- Log in to the site as administrator.
- Go to admin/config/workflow/rules/schedule and verify that a reminder e-mail has been scheduled to be sent out to the administrator in one month.
- Log out and log in again.
- Check that the scheduled time for the reminder has been pushed forward by a minute or so.
Preparation
- A standard Drupal installation.
Suggested solution
- Go to the components tab in Rules, add a new component, select the action set Component plugin. Give it the name "send reminder e-mail". Have the action set receive a user object as parameter with the label account. In the Variables section- Data type: user, Label: "Account", Machine Name: "account", Usage: Parameter.
- In the action set, add the action send mail, with [account:mail] as the recipient. Use replacement patterns to include the user name [account:name] in the sent message.
- At the Rules overview page, add a new rule titled "schedule reminder e-mail", reacting on the event user has logged in.
- In the reaction rule, add the action schedule component evaluation. Select the send reminder e-mail component. Set +1 month as scheduled evaluation date, send reminder to user [account:uid] as identifier, and select the logged in user to send as parameter to the action set (under Account, input account for the data selector).
Comments
- If the client wants repeated reminders, this can be achieved by having the action set scheduling itself in (say) another two months. When repeating e-mails, it is important to allow users to opt-out and turn off the notifications.
Exercises: News site
These exercises build on previous exercises in the news site suite. They can be carried out individually, with some preparation, or in sequence with the previous exercises. The exercises require using the concepts described in parts A and B of this book, as well as concepts from the Rules and Flag chapters.
Unpublish comments at the third spam flag
As site editor, I would like comments receiving at least three independent spam flags to be unpublished. This is important since it reduces the manual work needed to keep the site tidy.
How to demo
- Log in to the site as writer.
- Post a comment to an article, and mark it as spam. (Create an article first, if necessary.)
- Log out and log in as editor. Mark the comment as spam again.
- In a separate browser, as anonymous visitor, mark the comment as spam again. Reload the page to verify that the comment is now unpublished.
Preparation
- The site should have a news article content type, as provided by the first exercise in this suite.
- The site should have the comment spam flags, as described in the exercises in the Flag chapter.
Comments
- If there is a flag approved comments used by editors to approve comments that some visitors classify as spam, as described in an exercise in the previous chapter, it would make sense to extend this user story to never automatically unpublish comments flagged as approved.
Repeated reminders for unpublished articles
As a writer, I would like to be reminded if I leave any of my unpublished articles untouched for more than three days. After the first reminder, I would like repeated reminders every week. This is important since I sometimes forget about my unfinished articles.
-
How to demo
- Log in to the site as a writer.
- Create a news article and save it in an unpublished state.
- In another browser, log in as administrator. Visit admin/config/workflow/rules/schedule and verify that an e-mail reminder for the created node, to the writer, is scheduled in three days’ time.
- As a writer, edit the unpublished article and save it in an unpublished state.
- As administrator, verify that the scheduled reminder time has been pushed forward a minute or so.
- As a writer, again, edit the unpublished article and save it in a published state.
- As administrator, verify that the scheduled reminder is deleted.
- Optionally: Create another unpublished article and wait for the reminder e-mail to be sent. This may take some time. As administrator, verify that a new reminder is scheduled to be sent in a week. (To speed up the process you may change the initial delay to one second, and then run cron manually.)
Preparation
- The site should have a news article content type, as provided by the first exercise in this suite.
Comments
- The quick-minded reader may want to add some more Rules logic to this feature, deleting the scheduled reminder if the corresponding article is deleted. This would be tidy, but actually not necessary. If a scheduled task fails to load the required objects, which would be the case if the article is no longer present, it will be cancelled. (There is also no need to cancel reminders if the writer’s user account is removed.)
Help improve this page
You can:
- Log in, click Edit, and edit this page
- Log in, click Discuss, update the Page status value, and suggest an improvement
- Log in and create a Documentation issue with your suggestion
