Usage instructions
Drupal 7 will no longer be supported after January 5, 2025. Learn more and find resources for Drupal 7 sites
Before adding a dependency, you will have to create at least two fields in the same content type or other fieldable entity like user, comment or vocabulary. For simplicity, we will refer to dependencies attached to content types, but the same instructions apply to all entity types.
Dependencies are listed in a site-wide overview page at admin/structure/dependencies. You can filter the overview by entity type by clicking on the corresponding tab. For added convenience, a "Manage dependencies" tab is also available to the right of the "Manage fields" tab of every content type.
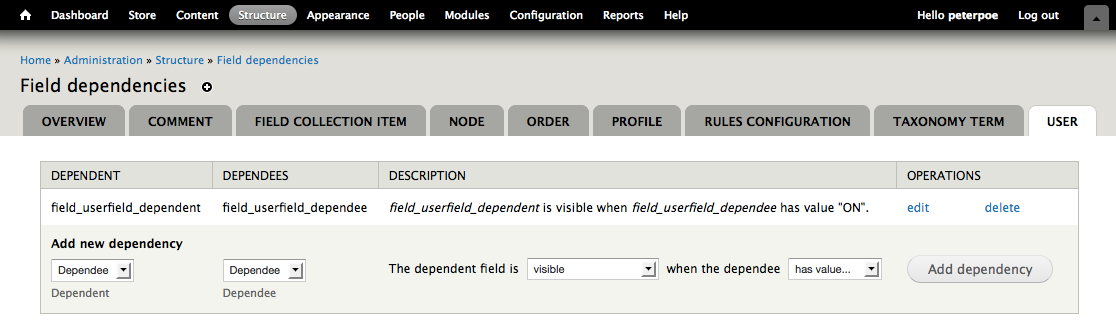
In the dependency overview page, you will see a table with 4 columns:
- Dependent: The field that is controlled by the dependee.
- Dependee: The field that controls the dependent.
- Description: A textual description of the dependency.
- Operations: Buttons to add, edit or delete a dependency.
The last row of the table is used to add a new dependency. Select the Dependent, the Dependee and two basic options "state" and "condition". If you are not sure about these two options, don't worry, you will be able to change these later. Click on the "Add dependency" button.
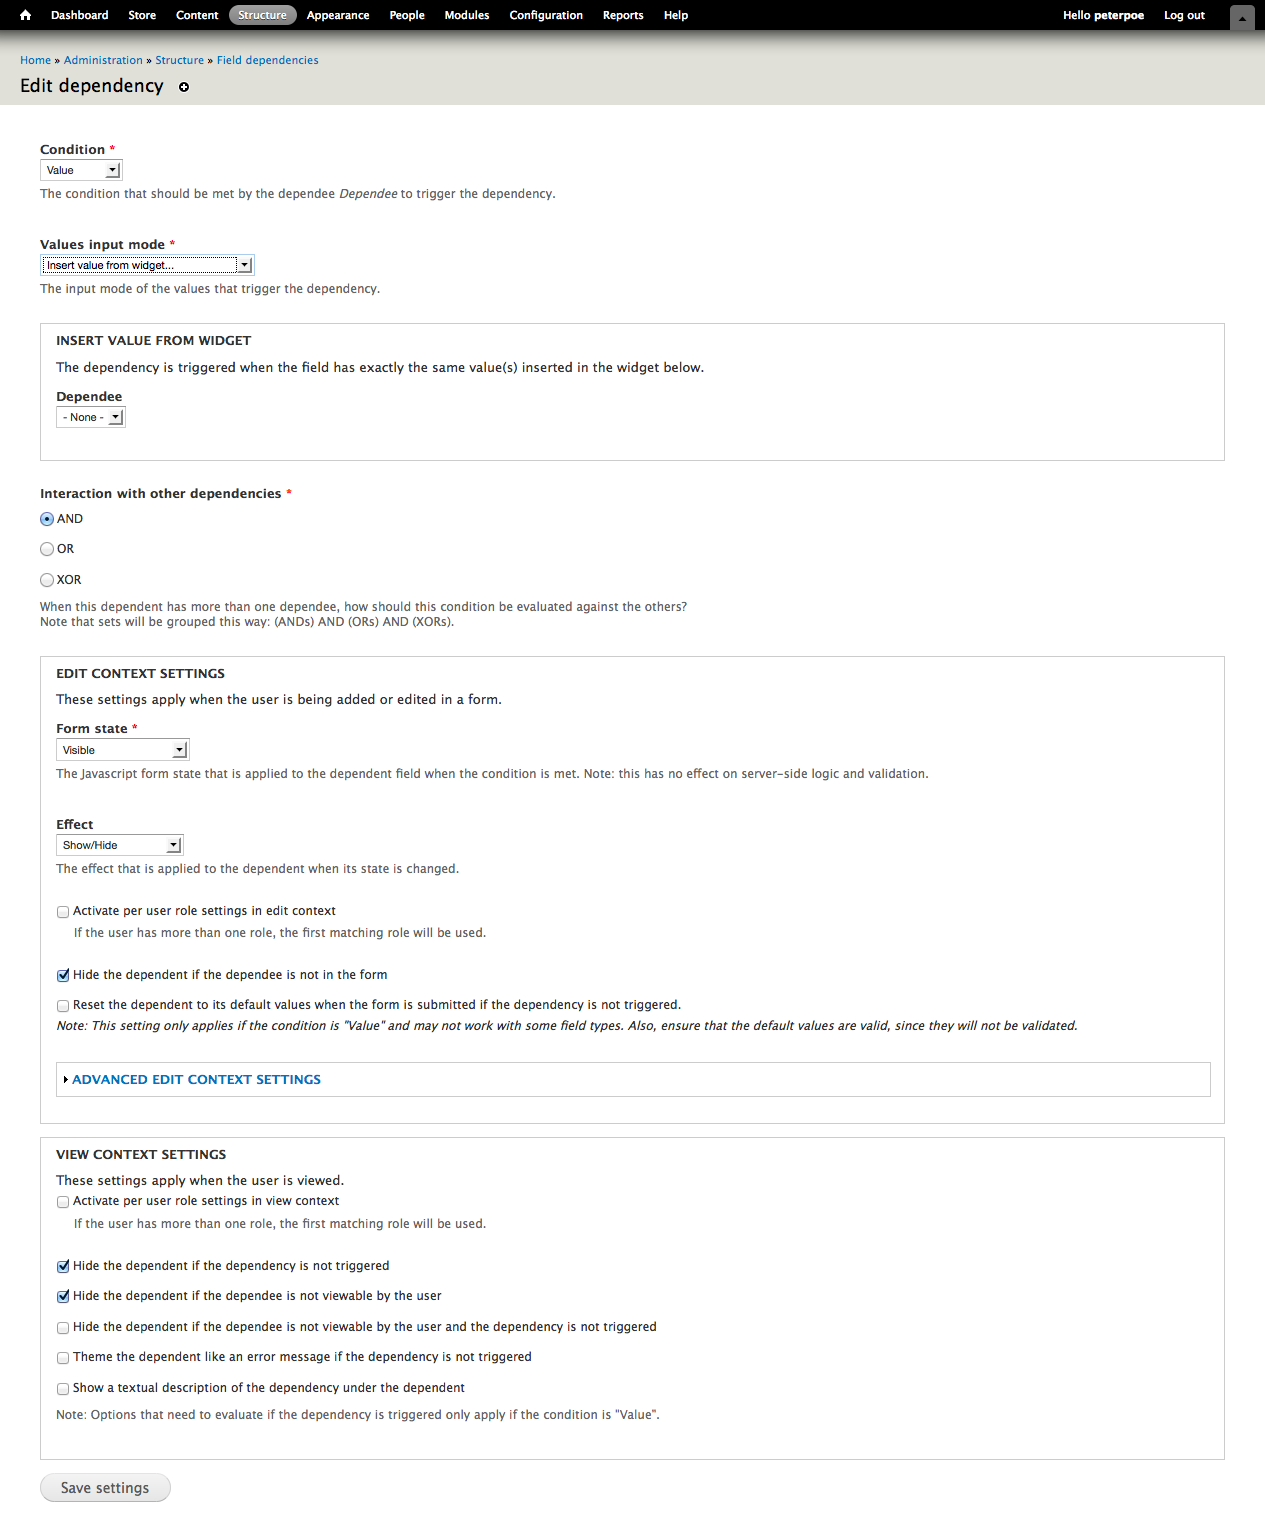
You are now on the dependency settings page. Before digging into the details of each option, let's understand how a dependency works:
A dependency comes into play in two distinct contexts: when creating/editing a node, and when viewing a node (remember that the same applies to users, comments, categories, etc). The two contexts are independent: you can set up a dependency that acts on node edit and does nothing on node view, and vice-versa.
Basically, a dependency acts as a trigger: if the dependee field meets a certain condition, then a certain state is applied to the dependent field. The dependency is biunivocal and every state has a converse, so the following also applies: if the dependee does NOT meet a certain condition, then the converse of state is applied to the dependent.
When editing a node, the dependency is evaluated by the Javascript States API).
When viewing a node, the dependency is evaluated server-side by Conditional Fields.
Now we are ready to examine each option:
Condition
This is the condition that dependee should meet to trigger the dependency.
Available options:
- Filled: The dependee has at least one non-empty value.
- Empty: The dependee has an empty value (empty string or array).
- Touched: The dependee has received focus at least once.
- Untouched: The dependee has never received focus.
- Focused: The dependee is currently focused.
- Unfocused: The dependee is currently not focused.
- Checked: The dependee is a checkbox and is checked.
- Unchecked: The dependee is a checkbox and is not checked.
- Value: The dependee has a certain value or set of values (see below).
The "Value", "Filled" and "Empty" conditions are special: they are the only conditions that have ANY effect on form validation and content view.
Also, if the "Value" condition is selected, a set of specific options is presented to the administrator.
Values input mode ("Value" specific option)
This lets the administrator choose the way she wants to insert the value or set of values that will trigger the dependency. Whenever an option is selected, the corresponding value(s) field appears below.
Available options:
- Insert value from widget: Use the actual form widget to insert the desired values. This is a quick but limited way to set up simple dependencies.
- Regular expression: Use a text field to insert a regular expression.
- All these values (AND): Use a text area to insert a list of values.
- Any of these values (OR): Use a text area to insert a list of values.
- Only one of these values (XOR): Use a text area to insert a list of values.
- None of these values (NOT): Use a text area to insert a list of values.
Interaction with other dependencies
This field governs the way this dependency interacts with other dependencies that have the same dependent.
Edit context settings
These settings apply when a node is being added or edited in a form.
Form state
The Javascript form state that is applied to the dependent field when the condition is met.
Important note: this has no effect on server-side logic and validation. Keep this in mind, since it can lead to counter-intuitive results, including but not limited to:
- If you choose form state "Required", but the dependent field is not a required field, it will look like it's required when the dependency is TRIGGERED in the form, but no validation will be performed.
- If you choose form state "Invisible", the dependent will be HIDDEN when the dependency is TRIGGERED. But when you view the node (and the "Hide the dependent if the dependency is not triggered" option is active, see below), the dependent will be VISIBLE, since the dependency is triggered.
Some options have additional settings (like animations) that appear below when selected.
After "Form state", there are some advanced options that cover peculiar use cases, which are self-explanatory. You can even set up per-role sets of options.
View context settings
These options are also self-explanatory. You can set up per-role sets of options here as well.
Just keep in mind one important thing: in view context, options that need to evaluate if the dependency is triggered or not work only if "Condition" is "Value".
Working with Display Suite
When field A depends on field B, and field B is not loaded in a display (teaser, full, etc) it could be interpreted that field A is an orphan field (see conditional_fields_entity_view_alter) and thus it's access set to false. To prevent this behavior load/show the dependee (field B) in your display in any region, it even could be a hidden region using Display Suite Extras.
Help improve this page
You can:
- Log in, click Edit, and edit this page
- Log in, click Discuss, update the Page status value, and suggest an improvement
- Log in and create a Documentation issue with your suggestion
