 Come together with the global Drupal community in Rotterdam, 28 Sept – 1 Oct 2026. Sessions, contribution, connection, and Early Bird savings until 8 June.
Panels 2: Create a node override
Last updated on
30 April 2025
Drupal's built in content viewing is decent, but sometimes (especially with custom content types) you might need a special way of displaying that content. If you want some basic layout tools, you can very quickly create specific layouts for specific content types with Panels 2. Let's try it, creating different layouts for pages and stories.
- Add a panel with the following settings:
- Panel name: node_override
- Page title: 'Panels 2: Create a node override'. This will feed in the title of the actual node we're overriding.
- Path: node/%
- Now go to the 'Context' tab, and under the 'Arguments' section, select 'Node ID' and click 'Add argument'.
- In the modal dialog, select the content types 'Page' and 'Story', and select them again under 'Own display'. This will allow you to modify the node presentation for just these content types (and separately if you choose, as we are doing). Content types you don't select here will bypass the panel display completely and display as regular nodes. Click 'Save' at the bottom of the window.

- Click 'Save' at the bottom of the page.

- Click the 'Content' tab at the top.
- Since we want different displays for different content types, we aren't using the 'Default' tab. So let's click the 'Node ID 1 Page' tab for now. That will edit the page node override.
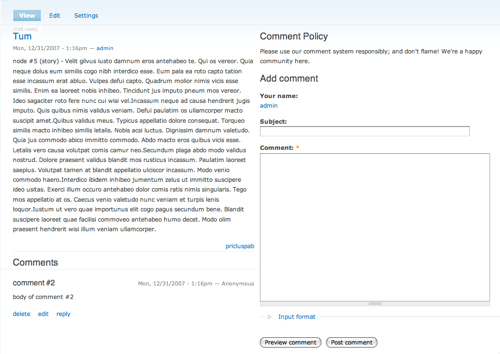
- For the 'Page' content type, let's have an override that shows the content on top, the comments on the middle left panel, as well as some text and a comment add form on the middle right. The bottom won't be used, but don't worry, Panels 2 ignores the parts that aren't used. The first thing to add is the content:
- Click the plus sign icon in the top section of the panel.
- Under the 'Node context' heading, find and select 'Node content'.

- Click the 'Link title to node' checkbox.
- Click 'Add pane' at the bottom of the window.
- Ok, now for the left side. Click the plus sign on the left section of the panel.
- Under the 'Node context' heading, find and select 'Node comments'.
- Click 'Add pane' at the bottom of the window.
- And on to the right side; click the plus sign on the right section of the panel.
- Under the 'Custom' heading, find and select 'New custom content'.
- Set the Title to: Comment Policy
- Set the Body to:
Please use our comment system responsibly; and don't flame! We're a happy community here. - Click 'Add pane' at the bottom of the window.
- Click the right plus sign again.
- Under the 'Node context' heading, find and select 'Comment form'.
- Click 'Add pane' at the bottom of the window.
- Click 'Save'.

- And now we have a page override:

- Now, on to the node override for Stories. Let's have something similar to our page node override, but with the content and comments on the left, and the comment policy and comment add form on the right. Nothing will be on the top this time.
- Click the 'Node ID 1 Story' tab at the top.
- Click the plus sign on the left.
- Under the 'Node context' heading, find and select 'Node content'.
- Click the 'Link title to node' checkbox.
- Click 'Add pane' at the bottom of the window.
- Click the plus sign on the left again.
- Under the 'Node context' heading, find and select 'Node comments'.
- Click 'Add pane' at the bottom of the window.
- And on to the right side; click the plus sign on the right section of the panel.
- Under the 'Custom' heading, find and select 'New custom content'.
- Set the Title to: Comment Policy
- Set the Body to:
Please use our comment system responsibly; and don't flame! We're a happy community here. - Click 'Add pane' at the bottom of the window.
- Click the plus sign on the right side again.
- Under the 'Node context' heading, find and select 'Comment form'.
- Click 'Add pane' at the bottom of the window.
- Click 'Save'.

- And now we have a page override:
- You are now done with this tutorial, but remember, this can apply in a ton of ways to any content type.
If you want to import a starting point, download the code and import it by clicking the import tab at the top of the Panel pages module.
Help improve this page
Page status: Not set
You can:
You can:
- Log in, click Edit, and edit this page
- Log in, click Discuss, update the Page status value, and suggest an improvement
- Log in and create a Documentation issue with your suggestion
