
This describes the steps to theme some Views output. I had to figure this out for a client who wanted his user-community to share "notes". The overall look of this part should be as pinboard with sticky notes on it.
Functional Part
I prefer to use Drupal modules CCK and Views for building custom node types and selecting desired data. So, the first step is to assure that modules Views and CCK are installed and set up. You can optionally install further Drupal modules like Date, Link to build your "note".
Then create a custom node type named "note". A "note" is the information-unit with a Title, a Textfield and some more fields of your choice (for example, a date-field could be useful). Just follow the Installation-Readmes for Drupal modules and CCK-modules to get more information bits into your note.
The pinboard is the "container-element" for many "notes". This can be done by module Views easily. Just add a new View named "pinboard" that shows content of type "node". Now create a View-Page named "pinboard page" and set it to show a grid of fields. Select any Fields that should show up on your note and arrange the order of the fields on the note. Limit the Title-Field and the bodytext to 35 / 65 characters so it would fit onto a small note-graphics.
Set up a Filter to show only nodes that are published and of type "note". Because this is a page-View you'll have to add a path (for example, "pinboard") and a menu entry if you like.
Be sure to save your work and try it. Fill some sample notes and check if everything is working. The pinboard should show your desired number of notes in a grid, for example 2 columns and 3 rows (= 8 notes on one pinboard). If you don't add some routine that will automatically delete old notes, you should also add "page navigation" in the View. Paging is very smooth with AJAX (just turn it on). There is no need to worry about SEO issues if these are only notes that are used internally only (only seen by registered members of the site), so AJAX is ok.
Important: set your note-title up that clicking on the title will lead to the note. Check "output this field as a link" and type in Link Path: pinboard/[nid]. Make sure you selected the field node:node-id (can be set to "hidden").
Also important (for this example to work): Set your note-page to show up in a grid, too (1 x 1 grid)...
Now add a second View-Page named "note" and set it to overdrive the settings for your further built "pinboard page". Adjust the Settings to show just one note with full bodytext (and your desired fields). Give it an argument of type node:node-id and set the path to pinboard/%. The % will be substituted by the node-id of one single note. The note-page doesn't need a menu-entry.
At this point you should have an pinboard-page and a note-page. Clicking on a single note's title should lead to this note on a note-page.
With Views-Attachments you can even create a "back to pinboard" Button/Link and a "add new note" Button/Link that show up underneath the single note and/or the pinboard.
Theming the output
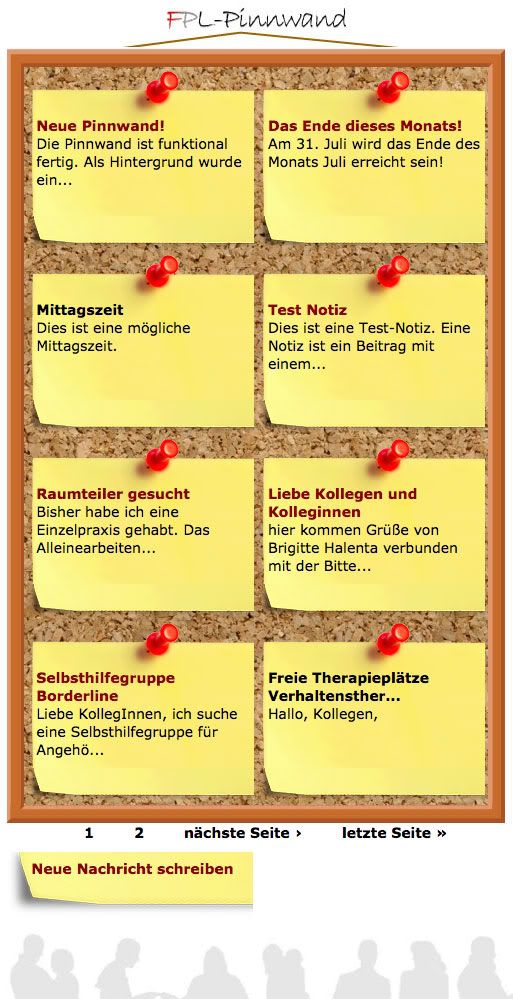
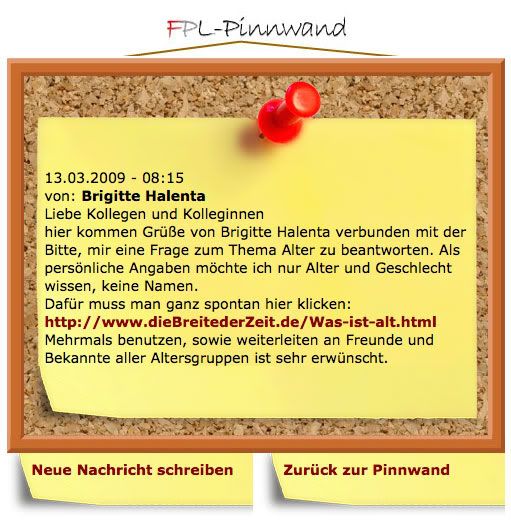
At some point you will have to imagine the look of the pinboard and the look of the note and create graphics. If you take a quick look at the Screenshot-Links beneath, that's how the client wanted it to look like. I cut the note-graphics into 3 parts vertically and the pinboard is made of 9 graphics (border-up, border-up-left, border-up-right, ..., pinboard-background).
- Screenshot pinboard: http://i302.photobucket.com/albums/nn110/seoscout/drupal-doku/pinboard-a...
- Screenshot note: http://i302.photobucket.com/albums/nn110/seoscout/drupal-doku/pinboard-o...
Make a Screenshot of your current Theme and set your desired graphics up in size, shape and slices.
If you're done with this, you can finally start theming the output of the Views-pages. Just return to the Views-Editor and select your Views containing "pinboard page" and "note page". If you click on Theme:Information you see a bunch of filenames that may be used to style the html-output. I made some tests and decided to go with views-view-grid.tpl.php.
I clicked onto that filename in the already open Theme:Information and got the code that is normally used to output this View's content. I just copied that code into the clipboard, created a blank file named views-view-grid.tpl.php in my theme's folder and put that code from the clipboard into it.
After that, don't forget to click on "reload templates" in the still open Views control panel so this newly created file will be recognized by Drupal. You can test this by writing some nonsense into your new file and check if it shows up on your website if you reload the page. If this doesn't work for you, look in the Drupal documentation for solutions, there isn't just one but many (based on different circumstances).
Now have a look at your webpage showing the pinboard and look at the (html) sourcecode of that page. Somewhere around your pinboard-title there should be similiar code like this:
<div class="view view-pinboard view-id-pinboard view-display-id-page_1 view-dom-id-1 views-processed">
<div class="view-content">
<table class="views-view-grid">
<tbody>
<tr class="row-1 row-first">
<td class="cell col-1">
<td class="cell col-2">
</tr>
<tr class="row-2">
and so on...
The important thing here is: view-display-id-page_1
Now look at the html sourcecode of your page showing one single note. It should be the same but this view-display-id-page_2. This is the difference between views "single" and "all" notes. You can use different CSS-rules to the same html-code to get different "looks".
You can now start adding more html-code to your views-view-grid.tpl.php file and your theme's CSS file(s) to style the pinboard and the single note.
This, for example, is my html-code in that file to get the pinboard-and-note-look:
<?php
// $Id: views-view-grid--pinnwand.tpl.php Exp $
/**
 * @file views-view-grid--pinnwand.tpl.php
 * forum psychotherapie luebeck pinnwand grid
 *
 * - $rows contains a nested array of rows. Each row contains an array of
 *   columns.
 *
 * @ingroup views_templates
 */
?>
<?php if (!empty($title)) : ?>
	<h3><?php print $title; ?></h3>
<?php endif; ?>

<table class="pinnwand-title"> <!-- pinboard-title -->
<tbody>
<tr>
<td></td>
</tr>
</tbody>
</table>

<!-- pinnwand = pinboard; lo, o, ro = upper-left, upper, upper-right and so on... -->
<table class="pinnwand" border="0" cellspacing="0" cellpadding="0">
<tbody>
<tr>
	<td class="pinnwand-lo"></td>
	<td class="pinnwand-o"></td>
	<td class="pinnwand-ro"></td>
</tr>
<tr>
	<td class="pinnwand-l"></td>
	<td class="pinnwand-bg">
		<table class="views-view-grid">
		<tbody>
		<?php foreach ($rows as $row_number => $columns): ?>
		<?php
		$row_class = 'row-' . ($row_number + 1);
		if ($row_number == 0) {
			$row_class .= ' row-first';
		}
		elseif (count($rows) == ($row_number + 1)) {
			$row_class .= ' row-last';
		}
		?>
		<tr class="<?php print $row_class; ?>">
		<?php foreach ($columns as $column_number => $item): ?>
			<td class="<?php print 'cell col-'. ($column_number + 1); ?>">
				<div class="cell-head"></div>
				<div class="cell-item"><?php print $item; ?></div>
				<div class="cell-foot"></div>
			</td>
		<?php endforeach; ?>
		</tr>
		<?php endforeach; ?>
		</tbody>
		</table>
	</td>
	<td class="pinnwand-r"></td>
</tr>
<tr>
	<td class="pinnwand-lu"></td>
	<td class="pinnwand-u"></td>
	<td class="pinnwand-ru"></td>
</tr>
</tbody>
</table>
And this is the corresponding CSS-code:
/*	pinnwand
	views-view-grid.tpl.php
--------------------------------------------------------- */
table.pinnwand-title {
	width: 100%;
	overflow: hidden;
	margin: 0;
	padding: 0;
}
.pinnwand-title td {
	width: 498px;
	height: 45px;
	margin: 0;
	padding: 0;
	background: transparent url( pinnwand-title.jpg ) no-repeat scroll 110px 0;
}

.pinnwand {
	margin: 0;
	padding: 0;
	width: 100%;
}
.pinnwand-bg { background: transparent url( pinnwand-bg.jpg ); }
.pinnwand-lo { width: 17px; height: 18px; background: transparent url( pinnwand-lo.jpg ) no-repeat; }
.pinnwand-o { height: 18px; background: transparent url( pinnwand-o.jpg ) repeat-x; }
.pinnwand-ro { width: 17px; height: 18px; background: transparent url( pinnwand-ro.jpg ) no-repeat; }
.pinnwand-l { width: 17px; background: transparent url( pinnwand-l.jpg ) repeat-y; }
.pinnwand-lu { width: 17px; height: 18px; background: transparent url( pinnwand-lu.jpg ) no-repeat; }
.pinnwand-u { height: 18px; background: transparent url( pinnwand-u.jpg ) repeat-x; }
.pinnwand-ru { width: 17px; height: 18px; background: transparent url( pinnwand-ru.jpg ) no-repeat; }
.pinnwand-r { width: 17px; background: transparent url( pinnwand-r.jpg ) repeat-y; }


/* die innere flaeche der pinnwand selbst */
table.views-view-grid {
	width: 100%;
	overflow: hidden;
}

/* pinnwand gridview (viele notizen)
--------------------------------------------------------- */
/*.view-display-id-page_1 .cell { width: 232px; }*/
.view-display-id-page_1 .cell-head {
	height: 46px;
	background: transparent url( cell-head.png ) no-repeat;
}
.view-display-id-page_1 .cell-item {
	/*width: 232px;*/
	min-height: 100px;
	background: transparent url( cell-item.png ) repeat-y;
	padding: 0 3px 0 10px;
}
.view-display-id-page_1 .cell-item .field-content p { margin: 0; }
.view-display-id-page_1 .cell-foot {
	height: 34px;
	background: transparent url( cell-foot.png ) no-repeat;
}


/* pinnwand notiz einzelansicht
--------------------------------------------------------- */
.view-display-id-page_2 .cell { width: 416px; }
.view-display-id-page_2 .cell-head {
	height: 89px;
	background: transparent url( cell-head-big.png ) no-repeat;
}
.view-display-id-page_2 .cell-item {
	/*width: 440px;*/
	background: transparent url( cell-item-big.png ) repeat-y;
	padding: 0 16px 0 18px;
}
.view-display-id-page_2 .cell-item .field-content p { margin: 0; }
.view-display-id-page_2 .cell-foot {
	height: 66px;
	background: transparent url( cell-foot-big.png ) no-repeat;
}


/* pinnwand "anhang" 1: neue nachricht schreiben (link)
--------------------------------------------------------- */
.view-display-id-attachment_1 {
	display: block;
	width: 220px;
	height: 66px;
	float: left;
	margin: 0em 0 0 0;
	background: transparent url( cell-foot-big.png ) no-repeat;
	padding: 7px 1px 3px 25px;
}

/* pinnwand "anhang" 2: zurueck zur pinnwand (link), nur bei einzelansicht
--------------------------------------------------------- */
.view-display-id-attachment_2 {
	display: block;
	width: 220px;
	height: 66px;
	float: right;
	margin: 0em 0 0 0;
	background: transparent url( cell-foot-big.png ) no-repeat;
	padding: 7px 1px 3px 25px;
}
It's quite a lot CSS stuff to get such a simple thing, but it works ;-)
Posting the exported Views-Code here is a messy thing as these are very long.
This is my first Drupal Module Theme customization. The more I read the more I understand. There may be better ways to get this example's results, but this worked for me. Keep on the very good work, Drupals ;-)


