Testing with REST Server
To get the most out of this page, you should first take a look at Working with REST Server to get more of a conceptual overview on how the REST Server works.
As described on that page, there are six types of resources you can define
We will test each one with the user service. When testing, use the URL you figured out in the previous section.
Retrieving information from your resource is very simple. The format is
http://<url>/<identifier>.<format>
Identifier is the unique identifier of the data you are attempting to retrieve (in this example, the user ID.) Format is one of the formats the REST server supports returning data in. Lets use XML for the time being. So to test the user resource, enter the following
http://<url>/1.xml
And you should receive something that looks like this:
<result><uid>1</uid><name>admin</name><pass>xyzzyxyzzyxyzzyxyzzy</pass><mail>gdd@heyrocker.com</mail><mode>0</mode><sort>0</sort><threshold>0</threshold><theme></theme><signature></signature><signature_format>0</signature_format><created>1267194321</created><access>1272894373</access><login>1272853099</login><status>1</status><timezone/><language></language><picture></picture><init>gdd@heyrocker.com</init><data>a:0:{}</data><roles is_array="true"><item>authenticated user</item></roles></result>
In order to create through a resource, you have to POST data to the URL. For posting, you just use the base URL without the identifier and format.
There are a couple ways to go about POSTing data to a resource. First, there is a handy Firefox plugin called Poster which allows the posting of arbitrary data to specified URLs. Poster can be downloaded at https://addons.mozilla.org/en-US/firefox/addon/2691.
For Google Chrome, you can use the Advanced REST Client extension found here: https://chrome.google.com/webstore/detail/advanced-rest-client/hgmloofdd...
It is fairly simple to use and it remembers your last entry so you can easily continue to test even after closing the browser.
The steps below are for Poster plugin for Firefox, but they are similar to Advanced REST Client for Chrome.
Here is a short tutorial on using Poster to POST data to create a new user through the user resource.
- After installing Poster you will need to reboot Firefox. Once you have rebooted you can active Poster from the menu at Tools->Poster.
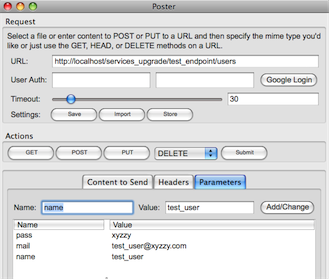
- In the URL field, enter the base URL for your resource.
- Click the Parameters tab. This is where you enter the data to be submitted, which mimics the fields that would be posted from a web form. This data is entered in kay/value pairs. For a user these value are
- name (username)
- pass (plain text password)
- mail (email address)
Enter a key/value pair and click the Add/Change button to add it to the list.
Note that for other types of data like nodes, you will need quite a bit more information than this. For more information on what type of data is needed to create a resource, please reference the documentation for that resource's create method.
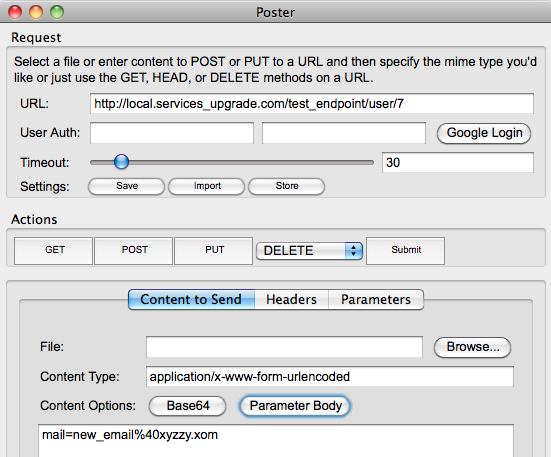
- Now click back to the Content to Send tab and click Parameter Body. This will convert your Parameters to properly encoded data, and change the Content Type to 'application/x-www-form-urlencoded'.

- Under Actions you'll see several buttons. Create requests are POSTed to the resource, so click Post. Ideally, if all went well, you will see something like the following:

This is an XML representation of the user you just created. Success!
If you would rather test from code, you can do this using a Drupal bootstrap script with the following code. The $account array created here is just an array representation of the parameters above.
$account = array(
  'name' => 'test_user',
  'pass' => 'xyzzy',
  'mail' => 'test_user@xyzzy.com',
);

$response = drupal_http_request($url, $headers, 'POST', http_build_query($account, '', '&'));
If your test did not succeed, here are some things to check
- Are your parameters named correctly? They have to be exactly right or the submission will not validate.
- Load your server's home page. Often a failed form submission will trigger a drupal_set_message(), however these messages are only mirrored to the screen, not to our service's response. You will often not see these messages until your next page load.
- Check the dblog on your server to see if any errors occurred.
- For users specifically, note that two users can not have the same username or email. If you resubmit with data that you previously submitted, your submission will fail.
These will often provide clues to your problem.
Update
Update functions work exactly the same as Create functions, except for a couple of small differences.
- The URL you submit to has the unique identifier appended to it
- Instead of using POST you will use PUT.
So in the above example, you can see in the response dialog that the UID of our new user is 7. So we can add this into our URL, and perhaps we want to change the user's email address as demonstrated below.
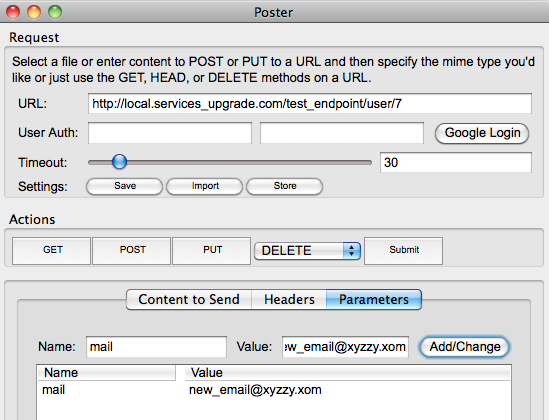
Click the PUT button and you will receive back the updated user information.
Delete
Delete functions work exactly the same as Update functions except for a couple of small differences
- You don't actually need to submit any parameters (you can submit them but they will be ignored.)
- You use DELETE instead of PUT
Beyond that everything should work as above. Typically this won't return anything.
Help improve this page
You can:
- Log in, click Edit, and edit this page
- Log in, click Discuss, update the Page status value, and suggest an improvement
- Log in and create a Documentation issue with your suggestion
