
The Zen subtheme CTI_Flex comes with four color presets, called black, blue, red, and teal.
In this theme, there is also a color picker that lets you choose your own colors. However, colors chosen this way come out as "flat" areas of color; they don't have the rounded, slightly 3D appearance of the preset color schemes. That's because those presets use images for certain areas, so that there are gradients in the header, navigation, and right-sidebar blocks (for each of which a background image is used), color-coordinated buttons, et cetera.
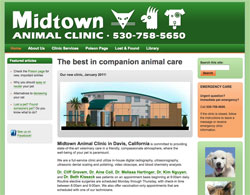
I like this theme, but one of my clients wanted a different color scheme to match the colors of their new building (green and orange). I was able to create a new "colorway" for this theme with just a little tweaking of images and templates. You can see this green/orange colorway in action at: http://midtownanimalclinic.com
I'm posting what I did as an example: you may actually want a brown/gold or magenta/turquoise color scheme rather than green/orange, but this will show you how I went about doing what I did.
The one caveat in doing this is that, if you want to edit the gradient images, you need to have some sort of photo/image editing software. I use Photoshop because it's easy to create gradients and adjust colors, and easy to save the resulting file in the correct format for web use (GIF in this case).
1. Since there was an existing teal/orange colorway, I took that as my starting point. The orange was perfect, so I only had to change any teal parts of the theme. (If you are changing both colors in your new colorway, I recommend doing all of one color first, then all of the other, to lessen confusion.)
If you unzip the theme file and look at it, you will see that each of the preset colorways has its own CSS file inside the cti_flex>colors folder, and its own color folder inside the cti_flex>colors>images folder. My first step was to clone the teal.css file and the teal folder and renamed them to green.css and green, respectively.
2. Then I experimented to get the "right" shade of green for my base color. Photoshop makes it easy to work in HSB color space (hue, saturation, brightness) and I chose hue #119, a true green tending a little toward the yellow side.
By keeping the hue the same and playing with the brightness, and occasionally with the saturation (which has to change if you want really light pastels) this gave me a range of colors I could use both in the CSS file and in the gradients. Some examples of the colors I used were:
- #1d631c (one of the darker shades at S=72, B=39)
- #358234 (medium green, S=60, B=51)
- #7ab079 (a light green, S=31, B=69)
- #b7d6b6 (very pale, S=30, B=80)
3. The next step was to create new gradient images for the new colorway. The most important ones in this case are header_bg.gif, primary_bg.gif and bl_block.gif, the backgrounds for the header, menu and blocks respectively.
I did this by copying the existing files, overlaying them with new gradients, and saving the results as GIF files. I saved my working files as multi-layered Photoshop files so I could go back and try different versions if I needed to. When saving the GIF files, Ii is very important NOT to change their filenames, so I kept careful track of how and where my new files were saved to be sure they were in the correct locations.
(It's also worth customizing the body background pattern: body_bg.gif -- this is quick and easy since it's just a few pixels in two colors, not a gradient.)
4. Next I turned to the CSS file, and changed all the URL references in the new CSS file to point to the green folder rather than the teal folder. I also changed all the shades of teal in the CSS to shades of green from my list.
It took some experimentation, and some tweaking both of the images and of the CSS file, to get all the colors just the way I wanted them. I was able to do all this "fine tuning" on a localhost site, which made it easier.
5. The final step is to add the new colorway to the theme templates. There are two files that have to be changed.
The first is template.php -- I simply added one more "case" to:
$design = theme_get_setting('cti_flex_design');
switch ($design) {
I added:
  case '4':
    drupal_add_css(drupal_get_path('theme', 'cti_flex') . '/colors/green.css', 'theme', 'all');
    break;
I also re-numbered the last case (which just contains "break;") as case '5'
Second, I edited theme-settings.php, so that the green/orange colorway would come up as a choice in the theme settings.
  $form['cti_flex_design'] = array(
    '#type'          => 'radios',
    '#title'         => t('Color Scheme'),
    '#default_value' => $settings['cti_flex_design'],
    '#options'       => array(
      '0' => t('Teal and Orange'),
      '1' => t('Blue and Green'),
      '2' => t('Red and Gray'),
      '3' => t('Black and Orange'),
      '4' => t('Green and Orange'),
      '5' => t('None (plain gray) - Select this option if using the color picker tool below to create your own custom color scheme'),
     ),
    '#description'   => t('Select the predesigned color scheme you would like to use. Each design has its own style sheet in the "colors" directory of the theme.
Here I simply added a new option (Green and Orange), re-numbered as necessary to match the number for the green/orange colorway in template.php, and saved.
(Note that like any template edits, these will be wiped out if you install any updates to the theme and will have to be re-done.)
6. Once everything was to my liking, I went to the actual website, uploaded my new green.css file and green color images folder in the appropriate places, and replaced the theme's original template.php and theme-settings.php with my changed versions.
Everything worked!
To summarize, here were the steps I went through.
- Clone the color CSS file and the color images folder, and rename to the new color.
- Create the new range of colors. (I used Photoshop for this.)
- Create new gradient images for the new colorway. Save them to the new color folder.
- Replace colors and URLs in the new CSS file to suit the new colorway.
- Edit the two template files, template.php and theme-settings.php.
- Upload everything into the cti_flex folder on the actual website.
| Comment | File | Size | Author |
|---|---|---|---|
| Midtown-liveT.jpg | 18.49 KB | claning |


Comments
Comment #1
claning CreditAttribution: claning commentedComment #2
ajross CreditAttribution: ajross commentedI've left this open for folks to use as a guide if they needed to do the same thing. I'm closing the issue (although it will still be available) as the D7 version is now the major maintained version of the theme. But thanks for posting the details of your work and I hope others found them useful.