Upgrade using web browser
Where the images refer to Drupal 8, it also applies to Drupal 8 or higher.
Before you begin
Before you begin the upgrade, make sure you have read the previous pages of this handbook:
- Upgrading from Drupal 6 or 7 to Drupal 9 (or later)
- Preparing an upgrade
- Choosing the upgrade approach
Make sure you are using the latest version of Drupal 9 or higher. You can check your version at the status report page of your Drupal site (/admin/reports/status).
Make sure the following core modules are enabled on your new Drupal site:
- Migrate
- Migrate Drupal
- Migrate Drupal UI
Install and enable the contributed modules on the new Drupal site for which you want to migrate configuration and content from the source site.
There are many great tips in Migrating Your Data from Drupal 7 to Drupal 10 in the articles under "Example Repository & Automated Migration", see Performing an automated migration and "Customize the automated migration" (coming soon).
Start
You can start the upgrade process by visiting the /upgrade path of your new Drupal site If you get a Page not found error, verify you have enabled the 'Migrate Drupal UI' module.
If an upgrade was not done then the Upgrade page provides information about the preparation steps that should be done before continuing with the upgrade. However, if an upgrade was done then you are asked if you want to import new configuration and content. If you continue, for either of these situations, you are then asked to define the source site.
Define the source site
- Define the database connection details for your Drupal 6 / 7 source site. If your source site uses a database prefix, be sure to expand the Advanced options and provide the prefix.
- Define public and private files directories of your source site so that files can be copied to your new Drupal site.
- You can define these values in settings.php, see below.
- See screenshot below.

Review the pre-upgrade analysis
If the database credentials to your source database are correct, the upgrade review page will appear as illustrated in the screenshot below. This page shows a summary of the upgrade status for all installed modules on the old site.
As a site builder you should carefully review the modules that will not be upgraded. For each module, evaluate if your new Drupal site will work without the module. The list includes modules that are installed on the old site but not on the new site and modules that do not provide an upgrade path.
Let's use some of the modules shown in the screenshot above as examples.
- Addressfield provides a field type for storing address data.
- If you would proceed with the upgrade, the nodes that had addresses on your source site would be migrated to the new Drupal without addresses which would most probably not be the desired outcome.
- This issue can be resolved by installing and enabling the Drupal Address module.
- In other words, you would not proceed and perform the actual upgrade but you would first install the missing Drupal module and then start the upgrade process again. You would then see that the Addressfield is included in the list of modules that will be upgraded.
- Color is a Drupal 7 core module that allows to easily change the color scheme of compatible themes.
- When the screenshot was made there was no upgrade path for migrating the configuration settings of the Color module from Drupal 7 to Drupal 9 or higher..
- However, you can manually set the configuration settings on your new Drupal site after the upgrade.
- It was safe to proceed with the upgrade and make a note that the configuration settings of the Drupal 7 module will not be automatically migrated.
- Views allows you to create different kinds of lists of your site content.
- Even if you have Views enabled on the new Drupal site it will appear as 'Not upgraded'. This is because there is no automatic upgrade mechanism that would migrate your Views configurations from Drupal 6 / 7 to Drupal 9 or higher.
- It is safe to proceed with the upgrade but you will need to manually create the views on your new Drupal site after you have executed the upgrade.
The list of modules that will be upgraded is collapsed by default. When you open the list, you can review what will end up where on the new site. For example, this shows that the block module from the source site is migrated to two modules on the new Drupal site. There is absolutely nothing to do about these, the list is purely informational.
ID conflict warnings
As described in the Preparing an upgrade page, upgrading from Drupal 6 or Drupal 7 to Drupal 9 or higher should be done to an complete empty new Drupal site. For example, if you manually create a node to the new Drupal site before upgrading and the source Drupal 6 / 7 site has a node with the same ID, the migration system will overwrite the node that was manually created in new Drupal site.
If conflicting IDs are detected, a warning about conflicting IDs will be shown as illustrated below. You can either ignore this warning and risk losing data or abort and take an alternative approach as described in the Known Issues documentation.
Perform the upgrade
The Pre-upgrade analysis summary is the final page before the actual execution of the upgrade, so this is the final chance to hit Cancel. Once you press the Perform upgrade button, the process is started.
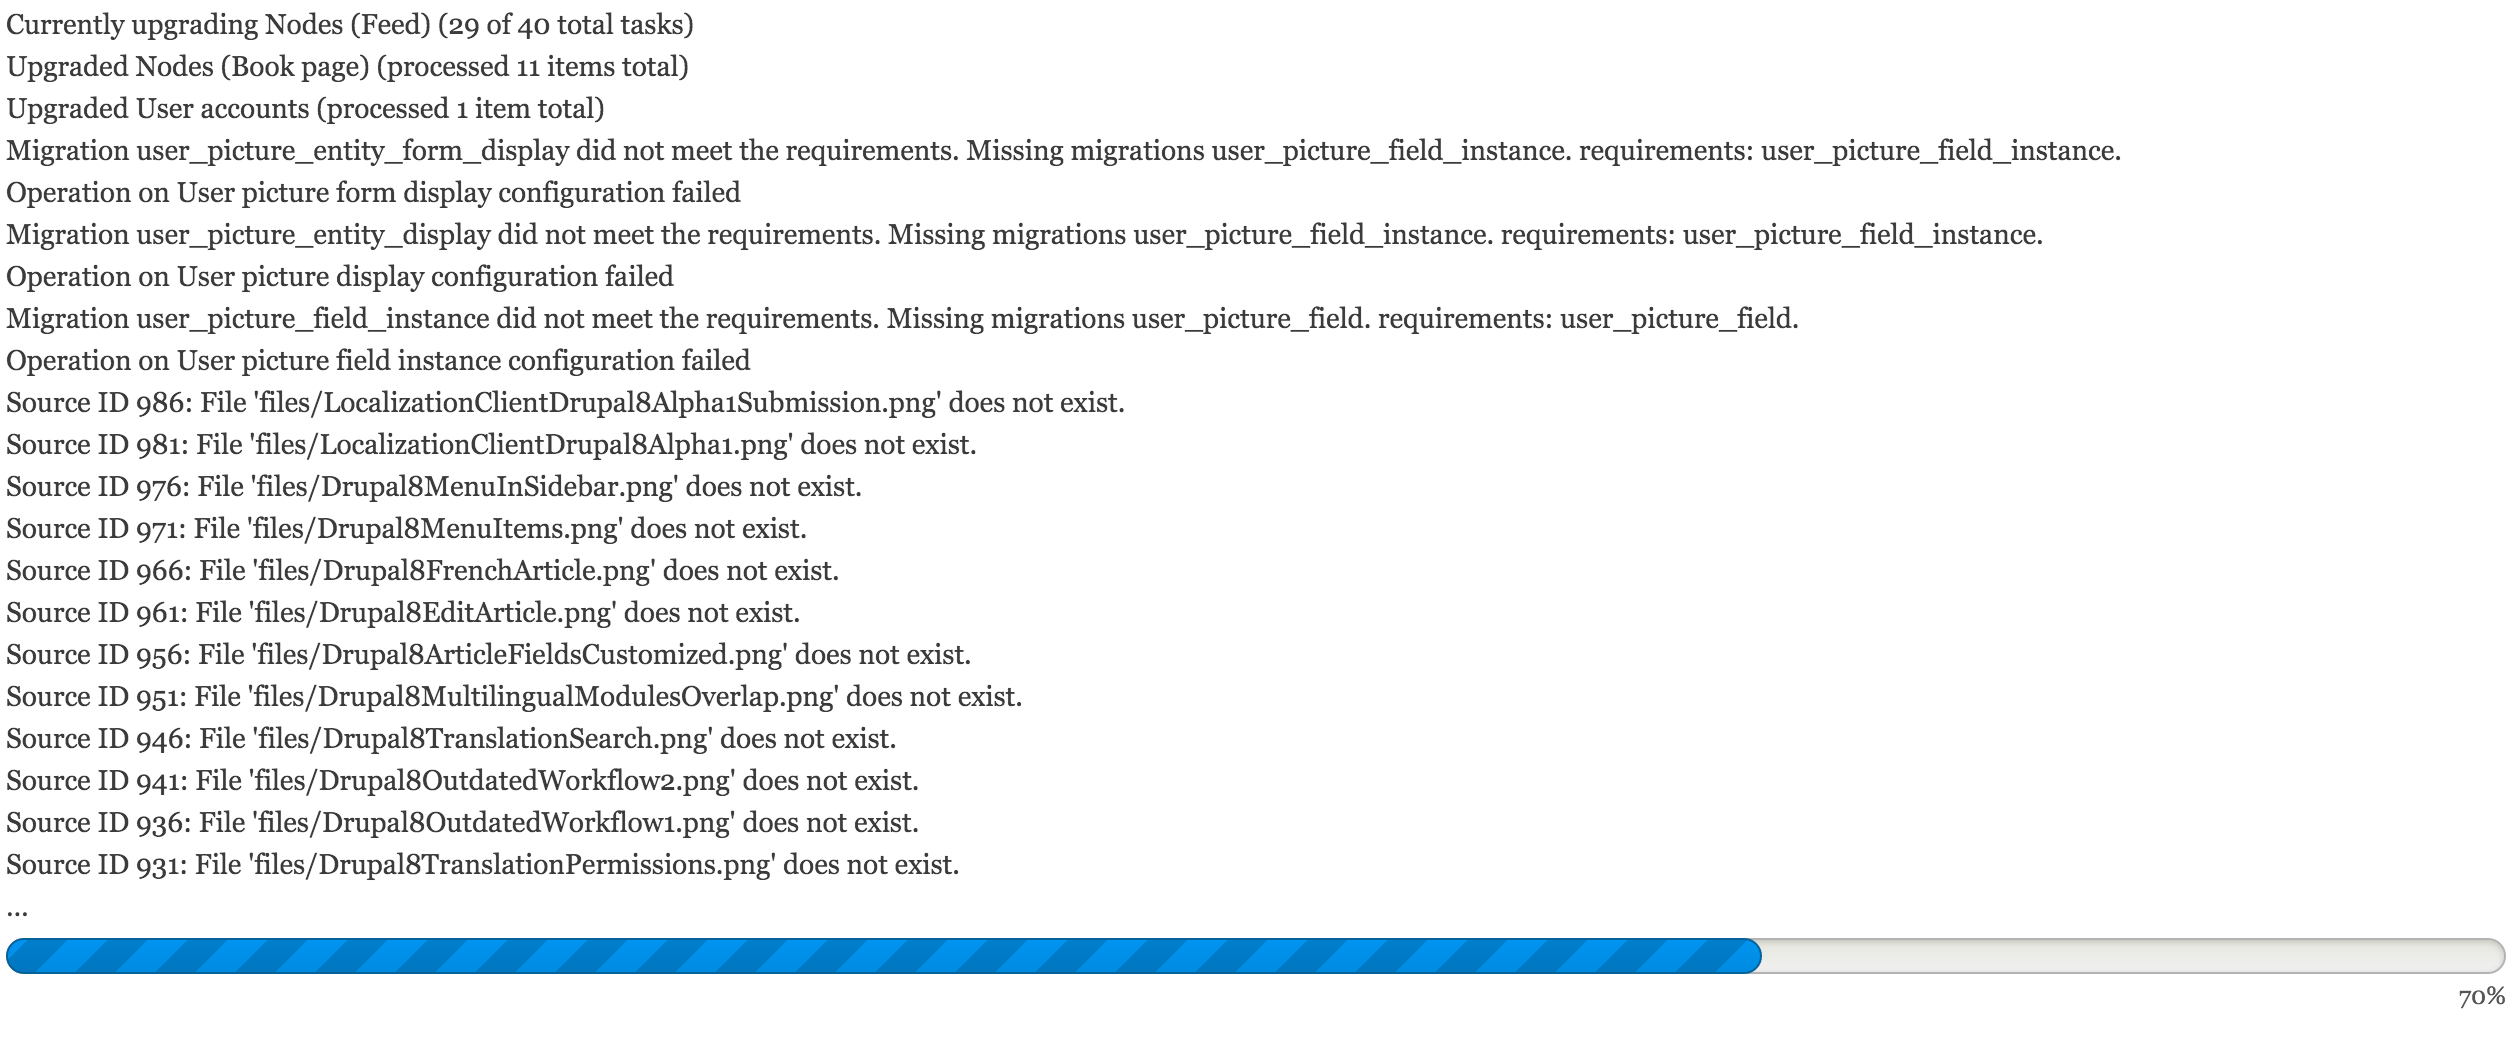
Depending on the size and types of content/configuration on the source site, the upgrade may take a very long time (possibly hours for a bigger data set). Due to password encryption, user accounts take particularly long to import. Continuous feedback is provided along the way with both progress information and errors encountered:

New messages show up at the top of the page, while old ones disappear at the bottom as the process goes on.
Review the migration logs
All of these messages shown during the upgrade can be reviewed later. Once the process is finished, you are directed to the site's frontpage with messages summarizing the results:

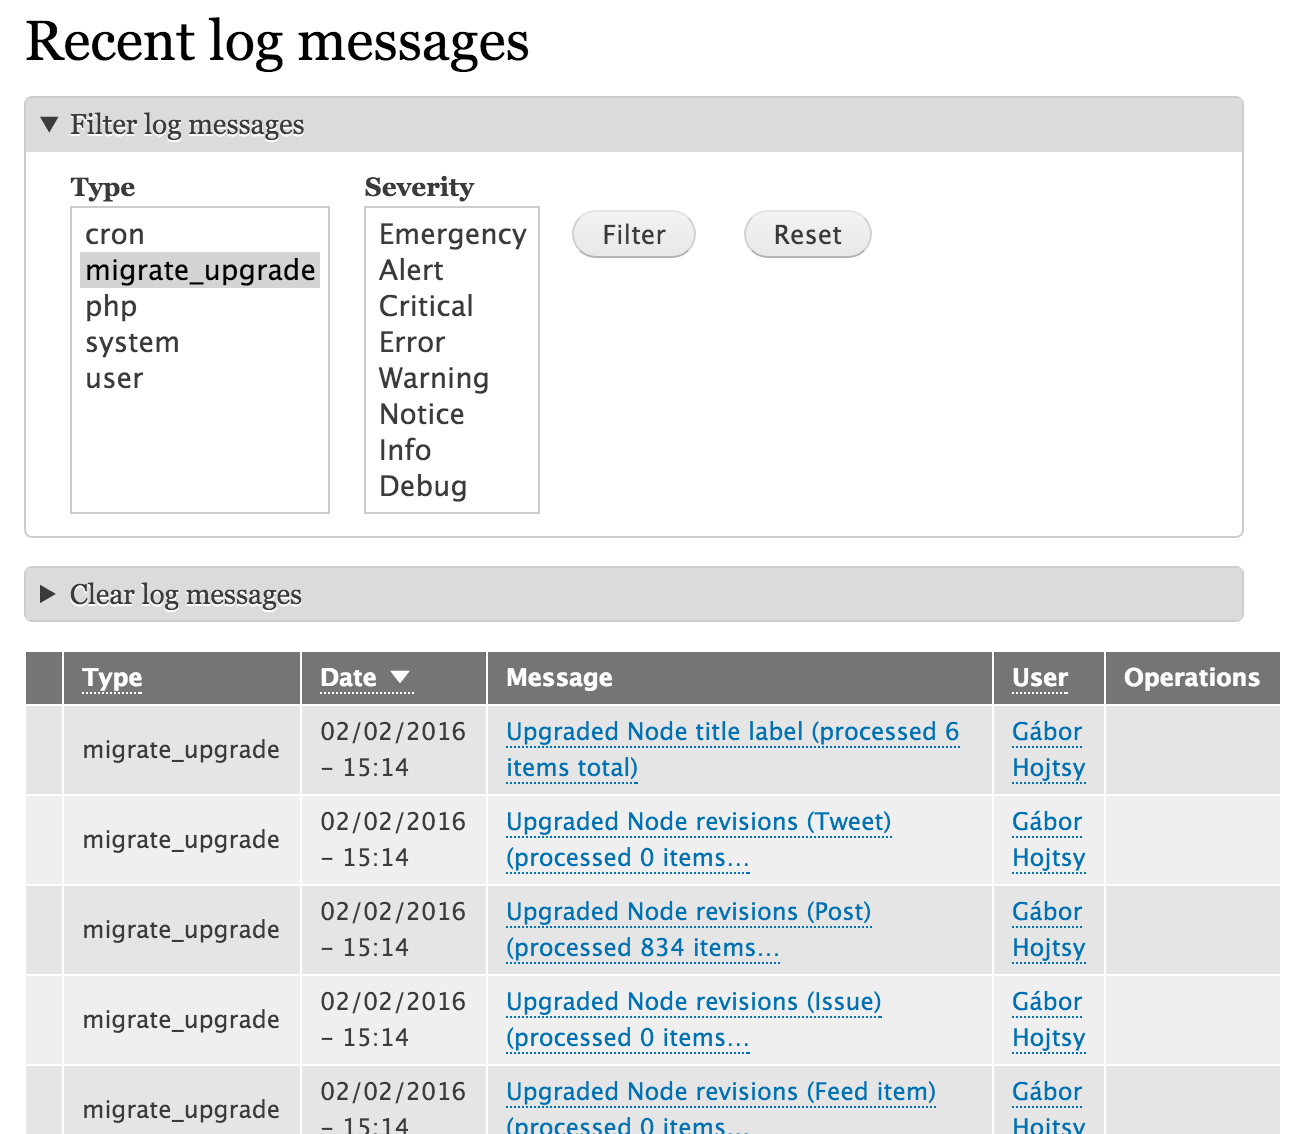
Here you have a chance to review the messages that were logged and inspect any errors found. The module uses the built-in logging system of Drupal, so in a default setup you can just review the logs stored in the database, which is where the link leads to:

You can filter the list of messages to show notices (used for positive feedback) or errors (used for reporting problems found in the migration). If something breaks, you've either found a bug (in which case, check the issue queue or contact the Migration team) or your data set is too large (in which case, try running the upgrade with Drush).
Extract error messages with Drush
You can extract all error messages to a file with this Drush command, for easier browsing and searching. To include warnings, use --severity-min=4, or exclude that line for all messages:
drush watchdog:show \
--type=migrate_drupal_ui \
--fields=message \
--format=yaml \
--count=100000000 \
--severity-min=3 \
--extended
Set default values in settings.php for the Migrate Drupal UI, /upgrade
When using the UI you must enter the database credentials for the source database and, if you are migrating files, the path to the public and private files.
These values can be set in settings.php so they do not need to be re-entered every time you perform an upgrade.
$settings['migrate_source_connection'] = '';
$settings['migrate_source_version'] = '';
$settings['migrate_file_public_path'] = '';
$settings['migrate_file_private_path'] = '';
where
- migrate_source_version - The version of the source database. This can be '6' or '7'. Defaults to '7'.
- migrate_source_connection - The key in the $databases array for the source site database.
- migrate_file_public_path - The location of the source Drupal 6 or Drupal 7 public files. This can be a local file directory containing the source Drupal 6 or Drupal 7 site (e.g /var/www/docroot), or the site address (e.g http://example.com).
- migrate_file_private_path - The location of the source Drupal 7 private files. This can be a local file directory containing the source Drupal 7 site (e.g /var/www/docroot), or empty to use the same value as Public files directory.
See change log record Set default values in settings.php for the Migrate Drupal UI, /upgrade.
Example values for DDEV
Assuming that your Drupal 7 site DDEV URL is drupal7.ddev.site the values could be something like this:
$settings['migrate_source_connection'] = 'migrate';
$settings['migrate_source_version'] = '7';
$settings['migrate_file_public_path'] = 'http://ddev-drupal7-web';
$settings['migrate_file_private_path'] = '';

$databases['migrate']['default'] = [
 'database' => 'db',
 'username' => 'db',
 'password' => 'db',
 'host' => 'ddev-drupal7-db',
 'port' => '3306',
 'driver' => 'mysql',
 'prefix' => '',
];
Help improve this page
You can:
- Log in, click Edit, and edit this page
- Log in, click Discuss, update the Page status value, and suggest an improvement
- Log in and create a Documentation issue with your suggestion
