 Come together with the global Drupal community in Rotterdam, 28 Sept – 1 Oct 2026. Sessions, contribution, connection, and Early Bird savings until 8 June.
On this page
- Views Tree with Taxonomy Terms
- Creating Taxonomy Terms
- Creating the View
- Views Tree with Book module (to create book table of content - TOC)
- Creating Book pages
- Creating the View
- Showing just one book
- Views Tree with Relation Module
- Setting up references
- Creating the View
- Views Tree with References Module
- Setting up a Content Type
- Creating the View
- Views Tree with Entity Reference Module
- Setting up references
- Creating the View
- Views Tree with Organic Groups
- Creating the View
Views Tree
Views Tree allows for the rendering of hierarchical relationships between entities or users as displayed in a View. The module simply adds a display format for Views titled 'Views Tree (adjacency model)'.
Views Tree with Taxonomy Terms
Creating Taxonomy Terms
Create some Taxonomy terms with parent/child (hierarchical) relationships.
Creating the View
First, create a new term view using the fields row style / unformatted list of fields (it is important that the tree style not be chosen now). Then:
- Add relationship for taxonomy term: parent term
- Add field term id (do not use relationship) and exclude it from display
- Add field term id with relationship, exclude from display
- Add any fields you want to display, like term name, term description, etc...
- Change style / format plugin to Tree (Adjacency model)
- Set Main field to Term ID
- Set Parent field to Term ID with parent relationship
(These instructions are taken from #1424414-6: How to configure for D7 Profiles/Taxonomy terms.)
Views Tree with Book module (to create book table of content - TOC)
Creating Book pages
Create a book and add some pages with parent/child (hierarchical) relationships.
Optionally, you can use the Outline Designer module to organize your book pages.
Creating the View
First, create a new view of your book content using the fields row style / unformatted list of fields (it is important that the tree style not be chosen now). No need for sorting but you can choose to output as a block.
Then:
- Add relationship for Book: Parent
- Add field Node ID (do not use relationship) and exclude it from display
- Add field Node ID with relationship, exclude from display
- Add title field (do not use relationship)
- Change style / format plugin to Tree (Adjacency model)
- Set Main field to Node ID
- Set Parent field to Node ID with parent relationship
Be aware that tree structure is not displayed in view preview.
Finally, you can set the block to be displayed on sidebar of every book content type so you have a nice hierarchical table of content where, not bad at all, current page is highlighted.
(These instructions are taken from above example using taxonomy terms.)
Showing just one book
The instructions above will show all books. You can limit the view to show
just one book, if you want.
-
Add a relationship from nodes to their book's top-level node
- Click the Add relationship button (under Advanced settings)
-
Add the Top level book relationship:
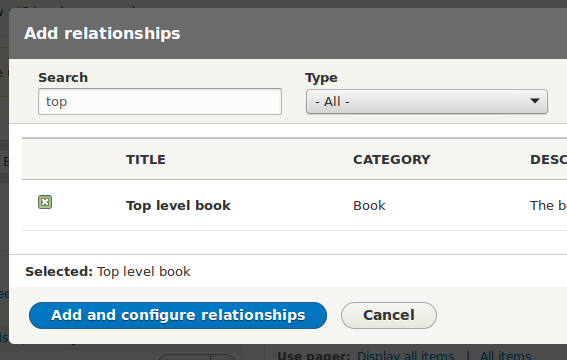
- You don't have to change the relationship's default configuration.
-
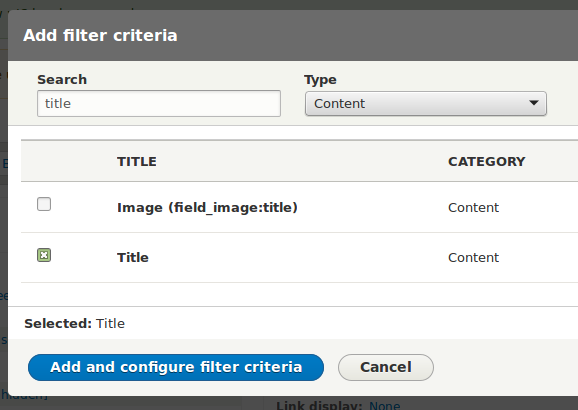
Add a criterion using the relationship
- Click the Add criteria button.
-
Choose the Title field from the Content category:
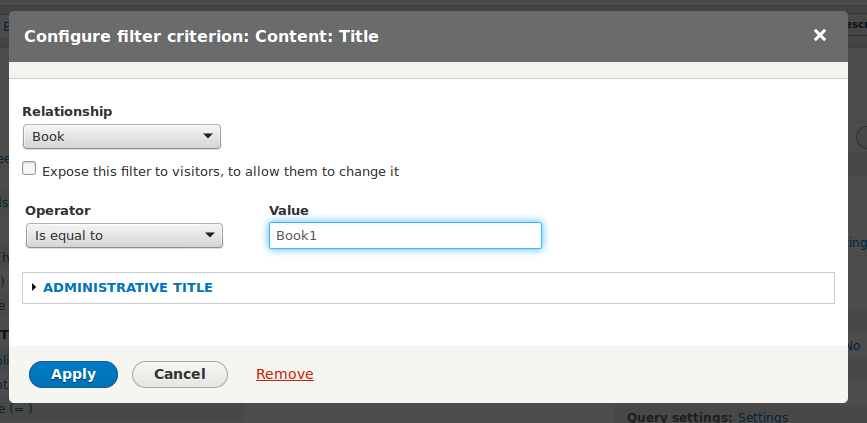
-
Configure the criterion to use your new relationship, and
the title of the book you want to show. That will be the
title of the book's root node.
Views Tree with Relation Module
Setting up references
Using the Relation module, add some entity items, and set them to reference each other.
Creating the View
- Create your view and add your relationships to the view (you will need to add a relationship [view relationship] from your bottom level node to the relation [built using the relation module] AND another relationship [view relationship] from the relation [relation module] to the node [being the next node on the hierarchy].
- Add a node id for the base level node (don't use a relationship).
- Add a node id for the next node up in the hierarchy (use a relationship for this one - the relation set up in the relation module) - call this one pnid (or parent node id).
- Hide the node ids from display.
- Change the display to Views Tree (Adjacency model) and set the Main field to
nidand the Parent field topnid.
(These instructions are taken from #1911510-1: Support for the Relation Module.)
Views Tree with References Module
Setting up a Content Type
- Using the References module, add a node/user reference field to one of your entity types.
- Make some content that references other content.
Creating the View
- Create a new view with a display using Views Tree (Adjacency model).
- Configure the view:
- Add a relationship:
- The relationship field you have on your entity (in my case, Parent Page).
- Add the following fields:
- Node: title
- Node: nid (this will be the unique record for the row).
- Node: nid (set this second one to use the relationship you defined earlier. It’s also a good idea to set an administrative name under ‘More’ distinguish it from the other ‘Node: nid’.
- (Set "nid" fields to be Excluded from display).
- Set up settings for the Views Tree format:
- Main field == nid.
- Parent field == Parent/reference nid.
- Profit!
Views Tree with Entity Reference Module
Setting up references
Using the Entity Reference module, add some entity items, and set them to reference each other.
Creating the View
- Create a new View using the Fields row style and configure the Filter criteria i.e. Content Type.
- Add the desirable fields i.e. Node ID, Node Title, and the Node Reference field and configure their display.
- Set the View's format to "Tree (Adjacency model)" and set linking fields titled Main and Parent accordingly.
In this example the Main field would be the Node Id and the Parent field the Node Reference field.
Generally, you will want to link from a nodereference field to the nid on the same node type. That is, the nodereference field is used as a pointer to the "parent" node. - Save and enjoy.
Note: When using the preview in Views (D7) the result seems like a flat list with no hierarchy but that is a CSS issue of the admin theme. If you set the list type to an 'ordered' list in Format Settings the preview works fine.
TODO: Add documentation for this process—see #1719206: Test with Entity Reference, add to documentation/readme/project page.
Views Tree with Organic Groups
Creating the View
- Create a new View using the Fields row style and configure the Filter criteria i.e. Organic Group Content Type(s).
- Create relationship: OG membership: OG membership from Node
- Create new relationship: OG membership: Group Node from OG membership using OG membership from Node
- Create a field: Content: Nid (Group Nid)
- Create a new field: Content: Nid (Parent Nid) using the relationship Group Node from OG membership
- Set the View's format to "Tree (Adjacency model)"
- Update the views format settings:
- Main field: Group Nid
- Parent field: Parent Nid
Help improve this page
You can:
- Log in, click Edit, and edit this page
- Log in, click Discuss, update the Page status value, and suggest an improvement
- Log in and create a Documentation issue with your suggestion
