Synchronizing Fields Between Project and Show
Sharing Fields Between Project and Show
Community Media Project is used by Community Media organizations to group users, shows, and reservations. It is dependent upon and makes heavy use of the Organic Groups module, multiple users can submit shows or make reservations associated to the same Project.
The Project module defines very little allowing each organization using it to add and remove fields as they need to for their workflow. Projects can be as simple as just a title and used only for grouping users and other content. Projects can also include dozens of fields and replace paper "project proposal" forms. Projects can be published with a public URL that drives traffic to the organization's website or only used behind the scenes by staff and producers.
It's up to each Community Media organization to configure Project to meet their needs and adjust the configuration as those needs change.
The first thing a station needs to determine is whether or not this module is something of use to you. Ask yourself the following questions:
- Do I have multiple shows that are part of the same series ("series" in this case would be synonymous to "project")
- Do we want to collect information from our producers that could apply to multiple shows? For example, let's say you have a project called "Geography of Vermont." In this project there are five 30-minute shows. All the shows have the same Executive Producer, the same general 30-minute length, and all of them are about geography. Instead of collecting this information 5 times from the EP, we could collect it once for the overall project.
- Do we want to someday connect equipment reservation to a project?
- Do we want to allow community members to subscribe to any updates about this project (or the shows in it)?
If you answered yes to any of the above, you could benefit from using Community Media Project.
The Community Media Project module is dependent on Organic Groups. Therefore, you must first install and enable Organic Groups.
Please note that at the time of this posting, Community Media Project is only compatible with Organic Groups versions 7.x-2-x.
1. Download and unpack the latest stable release of OG into your sites/all/modules folder.
2. Browse to Modules and locate the Organic Groups section.
3. If it is not possible to turn on the very top Organic Groups module, look to see if it requires any modules you do not currently have installed. In the below screenshot, the Entity module needs to be installed before Organic Groups can be turned on.
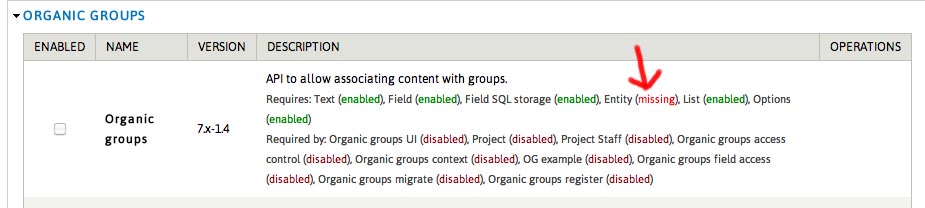
In this case, I need to download the Entity module and install it first.
After you have installed OG's dependent modules, you should be able to turn it on. Specifically, enable the following modules:
Organic Groups
Organic Groups Context
Organic Groups UI
Depending on your needs, you may want to enable other OG-related modules. Read their descriptions carefully, and always experiment on a test server if you have one available. There is also OG documentation and tutorials that you can read here.
You may be prompted to enable other modules that OG depends on, click "Continue" at this prompt.
4. Now you can enable the Project module from the Modules page. Once enabled set all necessary Permissions. Permissions can be set at the Module and group level. At the group level you can create roles and set permissions for people who become members of your group.
1. Now that the Community Media Project module is installed, the first thing you want to do is set it up to work properly with Organic Groups.
With Organic Groups installed, any type of content can be configured to be a "group," which then allows you to add people to it (for subscriptions, or for equipment reservations -- this will be discussed in the Reservations section of this handbook), organize other content within the group (such as shows), and various other helpful tasks. Therefore, we want our "project" content type to be associated as a group content type.
Browse to Structure > Content Types and click "Edit" next to the "Project" content type. Scroll down the page and you will notice just above the "Save Content Type" button there is a settings tab called "Group." In this area under the first "Group" options there are two choices:
- Not a group type (currently selected)
- Group type
Choose "Group type" so that our projects can automatically be their own groups.
Click "Save Content Type" at the bottom of the page.
2. Now you are ready to add any additional fields to the project content type. You might want every project to have a description associated with it for example.
Browse to Structure > Content Types and click "Manage Fields" next to the "Project" content type and add any additional fields you desire.
To learn more about adding, editing, and managing fields in Drupal you can read the following documentation:
Working with Content Types and Fields in Drupal 7
Adding Fields to a Content Type
If you're upgrading from OG 7.x-1, you'll notice the machine name is no longer group_audience, it's now group_group.
Tip
If you’re migrating from OG 1 to OG 2, when you attempt to configure your OG permissions, the check boxes might be missing. For the check boxes to appear you will need to reserve at least one Project for the UI to start working. See View issue comment for more information
Sharing Fields Between Project and Show

Drupal is a registered trademark of Dries Buytaert.
