On this page
- Grouping view fields
- Rewriting view fields
- Exposed settings
- Settings for exposed filters
- Settings for exposed sort criteria and pagers
- Exposed settings in blocks, and further settings
- Contextual filters
- Configuring contextual filters
- Managing missing filter values
- Contextual filters and paths
- Creating menu tabs
- Menu tab
- Default menu tab
- Relationships
- Adding relationships
- Utilizing relationships in configuration
- Other Views settings
- Example implementations of advanced Views configuration
- List articles, grouped by month
- Tabs with the editor's own posts
- Exercises: documentation site
- Customized search page
- How to demo
- Preparation
- Suggested solution
- Comments
- List a user's content on a user page tab
- How to demo
- Preparation
- Suggested solution
- Comments
- Table with a collection's documentation pages
- How to demo
- Preparation
- Suggested solution
- Comments
- List user’s comments on a user page tab
- How to demo
- Preparation
- Suggested solution
- Comments
- Exercises: News site
- Display fact boxes
- How to demo
- Preparation
- Comment
- More articles in the same section
- How to demo
- Preparation
- Recent comments, grouped by section
- How to demo
- Preparation
10: Advanced Views configuration
Drupal 7 will no longer be supported after January 5, 2025. Learn more and find resources for Drupal 7 sites
There are many ways of describing what Drupal is. One of the better ones is: Drupal is a tool for making easy things difficult, and difficult things easy.
This statement is particularly true for Views. While it may take thirty minutes or sometimes several hours to create a simple list, just a handful of extra clicks may transform the list into an image slideshow, a sortable table or a customized search page.
The difficult part is to know where these handful of clicks should be made. This chapter presents some of the more complex and powerful functions in Views.
The initial version of this section of the Community Documentation came from the book Drupal 7: The Essentials, courtesy of NodeOne and Johan Falk.
Grouping view fields
The sub settings for view formats contains an optional grouping field. (See figure 10.1) This allows you to select a view field used to group all results before they are sorted – all results with the same value in the view field will be grouped together, using the view field as header for the group. (See figure 10.2 for an example.) Grouping of view fields may for example be useful for displaying all comments on your site, grouped by the day they were written.
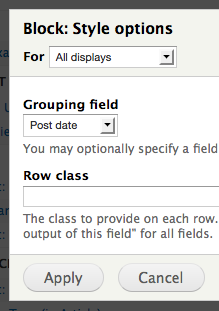
Figure 10.1: You can choose to group your view results according to (at most) one view field.
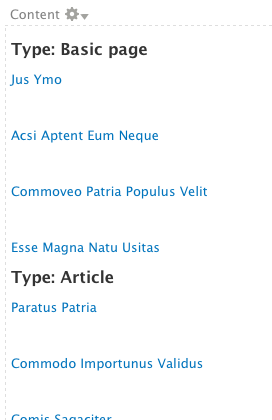
Figure 10.2: Grouped lists get sub headers, based on the selected view field. (In this case the content type.)
TIP: If you don't want the view field used for grouping to appear inside the actual list, you can use the exclude from display setting in the view field configuration.
Rewriting view fields
You sometimes find yourself in situations where view fields contain data that you want to show in the view, but it doesn't quite fit your needs. You have the author name, but you would like it to say written by James Joyce rather than just James Joyce. In these situations you can use the option rewrite the output of this field and also output this field as a link. Both of these options are revealed when clicking the rewrite results option when configuring view fields. (See figure 10.3) The options allow you to take control of the text (or otherwise) shown in the view field and any link that Views creates from the view field.
An important feature is that you may use all view field so far loaded by Views as variables when rewriting your field. For example, you could include a user ID when building a link, or a node title when setting a link tooltip. The rewrite settings in the view field configuration contain a list of available variables.
TIP: The option to output a field as a link only works for affecting links created by views (such as the link this field to the original piece of content setting) – not if the view field itself contains the link (such as image fields rendered as links to a node).
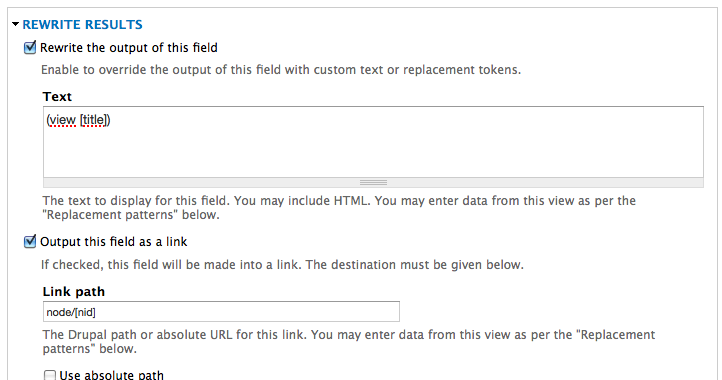
Figure 10.3: You can rewrite text and links in view fields, and even include data from other view fields in the rewriting.
Exposed settings
Views can expose a number of settings to end users, allowing them to adjust settings as desired. The settings that can be exposed are filters, sorting, and pagers. For example, the settings can be used to build a comment list displaying only comments written by an entered user; a node list that lets users search for words in the node title; a list where users select the number of results to be displayed on each page; or a list that can be sorted either by most recent or by most popular content. (See figure 10.4)
Filters are exposed by checking the option expose this filter to visitors, to allow them to change it, in the filter configuration dialogue. Sort criteria and pagers have similar options.
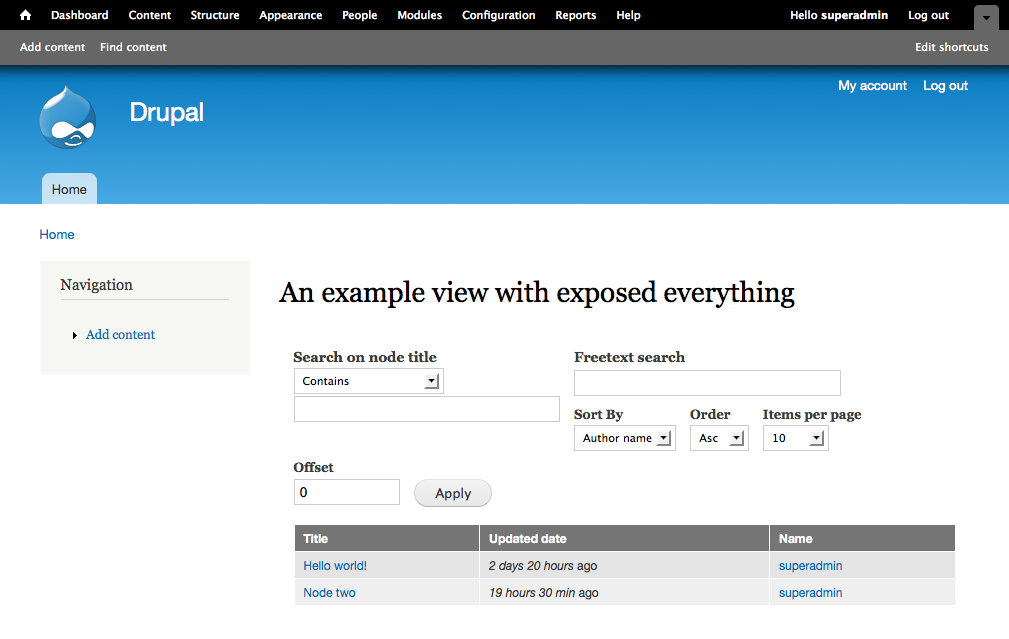
Figure 10.4: An example view with a lot of exposed settings – filters, sorting and pager.
Settings for exposed filters
When exposing a filter, a number of new settings become available. (See figure 10.5.) The most important ones are:
- Label: This text will be shown at the input box for the exposed filter, prompting users to enter something.
- Expose operator: This option allows you to expose the operator for the filter, not only the filtering value.
- Remember the last selection: This setting allows storing the parameter values for the exposed settings in the user's session cookie for the site, instead of passing them in the URL.
If a filter value is entered into the filter configuration, it will be used as the default value in the exposed filter (unless other settings say otherwise).
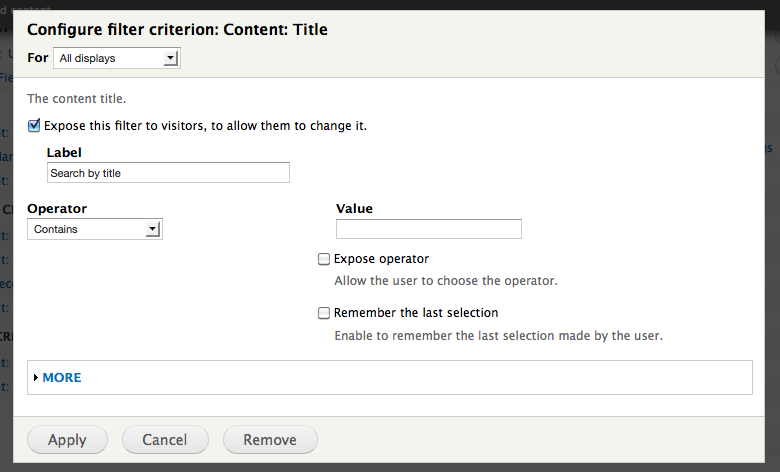
Figure 10.5: Exposed filters have a number of new settings, such as the label to be used for the exposed filter.
TIP: With the Search module enabled (which is the case in a standard Drupal installation), a filter option search: search terms is available. It can be used as an exposed filter to get the same search results as Drupal's built-in search. Using Views to build search pages drastically increases the possibilities for customizing search filtering and display.
Settings for exposed sort criteria and pagers
When sort criteria are exposed, you may choose custom labels for the sort fields. For example, the data field user: name could have the label author or user when presented to the visitor. End users can choose which of the exposed sort criteria to use and can select either an ascending or descending sort order.
The exposed settings for pagers include how many results should be displayed per page, and, optionally, an offset. You may include or exclude the option to display all results on one page.
Exposed settings in blocks, and further settings
The Views main configuration panel contains two further settings for exposed settings, under the advanced section.
They allow the following options:
- Exposed form in block: This option moves the exposed settings from the view header to a completely separate block. Placing exposed search filters in a block on your site may serve as a customized search box. The block must be placed in a region to be visible.
- Exposed form style: This allows you to set whether end users are required to set exposed filter values, or if all fields may be empty. Sub settings allow you to set the text displayed to the end users on things such as the button to execute the settings. (See figure 10.6)

Figure 10.6: You can customize the text strings displayed on the exposed settings.
TIP: Moving exposed settings to a block normally only works if the view has a page display. Otherwise Views doesn't know to which path end users should be redirected when using the exposed settings.
Contextual filters
Views is a highly flexible module to start with, but the contextual filters increase the use cases for the module by an order of magnitude. Contextual filters work similarly to regular filters, but there is one important difference. Instead of setting a filter value manually, the value is fetched from variables sent programmatically to the view. A regular filter could give you all nodes written by a specified user. A contextual filter for a node author would be able to display all nodes written by the currently viewed user, or the same user who wrote the currently viewed node. The concept is that contextual filters prepare a view for filtering, but the filter value is not yet determined. When the view is eventually called, it is also provided with data used to complete the contextual filters.
The classic example of how contextual filter values are provided to views is by the view path. If a view has the path example.com/my-view, the URL example.com/my-view/story/22 will call the view along with two values for contextual filters (in this case story and 22). But there are more ways of providing contextual filter values. These are discussed in Chapter about Page manager and Panels.
The difference between standard filters and contextual filters may seem trivial, but in practice it is huge. Contextual filters allow you to reuse views in many different situations and allow Views to interact with other parts of the website. One could write an entire book about how to use contextual filters in Views.
TIP1: Until recently, contextual filters were called arguments in Views, and much documentation and many tutorials and Views-compatible modules still use that term. If you see the term argument, it should be interpreted either as a contextual filter, or the value provided to a contextual filter.
TIP2: the standard functionality of contextual filters may be extended to accept filter ranges, such as example.com/my-view/story/21--100 by installing the Views Contextual Range Filter module.
TIP3: you can configure both an (exposed) regular filter and a contextual filter for the same field in your view, but the result may not be what you expect. For a description of the issue and a solution, see the Views Filter Harmonizer project page.
Configuring contextual filters
Contextual filters are added and managed in the advanced section in the Views main configuration panel. They generally follow the same patterns as filters, but have a number of settings that normal filters lack. (See figure 10.7) Take a deep breath:
- When the filter value is not in the URL: This setting determines the view behavior, if there is no value for the contextual filter. This is an essential setting when using contextual filters in block displays.
- Override title: This setting is used to alter the view's title, if there is a contextual filter value present. You may use variables in the form %1, %2, and so on, to include the first, or second filter values in the title (and so on). If there is any title element associated with the filter value, such as a node title for node IDs or user names for user IDs, the title element will be used - but only if the contextual filter is validated (see "Specify validation criteria" below). A typical use case is the title articles written by %1.
- Override breadcrumb: This setting allows you to set the breadcrumb to use when a filter value is present – or default to using the view title. The breadcrumb will lead to the view without this contextual filter value and the view must have a valid response to this.
- Specify validation criteria: Since you cannot limit what users may input as contextual filter values in the path, there may be reasons to verify that the filter value corresponds to what you expect. This setting allows you to validate the filter value in a number of ways. It also determines the view behavior if the validation fails. A typical example is to only allow filter values that are node IDs for selected node types.
- More/allow multiple values: This setting allows several values for the contextual filter. Values separated by commas are interpreted by Views as AND conditions. Values separated by plus signs are interpreted as OR conditions. A typical example is allowing several taxonomy term IDs to display all content marked with any of the terms.
- More/exclude: This setting inverts the filtering. The rows matching the filter criteria will be excluded rather than included. A typical example is applying this to a node ID filter to exclude the node currently viewed from a list of similar content.
- Reduce duplicates: When filtering on several criteria, Views may end up repeating some of the results (if they meet more than one condition). This option reduces any duplicates, but makes the database query heavier. A typical example is reducing duplicates occurring when filtering on multiple taxonomy terms.
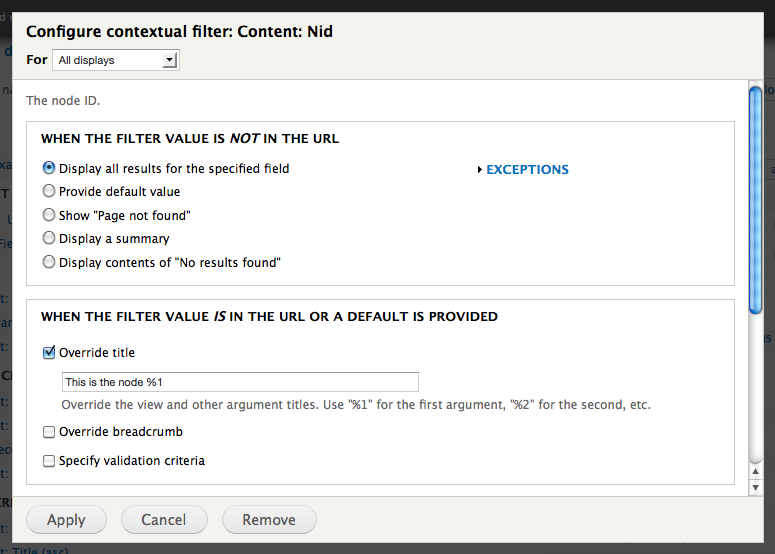
Figure 10.7: The settings available for contextual filters vary between different data fields. This is the settings for content: nid.
It is worth pointing out that contextual filters lack some of the settings available for normal filters:
- There is no functionality for grouping contextual filters in OR or AND groups.
- There are no options for selecting which operator should be used with contextual filters (save the exclude option). All default to is equal to.
TIP: There is a data field unique to contextual filters – global: null. It is used to have the view accept filter values without altering the database question created by Views. The null contextual filter may still alter the title or breadcrumb of a view and validate the input.
Managing missing filter values
It often happens, even deliberately, that views with contextual filters are called without the data to set the contextual filter values. This is particularly true for block displays, which without any paths don't have a natural way of receiving contextual filter values.
You can configure each contextual filter to set how the view should react if the filter value is missing. (See figure 10.8). The options are:
- Display all results for the specified field: This will ignore the contextual filter all together.
- Provide default value: This is used to fetch/create an artificial filter value, should a real one be missing.
- Show ”Page not found”: This hides the view.
- Display a summary: This alters the view, having it display a list of all filter values that would lead to results in the view, linked to the view with each contextual filter value present. The list may be configured in a number of ways, for example to display the number of results for each filter value or displaying a jump menu rather than an HTML list.
- Display content of ”No results found”: This gives the same result as when the view has no results to display.
The functions for creating or fetching default values for contextual filters are used rather frequently, especially for block displays, and there are a numbers of options available to do this. These options may vary between different data fields, but the most common ones are:
- Fixed value: This gives a static value, provided by you when the view is built.
- Content ID from URL: This is used to fetch a node ID from the current path, assuming it contains a node ID.
- PHP code: This allows a manually entered PHP script, with access to local data, to build a default filter value. Having PHP code in the configuration is bad for a number of reasons (such as security and performance), but it may be useful during prototyping.
- Taxonomy Term ID from URL: This is used to fetch a term ID from the current path. You may optionally fetch term IDs from a currently viewed node and limit the terms to selected vocabularies.
- User ID from URL: This is used to fetch a user ID from the current path and, optionally, the user ID for the author of the currently viewed node.
- User ID from logged in user: This fetches the user ID from the active user.
- For contextual filters for date and time fields there are some settings available to fetch current date and time, or time values from a currently viewed node.
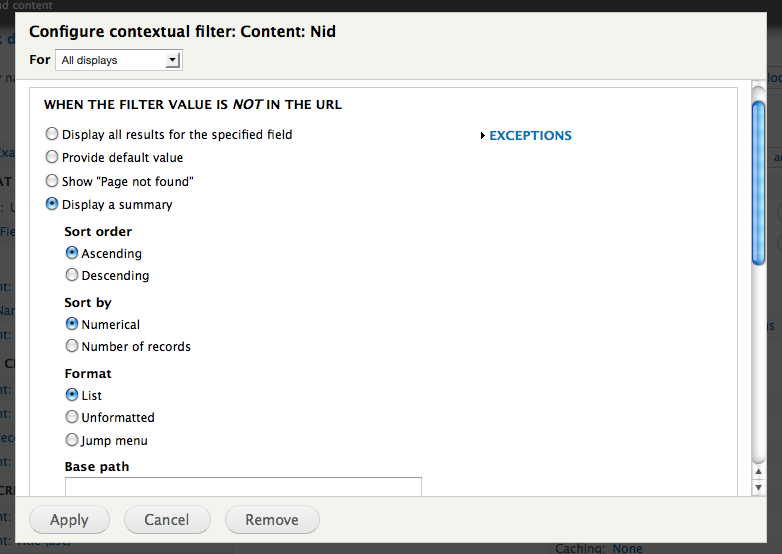
Figure 10.8: A view may react in a number of different ways, if a value for a contextual filter is missing. Possible reactions include displaying a summary of possible filter values, or having the view generate a value by itself.
Contextual filters and paths
The normal way a view gets values for contextual filters is by the view path. The easiest way of doing this is to append filter values to the path, separated by slashes. It is also possible to have contextual filter values within a path. This is done by using a percent sign where the view expects a contextual filter value in the path of the view (for example user/%/comments).
Having contextual filter values inside paths is particularly useful when creating menu tabs, which is the subject of the next section.
Creating menu tabs
Page displays have settings for creating menu items, found in the group page settings. The options no menu entry and normal menu entry are rather self-explanatory, but there are two more options that require some explanation.
Menu tab
The first of the more obscure options is menu tab. (See figure 10.9) Menu items of this kind will be visible as tabs on a given path, here called the tab's main page, rather than being displayed as normal menu items. Two requirements must be met to use menu tabs:
- The path to the menu tab must be the same as the tab's main page, but one step deeper. If you want a tab to show up on example.com/main-page, the path to the menu tab could be example.com/main-page/my-tab.
- There must be at least two (accessible) tabs on the main page. If there is only one tab present, it will be hidden by Drupal to avoid displaying tabs unnecessarily.
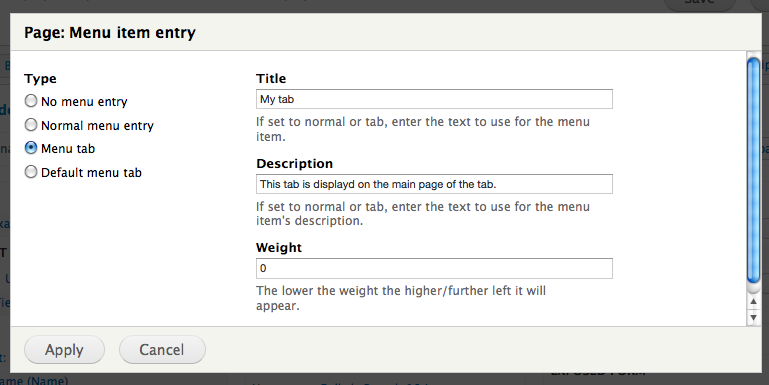
Figure 10.9: The menu option menu tab makes it easy to add new tabs to the pages on your website.
TIP: Menu tabs are efficient ways of extending existing pages on your Drupal site. A view with the path node/%/related could be added as a tab to all node pages with a few clicks.
TIP: It is likely that another option for menu links will become availble soon, local action. Menu items of this kind are similar to menu tabs in how they are set up, but are displayed as links at the top of pages, in the same way as the add new view link on the Views overview page.
Default menu tab
The second somewhat mysterious option is default menu tab. Creating default menu tabs is similar to creating regular menu tabs, but at the same time you are creating the main page for the tab. (This should only be used if there is not already a main page available.)
If the path to a page display is example.com/my-view/default-tab, a default menu tab will make the view accessible from both example.com/my-view/default-tab (the tab page) and example.com/my-view (the main page).
When configuring a default menu tab, you are also prompted to set which kind of menu item the main page should use.
Note: This section should be complemented with descriptions of the new fancy menu option "contextual link".
Relationships
The last group of Views settings presented in this book is relationships. Relationships are used to allow Views to bring in data that is associated with the data already available in the view. A comment view could, for example, use the relationship comment: content to tap into data about the node for each comment. A term view could use the relationship taxonomy: parent term to tap into data from the parent term of each listed term.
TIP: People comfortable with writing SQL queries will recognize the relationships as joins.
Adding relationships
You add, edit and delete relationships in the same way as filter, view fields and sort criteria by using the add button and its related menu. (See figures 10.10 and 10.11) The settings for relationships are:
- Identifier: This is the name that will be used for the relationship within the Views administration interface.
- Require this relationship: Checking this option will make the view exclude items where this relationships cannot be fulfilled. For the relationship taxonomy: parent term, for example, it would mean that terms without parent terms would be excluded.

Figure 10.10: The number of available relationships in a view is often less than the filters or view fields.
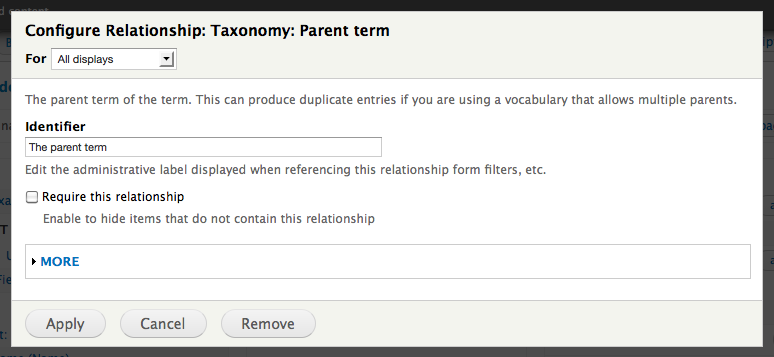
Figure 10.11: Each relation gets a label, used internally in the view configuration.
TIP: Relationships are powerful tools, but if used carelessly they may slow your site.
Utilizing relationships in configuration
A view with relationships will, for each result in the view, not only have data for the base object of the view, but also for the objects described by the relationships. When editing the configuration of data fields there is (where applicable) an option relationships in the fieldset more. This setting can be used to select which object should be used for this data field. (See figure 10.12) This means that in a comment view utilizing the comment: content relationship, you can choose to filter on node type. If you are including the relationship comment: user you could sort the results by the name of the user writing the comment.
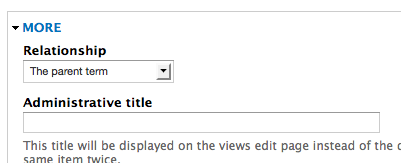
Figure 10.12: Data fields can be tied to the base object of the view, or to any of the objects provided by relationships.
TIP: When creating a view you select the base table for the view, comments, users, nodes, etc, to decide what will be the view's base objects. Some functionality in Views always acts on the base object, ignoring all relationships. An example of this is the distinct option, hidden under query settings in the advanced section.
TIP: If you use the Entity reference, References and Relation modules to connect entities on your site, these connections will show up as relationships in Views.
Other Views settings
This is the longest chapter in the book, and it was preceded by another whole chapter about Views. Despite this, there are some more aspects of Views that a well-trained Drupal developer should know.
This section should be updated with a description of the aggregation settings.
- There is some new functionality in Views allowing grouping directly in the database query generated by Views. The settings are enabled by the option use grouping in the advanced section. Once enabled, a number of data fields may be used for grouping operations. The functionality is not fully developed, and it is not clear how it will work. But it will make it possible to sort nodes by the number of comments, or taxonomy terms by how many nodes are marked with each term.
- At the toolbar, Structure, Views is a settings tab revealing a number of global Views settings. The two sub tabs basic and advanced contain options that are useful to see how different views affect your site's performance, or if you discover that the string <Any> can't be translated with Drupal's normal translation tools.
That's it.
Example implementations of advanced Views configuration
This section contains examples of how the concepts and functionalities in this chapter may be used. You can find more examples in the exercises.
List articles, grouped by month
As visitor on a blog site I want a list of old blog posts grouped by month, such as February 2011, January 2011, December 2010, and so on. This is important since it helps me find old blog posts I want to read again.
The functionality above can be achieved by the following steps:
- A new node view with the name blog archive.
- The quick-wizard is configured to display only blog post nodes, sorted with newest on top, and a page with the path blog/archive is created.
- In the main configuration panel, a number of view fields interesting to end users are added (such as content: title and content: body).
- A new view field content: post date is added, gets marked with exclude from display, has no label, and is outputted in the custom format ”F Y” (which is the PHP date expression yielding ”August 2011”, assuming that is the present year and month).
- The format settings are changed to group the view on the excluded date field.
- The view's header is set to Blog archive.
- A menu link is added for the page display, to be placed in a suitable menu.
Tabs with the editor's own posts
As editor on the site for my association I would like each editor's user page to have a tab listing all nodes created by this editor. The list should be accessible only on user pages for editors, and only by editors. This is important since it makes it easier to find your own content.
The functionality above can be achieved by the following steps:
- A new role editor.
- A new view with the name Editor's list, listing nodes without any particular limitation. The quick-wizard is set to create a page display.
- The access settings for the view is changed, allowing editors only.
- The filter for displaying only published content is removed.
- A number of view fields are added, depending on the information editors want to access (for example content: title, content: post date, content: comment count and content: new comments).
- The view format is changed to a table, for example, and all columns are made sortable, for example, with the default sorting providing the newest content on top.
- The path to the page display is set to user/%/list.
- The page display gets a menu item of the type menu tab and the title posts.
- A new contextual filter is added: user: uid.
- The contextual filter settings for title is set to Content created by %1.
- The validation of the contextual filter value is configured to only allow user IDs belonging to editors.
Exercises: documentation site
These exercises build on previous exercises in the documentation site suite. They can be carried out individually, with some preparation, or in sequence with the previous exercises. The exercises require using the concepts described in parts A and B in this book.
Video recordings of the suggested solutions to these exercises can be found at nodeone.se/learn-drupal.
Customized search page
As a site visitor I want to be able to search documentation pages based on when they were updated, topics, title, and free text search. I also want to be able to sort the results by relevance, updated time or number of comments. This is important because it helps me find the documentation I am looking for.
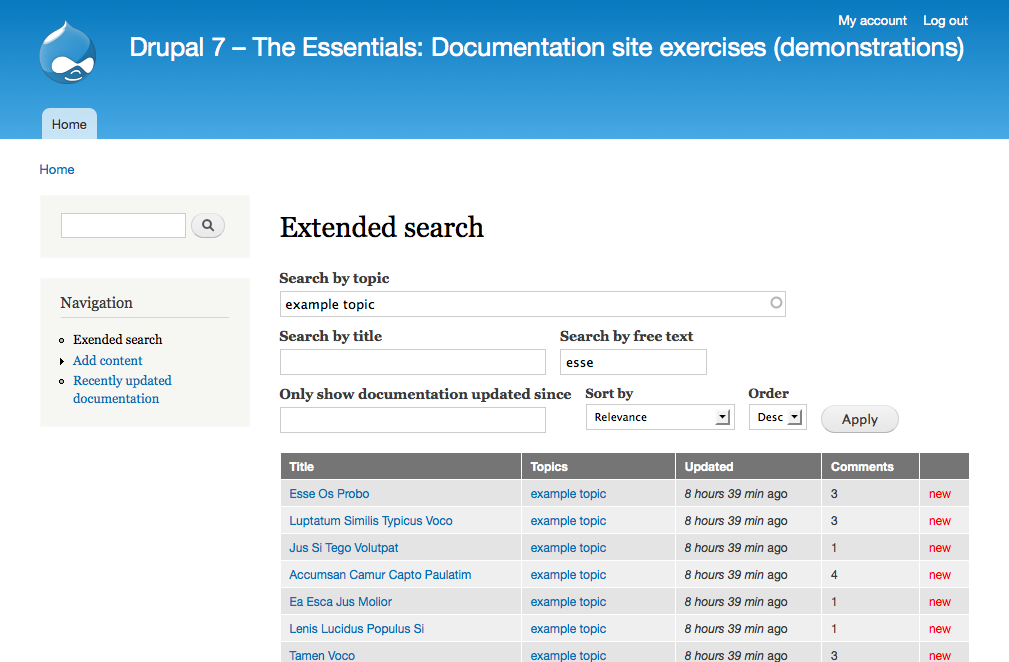
Figure 10.13: An example of how the customized search page may look.
How to demo
- As an anonymous visitor, verify that you can find the link extended search on the website.
- At the resulting page, verify that there are search fields for topic, title and free text, as well as a way to show only pages that have been updated since a given date. There should also be controls to change the sort order between search relevance, updated time and number of comments.
- Verify that each of these search criteria work individually.
- Verify that the sort criteria search relevance works, by searching for a word appearing both in titles and bodies on the website. Documentation pages with the search phrase in the title should appear first.
- Verify that the other sort criteria work.
- Verify that the search results have links leading to the relevant documentation page.
Preparation
- The site should have a documentation content type, as provided by the first exercise in this suite, as well as the topic tags provided by the exercise in the taxonomy chapter.
Suggested solution
- Ensure that all users have the permission to use search and advanced search. Check here
- Add a new view. Give it the name extended search, and have it list content of type documentation page. Check here
- In the quick-wizard, also add a page display, showing 25 results with a pager, in a table of fields. Finally also add a menu link in the navigation menu.
- In the main configuration panel, add view fields that seem reasonable to display with search results – see the recently updated documentation pages exercise in the previous chapter for suggestions. Make sure to include page title, linked to the documentation page. Check here
- Add three new filters, and mark all three as exposed – content: has taxonomy terms (limit to topic vocabulary), content: title (operator contains), and search: search terms. Provide them all with labels that makes it clear to end users that they are search fields. Check here
- Add yet another filter, content: updated date and set the operator to greater than or equal to, in order to display pages updated at the given date or later. Make the filter exposed.
- Remove the existing sort criteria. Add three new criteria, all exposed – search: score, content: updated date, and content: comment count. Set the default sorting to descending in each case, and change their labels to make it clear to end users what each sorting represent. Check here
Comments
- If you have done the exercise recently updated documentation pages in the previous chapter, the search page could be implemented as an additional page display rather than a completely separate view.
- If you have just recently created content, you may need to run cron before it appears in the search. (See other settings in Chapter 5.)
- The exposed filter for topics could use the reduce duplicate setting, preventing content from appearing more than once. This could be the case if you search for two topics and a documentation page has both of them. Another option would be to enable the distinct setting, which would provide the same effect for the view as a whole. This is found under the query settings in the advanced section.
- The user story doesn't say that the results should be presented in a table. Usually, search pages result is something similar to a teaser list, which could be implemented in this case too. However, when doing advanced searches it makes sense to present a lot of information condensed into a table.
- Users who are not logged in have no use of the column marking if content has been updated since last viewed. Drupal doesn't keep track of anonymous visitors' page views in the same way as logged in users.
- All the search forms and sorting settings make the extended search page appear quite messy. In a real project, this would most likely lead to a new user story with the objective of making it easier to overview all the options.
List a user's content on a user page tab
As a site member, I would like to have a list of all the content I’ve written available as a tab on my user page. I would like similar tabs on other users’ pages. This is important since it helps me keep track of my own contributions as well as following what other members write.
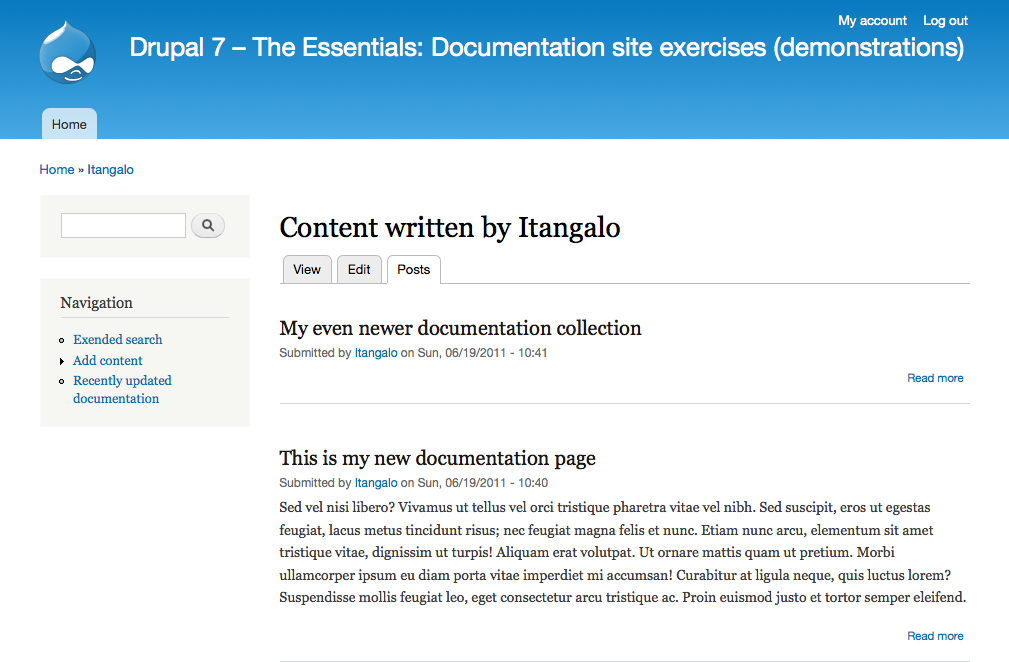
Figure 10.14: An example of how content lists may look at a user tab.
How to demo
- Log in to the site.
- Create a documentation page.
- Visit the user account page and click on the tab “Posts”. Verify that the documentation page is listed.
- Create a documentation collection.
- Verify that the documentation collection is listed, too, and (since it is newer) is listed above the documentation page.
Preparation
- The site should have the documentation page and collection content types, as provided by the first exercise in this suite.
Suggested solution
- Add a new view with the name Content by user. Have it display content of all types, sorted with newest on top. Create a page with the path user/%/posts, with a list of 10 teasers per page, and no menu link. Check here
- In the main configuration panel, add a menu item of the type menu tab and give it the link text posts. Check here
- If the contextual filter user: uid is not present, add a new relationship content: author. Check here
- Add a new contextual filter user: uid. Use the title override option to set the title to content written by %1. Use the validation options to verify that the contextual filter value is a user ID. Check here
Comments
- You may or may not have to add the relationship in step 3 in the suggested solution. It depends on how the Views module changes. (Normally, content authors are automatically available in a view of nodes, but this may change.)
- Whenever you have a view using contextual filters, you should have the view returning page not found if the contextual filter value is missing, unless you have reasons to do otherwise. This prevents the view from being used in unexpected contexts.
- The user story doesn't say how the content should be displayed. A teaser list is easy to make and usually pleasant to look at. Changing it to a table, for example, can be made in a future user story if the client wants to change the appearance of the list.
- While this exercise does give an example of using Views, in this case it might make more sense to just use the Tracker module that is included with Core.
The step where a contextual filter is added should be updated to reflect how Views treats user: uid contextual filters in a default node view.
Table with a collection's documentation pages
As a site visitor viewing a documentation collection, I want to see a table summarizing the documentation pages within the collection. The table should have documentation page title, first 200 characters or so, and comment count. This is important since it makes it easier for me to find documentation I am interested in.

Figure 10.15: An example of how a collection table may look.
How to demo
- Log in to the site and create a documentation collection, if necessary.
- View a documentation collection. Verify that its related documentation pages are listed in a table at the bottom of the page, with name, the first 200 characters (or so) of the body, and comment count. Also verify that the title links to the full documentation page.
Preparation
- The site should have the documentation page and collection content types, as provided by the first exercise in this suite.
Suggested solution
- Add a new view with the name documentation pages in a collection, and have it list content of type documentation collection. Create a block displaying a table, and set the title to documentation pages in this collection.
- Add a contextual filter content: nid. If no filter value is present, build a default value with content ID from URL. Use validation to assure that only collection node IDs are accepted.
- Add a relationship, using the node reference field on the documentation collections. Make sure to use all delta, to collect all related documentation pages. *If using the Entity Reference Module you will be selecting "Entity Reference: Referenced Entity" for this relationship.
- Add the documentation page fields you want to display, using the relationship to the documentation page. Make sure to also update the title field, provided by default.
- For the documentation page body, either use the trimmed formatter or use the trim this field to a maximum length in the rewrite results settings, to limit the body to 200 characters. Note: In the screencast, there was an error in the field that Johan used. He had attempted to use one of the fields from the Documentation Collection content type instead of using the Body field from the Documentation Page content type. So, to be explicit with this step, choose the Content: Body field and select the Documentation Pages relationship.
- Give the view block an administrative title.
- In the block administration page, place the new view block at the bottom of the content region.
- Change the field display settings for documentation collections, to hide the default output of the documentation page references.
Comments
- It is logically correct, but not entirely intuitive that you restrict the objects listed in the view to documentation collections – while what's being displayed is documentation pages. It might help thinking of relationships as providing new fields on the object you are listing – the collection gets new fields like collection:page:title and collection:page:body.
- Make sure that you add the fields used on the documentation page rather than the documentation collection and to select the right relationship in the field configuration. (This comment is directed toward the error that was made in the screencast.)
- The default order of the relationships will be their deltas – their sorting order in the documentation collection. You could, however, sort by documentation page title or any other available data if you want to override this.
- The view's limit on items to display relates to the base objects loaded by the view. So that even if you restrict the number of collections to one, all related pages will show. This is similar to how Views would handle a multiple-value field. If the view is configured to display each value as a separate row, each row won't count as a new result in the database query created by Views.
- At the block administration page, it makes sense to set block visibility to only show at documentation collection pages. The view wouldn't display anything at other pages, but setting the block visibility will prevent Views from ever being called, saving some performance for your site.
The suggested solution should be complemented with links to the relevant sections in this book.
List user’s comments on a user page tab
As a site member, I would like to view my own comments on a tab on my user page. I would also like to be able to list comments written by other users on their user pages. This is important since it helps me find my own comments, follow comments from other people comment and get an overview of a user’s contributions.

Figure 10.16: An example of a comment list at a user page.
How to demo
- Log in to the site.
- Write two comments.
- Visit the user account page and click on the tab Comments. Verify that the created comments are listed, with newest on top.
- Log out. As anonymous visitor, visit the same user page. Verify that the comments tab is visible and lists the two comments.
Preparation
- The site should have the documentation page and collection content types, as provided by the first exercise in this suite.
Suggested solution
- Set permissions so anonymous users can view user profiles
- Create a new view, displaying comments, newest on top. Create a page with the path user/%/comments, displaying full comments (not fields).
- Add a new contextual filter, Comment: Author uid. Set the title override to comments by %1, and also validate that the provided filter value is a valid user ID.
- Set the menu settings to a menu tab with the link text comments.
Comments
- It makes sense to limit the comment list to display comments only for nodes the user is allowed to view. This can be done using the content: accessible filter, however this feature is not fully functional.
- In future versions of Views, you may need the relationship comment: author to add the contextual filter on user ID.
- The user story does not define how the comment list should be displayed. Defaulting to standard comment view mode is a quick solution, that can be changed in a future user story if the client would like a different list.
The suggested solution should be complemented with links to relevant sections of this book.
The comment about "content: accessible" filter should be checked agains latest version of Views.
Exercises: News site
These exercises build on previous exercises in the news site suite. They can be carried out individually, with some preparation, or in sequence with the previous exercises. The exercises require using the concepts described in parts A and B in this book.
Display fact boxes
As a site visitor reading a news article, I would like to have any fact boxes belonging to the article displayed in the sidebar. This is important since it provides me with valuable information without cluttering the main text of the article.
How to demo
- Log in to the site as writer.
- Create a fact box, relating to a selected article. (Create an article first, if necessary.)
- View the article. Verify that the fact box is displayed in the sidebar.
- View another article. Verify that the fact box is not present in the sidebar.
- Add another fact box, relating to the same article. Verify that both fact boxes are displayed when viewing the article, with the newest fact box on top.
Preparation
- The site should have a news article and fact box content types, as provided by the first exercises in this suite.
Comment
- The DraggableViews module, combined with some wits and Drupal skills, could be used to allow drag-and-drop reordering of the fact boxes for each article.
More articles in the same section
As a site visitor viewing an article, I would like to have more articles in the same section listed at the bottom of the page. This is important since it helps me find more articles I’m interested in reading.
How to demo
- Log in to the site as writer.
- Create five news articles, all in the section world.
- Log out. As anonymous visitor, go to one of the newly created articles.
- Verify that the four other articles, but not the currently viewed one, is displayed below the viewed article. Verify that the newest is on top.
Preparation
- The site should have a news article content type, as provided by the first exercise in this suite, as well as the sections provided by the exercise in the taxonomy chapter.
Recent comments, grouped by section
As site visitor I would like to have a list of recent comments displayed on the front page. The comments should be grouped by the sub section of the articles they belong to. This is important since it helps me find hot news in the sections I am most interested in.
How to demo
- Post a comment to an article in the world section. (Create an article first, if necessary.)
- Verify that the world section appears as the first section in the comment list on the front page, with the new comment listed on top.
- Post a comment to an article in the Europe section. (Create an article first, if necessary.)
- Verify that Europe is now the first section in the comment list on the front page, followed by any other comments in the Europe section and that the world section is second.
- Verify that each item in the comment list contains the name of the related article, linking to the article page.
Preparation
- The site should have a news article content type, as provided by the first exercise in this suite.
Help improve this page
You can:
- Log in, click Edit, and edit this page
- Log in, click Discuss, update the Page status value, and suggest an improvement
- Log in and create a Documentation issue with your suggestion
