On this page
- 1. Prerequisites.
- 2. Add two new Image Style Presets:
- a. Name 1 'galleriffic_slide'.
- b. Add 'Scale and Crop' efffect.
- c. Add desired 'Width' and 'Height'. 500 x 400 is recommended.
- d. Name a second Image Style preset 'galleriffic_thumb'.
- 3. Add Gallery content type
- a. Add 'Gallery Image' field
- b. Select 'Hidden' for the gallery image in the "Manage display" setting.
- 4. Create a Gallery node with a number of images
- 5. Create a new View name 'Galleriffic Node Gallery'.
- a. Remove "Content: Title" field from "Fields".
- b. Add "title" field from your gallery node
- c. Add "description" field:
- d. Add slide field:
- e. Add thumbnail field:
- f. Add Format Settings:
- g. Add "Show" settings:
- 6. Add View to Gallery node.
- 7. You are done! Return to your gallery node and see your wonderful gallery!
Step by Step Instructions for Views Galleriffic in Drupal 7
1. Prerequisites.
Install Drupal modules Views, EVA: Entity Views Attachment, and Views Galleriffic. Login into your site as webmaster, and in the administration toolbar: Modules, group of modules called “Views”, enable “Eva”, “Views”, “Views Galleriffic” and “Views UI”.
2. Add two new Image Style Presets:
a. Name 1 'galleriffic_slide'.
- Choose Configuration→ Media and click Image styles to display the Image Styles screen.
- Click Add style and type galleriffic_slide in the Style name box as shown in the following image.
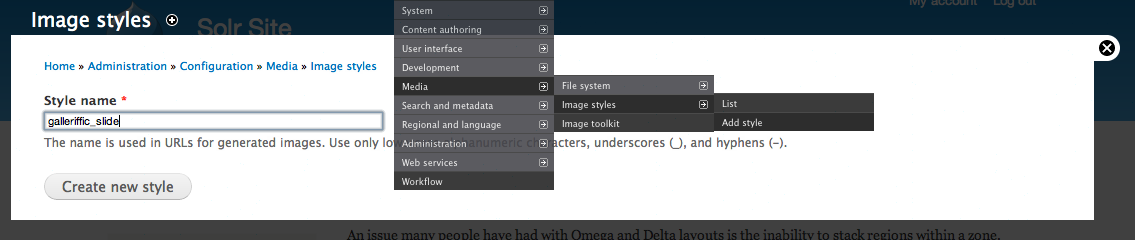
- Click the Create new style button and and Drupal displays the Edit Style galleriffic_slide window.
b. Add 'Scale and Crop' efffect.
- In the EFFECT Box, choose Scale and Crop and click the Add button.
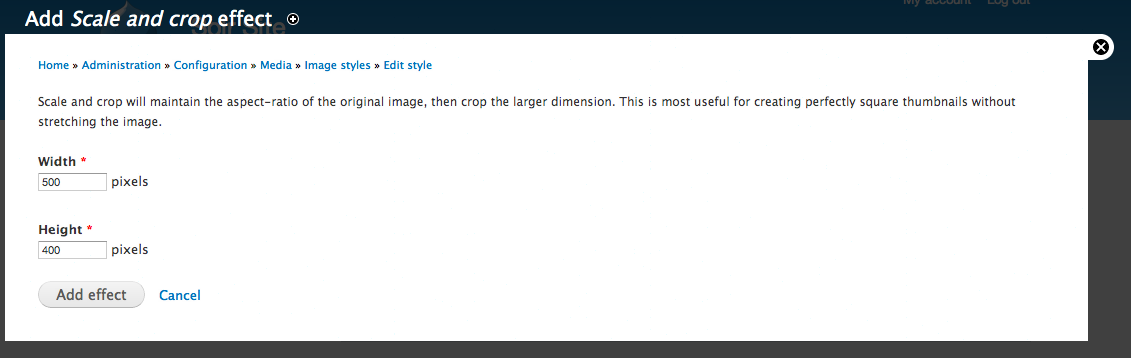
c. Add desired 'Width' and 'Height'. 500 x 400 is recommended.
- In the Add Scale and Crop box displayed by Drupal shown below, enter the desired Width and Height. Recommended values are 500 x 400. Then click the Add Effect button. Then click Update Style and close the window.
d. Name a second Image Style preset 'galleriffic_thumb'.
- Follow the steps described in 2a, 2b and 2c to add an Image Style galleriffic_thumb, add Scale and Crop effect and add the desired width and Height settings. The recommented settings for Width and Height are 75x75.
3. Add Gallery content type
In the administration toolbar, go to Structure → Content types → Add Content Type.
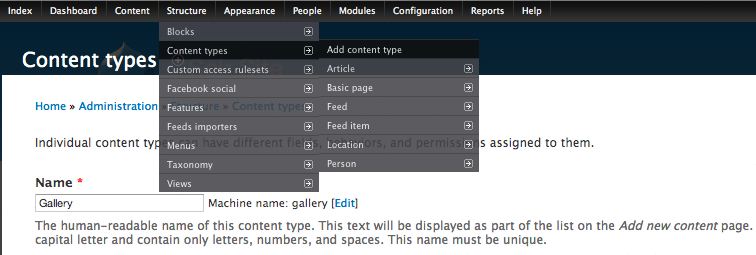
- Type Gallery in the name textbox and click the Save and Add Fields button and Drupal displays the MANAGE FIELDS window for the Gallery content.
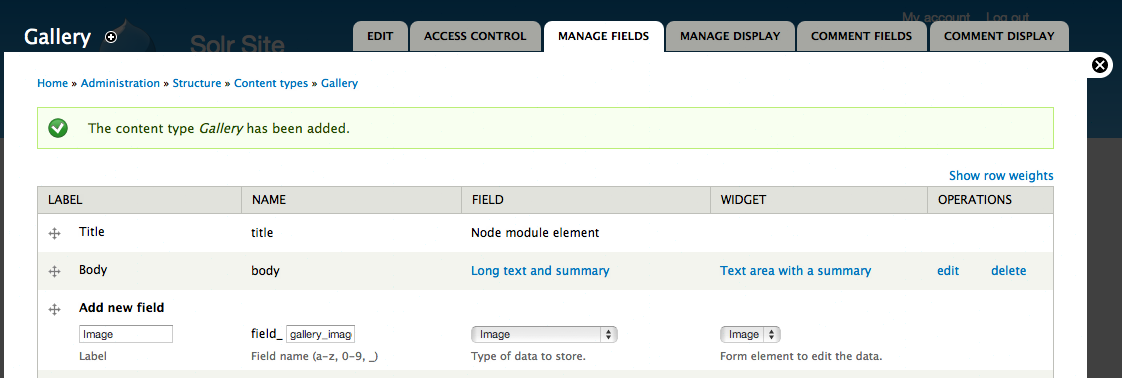
a. Add 'Gallery Image' field
(If you are not in the MANAGE FIELDS window, in the administration toolbar, go to Structure → Content types and click manage fields in the Gallery row.)
- Type “Image” in the “Add new field” text box. In the same row, “MACHINE NAME” column, click on “edit”, type gallery_image and choose “Image” in the combobox in the “FIELD TYPE” column as shown.
- Click the “Save” button to save the image field.
- Click “Save field settings” button in the “FIELDS SETTINGS” window and Drupal now displays a “Gallery Settings” window.
- Select 'Enable Alt field', 'Enable Title field' and 'Unlimited' under "Number of values" as shown.
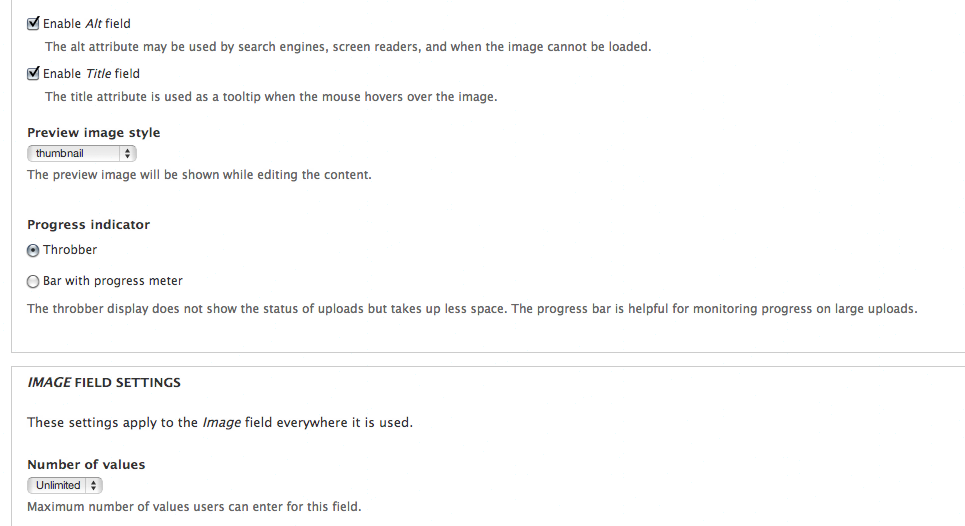
- Click the Save Settings button.
b. Select 'Hidden' for the gallery image in the "Manage display" setting.
- Click the MANAGE DISPLAY tab. The FORMAT column for the image row contains Image. Click Image in the FORMAT column and choose Hidden. Your screen should look similar to the following image.
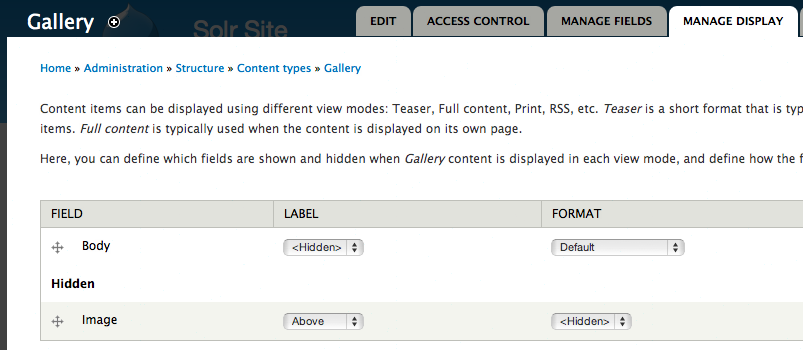
- Click the Save button to save settings.
This will keep the images from showing up on the node. We are going to use Views to show the images on the node. You have defined all settings. Now, its time to test the stuff. Go ahead a create a Gallery node with images.
4. Create a Gallery node with a number of images
In the administration toolbar, go to Content → Add content → Gallery, fill the field “Title” and, below the body, use the buttons “Browse” and “Upload” to choose pictures from your computer and upload them, one by one, to the web server.
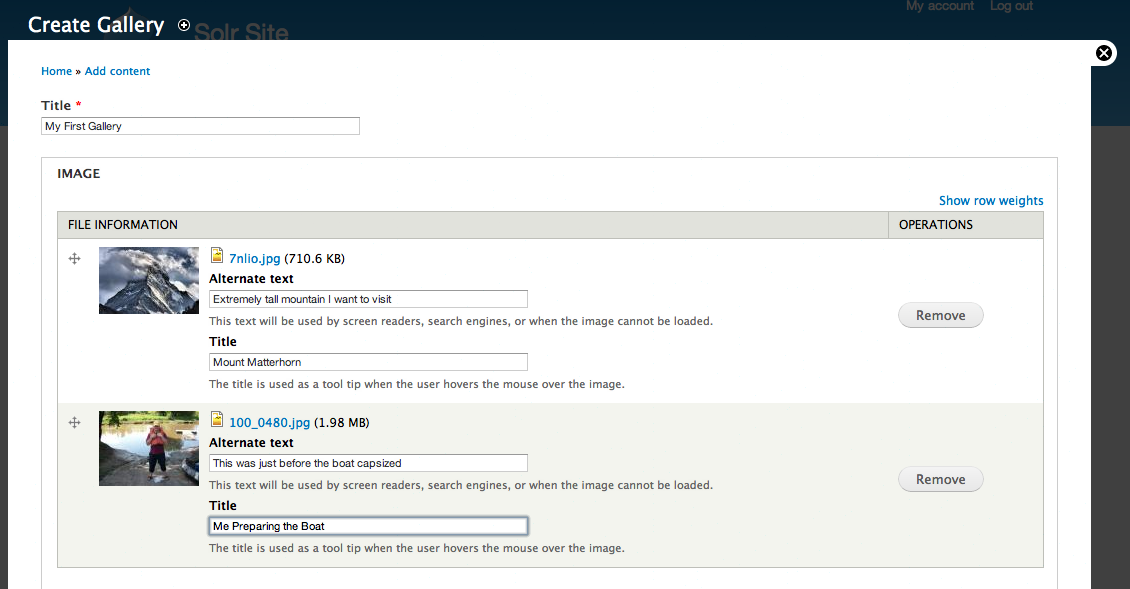
At the end, don't forget to click on the “Save button”, located at the bottom of the page.
5. Create a new View name 'Galleriffic Node Gallery'.
In the administration toolbar: Structure → Views → Add New View.
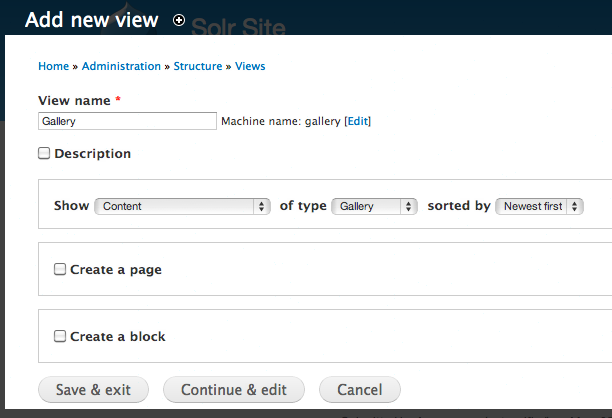
- Uncheck Create a Page. Do not select block or page. You can select content by gallery. Note that it says "Gallery" above instead of "Galleriffic Node Gallery". You can use either. Click Continue and Edit.
a. Remove "Content: Title" field from "Fields".
On the “Gallery (Content)” page displayed by Drupal, click “Content: Title” in the “FIELDS” section and click the “Remove” button.
b. Add "title" field from your gallery node
This might be a little confusing because we are going to override the field output.
- Click the Add button in the FIELDS section and you see an image similar to the following.
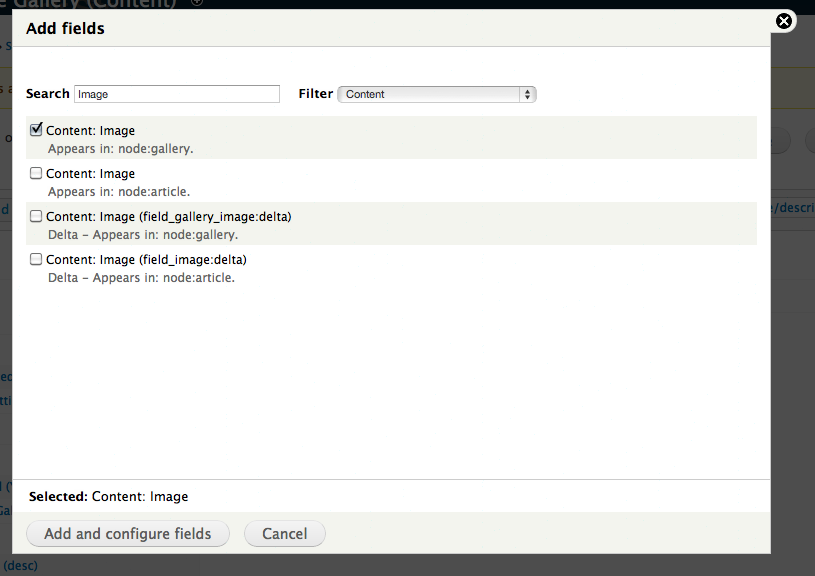
- Select 'Content: Image' . (Fields names on your screen may be different if you used a different field name earlier.) You may type Image in the search box to limit the number of fields displayed on the screen. Make sure that the field you choose is from the gallery (e.g. node:gallery and not article, e.g. node:article ).
- Click Add and Configure fields button.
Drupal displays Configure field: Content: image screen.
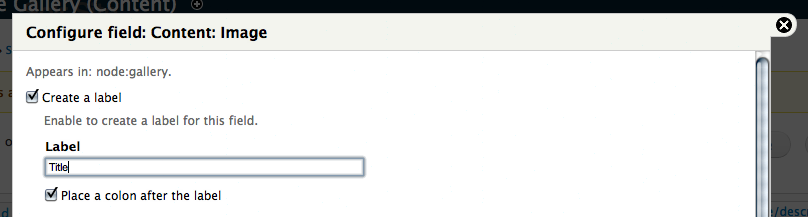
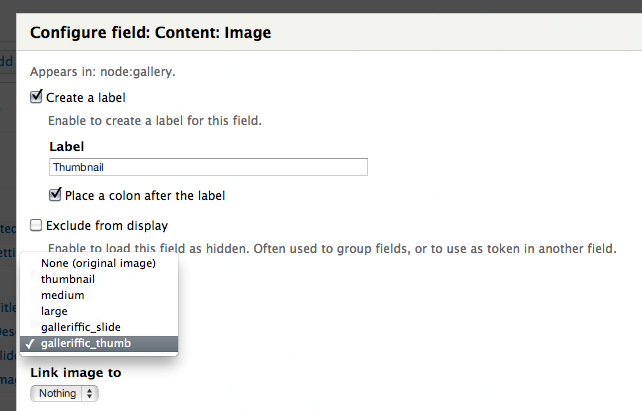
- Enter 'Title' in the Label box, as shown in the following image.
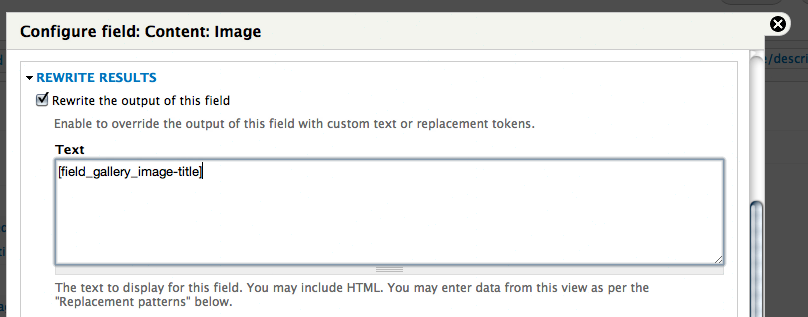
- In the same screen, click REWRITE RESULTS to expand it, if required. Then check Rewrite the output of this field and enter [field_gallery_image-title] in the "Text" box, as shown in the following image.
- Click MULTIPLE FIELD SETTINGS (located above REWRITE RESULTS section) and uncheck Display all values in the same row, as shown in the following image. Notice that this is important.

- Click the Apply button.
Drupal returns you back to the View you are creating. It displays the Content: Image (Title) in the FIELDS section. We need to add three more fields.
c. Add "description" field:
- Click the Add button in the FIELDS section..
- Select 'Content: Image' as in the previous step (5b).
- Click Add and Configure fields button.
- Enter 'Description' in the Label textbox.
- Enter [field_gallery_image_1-alt] instead of '[field_gallery_image-title]' under "Rewrite results" section.
- Click MULTIPLE FIELD SETTINGS (located above REWRITE RESULTS section) and uncheck Display all values in the same row, as shown in the following image. Notice that this is important.
Note: If you don't see the MULTIPLE FIELD SETTINGS section on the Configure field screen, you might have selected node:article field instead of node:gallery. In that case, delete the field and try again.
- Click the Apply button.
d. Add slide field:
- Select 'Content: Image' in the field list, same as above.
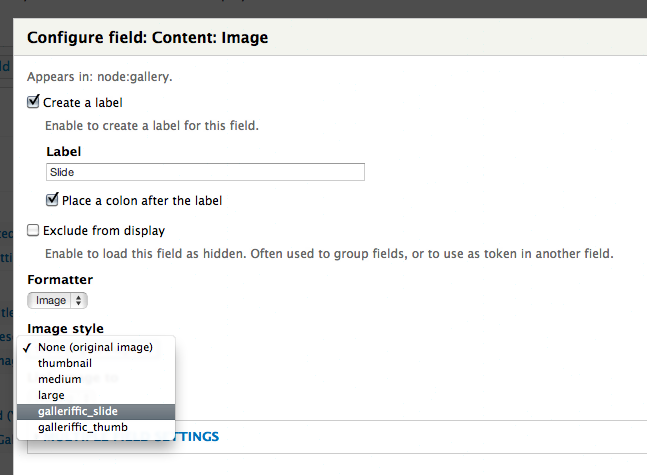
- Enter 'Slide' in label.
- Select galleriffic_slide under "Image style" as shown in the following image.
- Click the Apply button.
e. Add thumbnail field:
- Repeat steps above substituting 'Thumbnail' for 'Slide'.
f. Add Format Settings:
- Click the first item (Unformatted List) in the FORMAT section as shown in the following image.
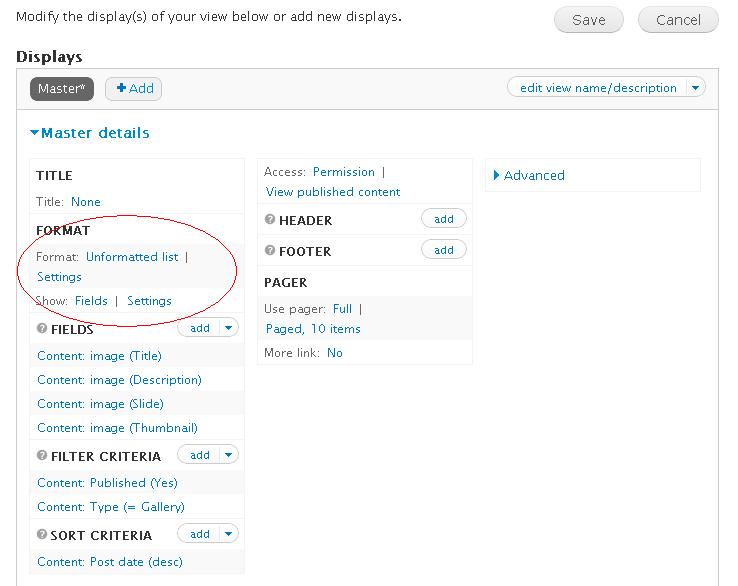
- On the Master: How should this view be styled dialog box displayed by Drupal, select 'Galleriffic Gallery' and click the Apply button.

Drupal displays the Master Style options as shown. These are used to define settings for the gallery. Defaults should be fine to start out with. You may changes these later.
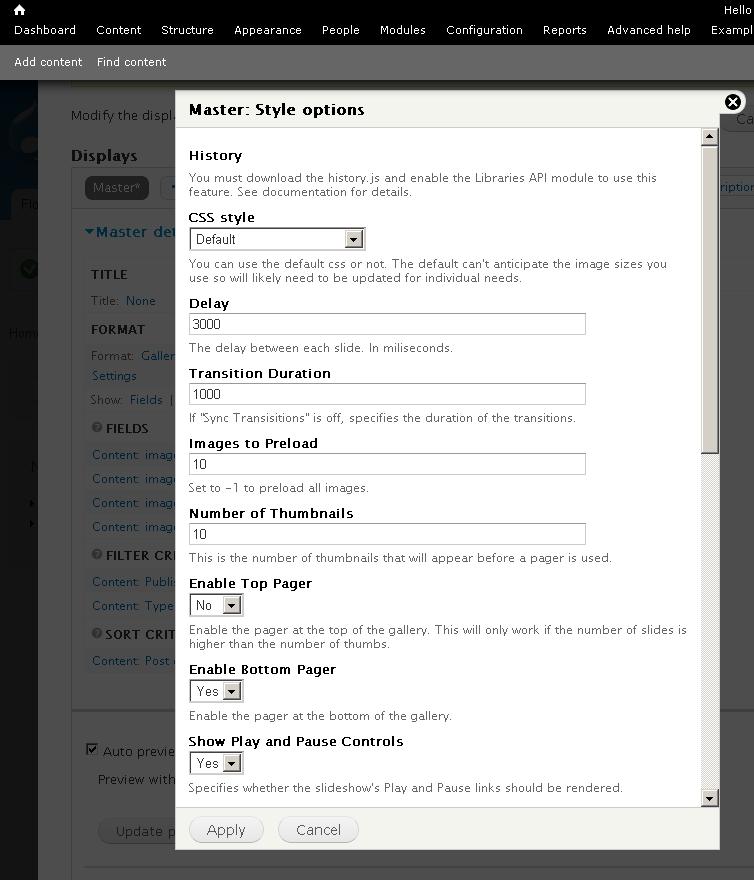
- Click the Apply button to close the Master Style Options dialog box.
g. Add "Show" settings:
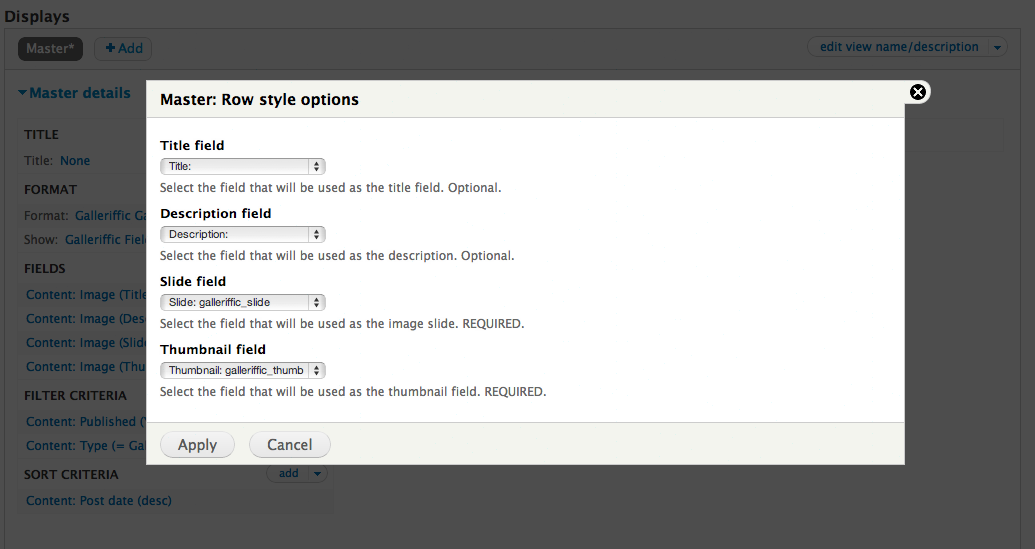
- Click Fields against Show in the FORMAT section to display the "Master: How should each row in this view be styled" dialog box. Click 'Galleriffic Fields'.
- Click the Apply button.
- Select the correct field for each type of row as shown.
6. Add View to Gallery node.
- Click ' Add' and choose 'Entity content'.
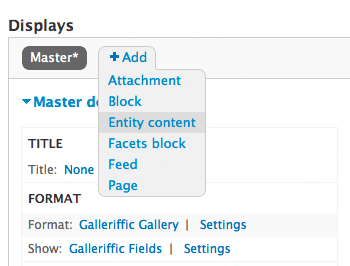
If you do not have the EVA module installed, you will not see this option.
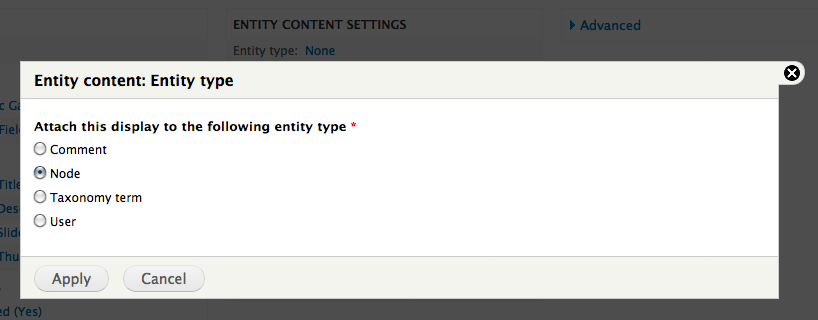
- In the ENTITY CONTENT SETTINGS in the middle of the screen, click “None” against Entity type and select 'Node' under "Entity type".
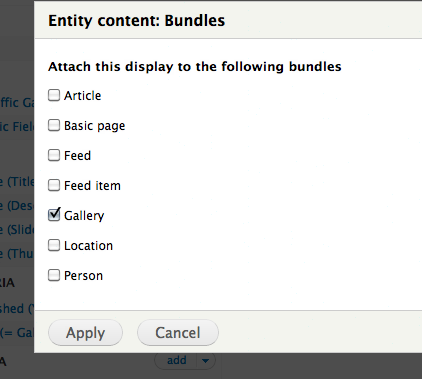
- Select 'Gallery' under "Bundles" in ENTITY CONTENT SETTINGS.
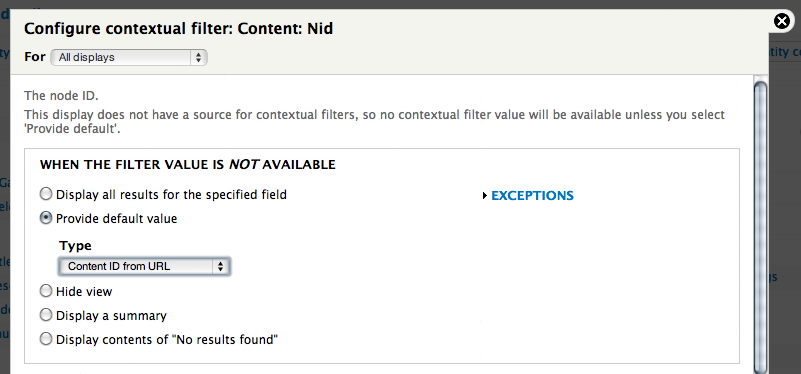
- Add a "Contextual Filter" (under "Advanced") and select 'Content: Nid'.
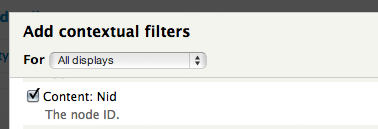
- Select 'Provide default value' and 'Content ID from URL' in the argument.
- Click Save to save the view.
7. You are done! Return to your gallery node and see your wonderful gallery!
![]()
Help improve this page
You can:
- Log in, click Edit, and edit this page
- Log in, click Discuss, update the Page status value, and suggest an improvement
- Log in and create a Documentation issue with your suggestion
