 Support for Drupal 7 is ending on 5 January 2025—it’s time to migrate to Drupal 10! Learn about the many benefits of Drupal 10 and find migration tools in our resource center.
Julio allows you to customize various elements of how your site appears by using administrative options via a web interface. This page covers how to customize the site header - where your school's name and logo are displayed - and your site's general appearance, which includes a variety of color, font, and style options.
Changing Your Site Name and Logo
The first step to configuring your Julio site is to add some basic information about your school. You may have noticed that the homepage is still displaying the default Julio logo, next to the site name you supplied during the installation process.

The site logo and the site name can both be displayed, or you can choose to use one or the other.
Changing the Name of Your Site
Starting at the Admin Dashboard:
- In the right-hand column, under Admin Quick Links, click the Site Information link.
- In the Site Name text box, type the new name you'd like for your site.
- Scroll down to the bottom of the page and click Save Configuration.
- Close out of the Admin Dashboard. The updated site name will display in the header, as well as at the top of your browser tab or window.
NOTE: If you would like to use only a logo image or only your site name in the header, see the next section.
Changing the Logo
Starting at the Admin Dashboard:
- In the right-hand column, under Admin Quick Links, click the Appearance link.
- There's lots of different appearance options on this page, which we'll get to in the next section of the documentation. For now, scroll down to where it says Toggle Display.
- If you want to display both the Logo and the Site Name, makes sure the checkbox next to both of those is filled. If you only want to display the site name or the logo, then uncheck the box next to element you don't want to display. (This is handy when, for example, you are using a logo that includes your school's name, rendering the site name redundant.)
- To upload a custom Logo, scroll down to the Logo Image Settings heading.
- By default, the checkbox next to 'Use the default logo' will be checked. To upload and display a custom logo, uncheck that box.
- After you uncheck the box, click on the Choose File button that appears.
- Select the logo image you'd like to upload from your computer, and hit OK.
- Once you've selected an image, scroll down to the bottom of the page and hit Save Configuration.
- Close out of Admin Dashboard. The page will reload and display your new logo.
Changing Your Site's Appearance
Now that you've got the header looking the way you want, you can update the site's overall appearance to match the look and feel of your school. Most of the appearance options are located on the Appearance page, which will look familiar if you've already made changes to your site logo.
To get to the Appearance page, click Admin Dashboard link in the upper-left and in the right-hand column, under Admin Quick Links, click the Appearance link. The following sections will outline each section of the Appearance page.
Changing the Color Scheme
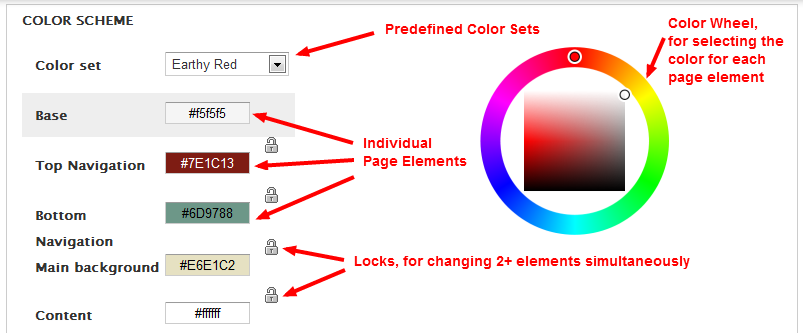
The top section of the Appearance page governs the Color Scheme for the site.

At the top, you can see the pull-down menu for choosing from among four predefined color sets: Colorful (the default color scheme), Earthy Red, Blue Gray, and Cool Orange. You can also choose Custom, which will give you the option of building your own color scheme from scratch.
If you want to customize your color scheme, simply choose the first page element you want to change, and put your cursor in the text box to select it. Then adjust the color wheel—drag the little circle on the outside ring to select a hue, and then adjust the saturation by dragging the little circle around the square. When you have chosen a color you like, the color code will be automatically filled in for the page element you selected. You can also use RGB values if you prefer.
Sometimes adjusting colors individually can be pretty laborious - this is where the locks on this page come in quite handy. By clicking the lock between two (or more) page elements, you are locking down the relationship between the colors of those two elements. As long as they are locked, whenever you adjust the color for one element, the color any elements locked to that one will also change, to maintain an equivalent relationship between the colors.
As you adjust the color scheme for your page, you can preview your results without having to leave the Appearance page, by looking at the Preview window just below the list of page elements.
When you are done making adjustments to your color scheme, scroll down to bottom of the page and click Save Configuration.
Adding a Shortcut Icon (favicon)
Related to choosing a logo for your site (though a little less conspicuous), you can upload a shortcut icon (or favicon) for your site as well. Shortcut icons are the tiny images appear in the title bar of your browser window or tab, preceding a site's name. Shortcut icons are perfectly square images, 16x16 pixels in size. There's not a lot of square footage on a shortcut icon, so you want an image that is simple and doesn't have a lot of detail. Often sites will use a simplified version of their logo as their favicon.
To upload a shortcut icon:
- Scroll down to the Shortcut Icon Settings box.
- By default, the checkbox next to 'Use the default shortcut icon' will be checked. To upload and display a custom icon, uncheck that box.
- After you uncheck the box, click on the Choose File button that appears.
- Select the 16x16 pixel image you'd like to upload from your computer, and hit OK.
- Once you've selected an image, scroll down to the bottom of the page and hit Save Configuration.
- Close out of Admin Dashboard. The page will reload and you'll see your new shortcut icon in the upper left corner of your browser tab or window.
Applying Custom Styles to Site Elements
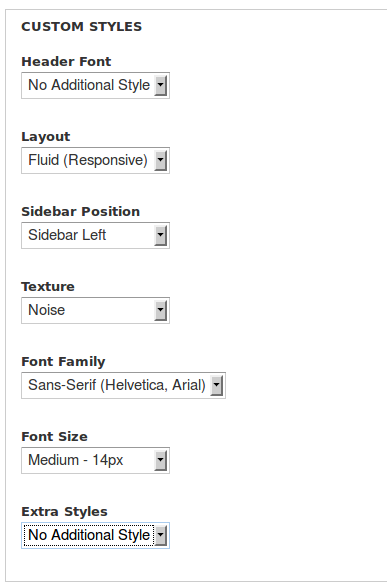
The last section of the Appearances page is Custom Styles. Each pull-down in this section offers additional customization options for particular aspects of the site.
 custom_styles_julio.png
- Header Font – Choose from 4 different fonts. This option will affect the font on headings and navigation menus throughout the site.
- Layout – Choose from Fluid (Responsive) or Fixed (960px). Fluid means the site layout will scale up and down, depending on the size of the browser window/monitor with which it's being viewed. Fixed means that the page will remain 960 pixels wide, regardless of browser/monitor size.
- Sidebar Position – Choose from Sidebar Left or Sidebar Right. This option governs the position of the sidebars on individual user group landing pages.
- Texture – Choose from three different background textures, which will display across the site.
- Font Family – Choose from three font families. This option governs all of the body text and menu links across the site.
- Font Size – Choose from three font sizes for the body text and menu links across the site.
- Extra Styles – Choose from Rounded Corners or Corner Fold. These options will change the shape of the corners of the menus and frames on the site.
When you are finished choosing custom styles from this section, hit Save Configuration at the bottom of the page. Close out of Admin Dashboard. The page will reload and display your changes.
Modifying the Site Footer
The site footer appears at the very bottom of the page. The footer appears on every page of your site. This section is often used to list contact information, hours of operation and other basic information about your organization.
To edit your site's footer section:
- Move your mouse over the footer and click the gear icon that appears, and click Configure Block.
- If you'd like a heading in your footer section, type it into the Block Title box.
- Add your contact information (or whatever else you like) into the textarea.
- Click Save Block, and scroll down to the bottom of the page to check out your new footer!


