 Support for Drupal 7 is ending on 5 January 2025—it’s time to migrate to Drupal 10! Learn about the many benefits of Drupal 10 and find migration tools in our resource center.
Creating a Gallery
To create a new Gallery:
- Go to the user group for which you want to create a Gallery.
- Click the Gallery link at the top of the page.
- On the Create Gallery screen, first enter a Title and a Description for the Gallery.
-
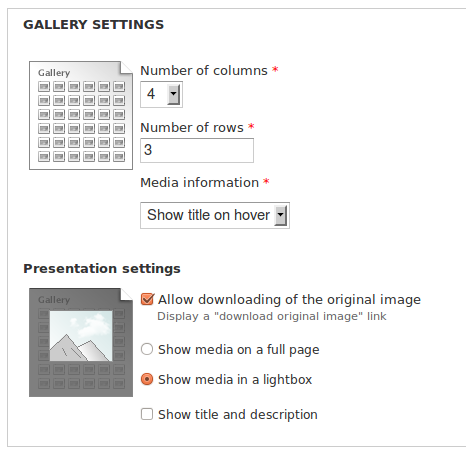
Under the Gallery Settings heading, you can choose options for the way your new Gallery will be displayed. There are options both for the Gallery landing page, which will display thumbnails of all of the images, as well as for the slideshow view, which people will see when they click on one of the Gallery images.
The first three options here are for the Gallery landing page:

- Number of Columns Chose how many columns of thumbnails you'd like on the Gallery's landing page. This will affect the size of the image thumbnailsthe more columns, the smaller the thumbnails.
-
Number of Rows - Choose how many rows of thumbnails can be displayed on the Gallery's landing page before continuing onto additional pages.
A couple of examples:
If you have 12 images in your Gallery, and you want big thumbnails but not all on one page, you can choose 2 columns and 3 rows. Your Gallery will display on two pages, with six thumbnails per page.
If, however, you'd rather have smaller thumbnails and all of your images on one page, choose 4 columns and 3 (or more) rows.
If you never want your Gallery to break onto more than one page, you can enter a very large number (100, 1000, etc.) for Number of Rows.
-
Media Information - The Media Information pull-down let's you choose how to display image titles on the Gallery landing page.
- Show Title on Hover means the title will appear when you move your mouse over the image.
- Show Title Below means the title will appear below the image on the Gallery landing page.
- Show Nothing means the title will not be displayed.
- The remaining options, under the Presentation Settings heading, govern the Gallery's display settings for the slideshow view:
- Allow downloading of the original image - Click this checkbox if you would like people to be able to download the images in your Gallery. (You'll have a chance to specify the copyright information for the pictures in a moment.)
- Show media on a full page - If you select this option, when people click on a Gallery image, it will take them to a new page with the full-size image, its title, and its description.
-
Show media in a lightbox - If you select this option, when people click on a Gallery image, it will display the full-size image in a lightbox window that will appear as an overlay on the Gallery's landing page.
- Show Title and Description - Check this box if you would like the image title and description to be displayed in the lightbox window.
Note: Both the full page and lightbox options will let people move easily back and forth between the full-size Gallery images. Try both options, and choose whichever one you prefer the look of.
- Once you've decided on all of your gallery settings, check the next pull-down, under the Belongs To heading, and make sure it says the name of the User Group for which you're creating the Gallery.
- Scroll down to the bottom of the page and click the Save button to create your new Gallery.
Add Media to a Gallery
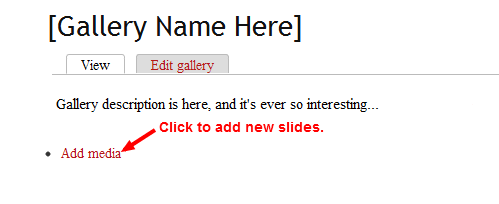
Now that you've created a new Gallery, it's time to add some images to it. You'll see the Gallery landing page, which will look something like this:

- Click on the Add Media link.
- This window will give you two choices for where to get images for the Gallery:
- On the Upload tab, you can drag and drop files from your computer (or click the +Add Files link to browse for them) and hit the Start Upload button.
- You can also go to the Library tab, and select images to add to your Gallery from among the images that you have previously uploaded to the site. Select the images you want to add (select more than one by holding shift while you click), and hit the Submit button.
-
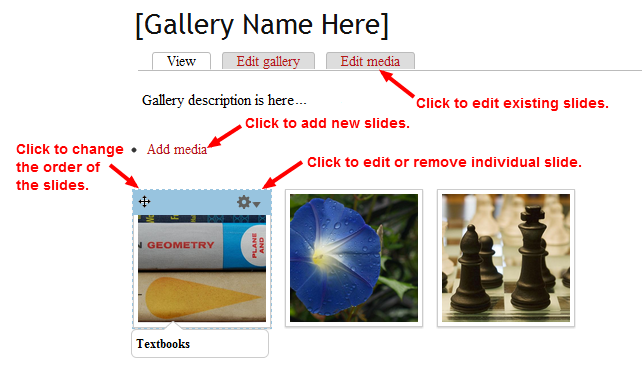
Once you've added the images you want, it will take you back to the Gallery landing page, which will look a little different:

- Click the Edit Media tab in the upper-right to add titles and descriptions for your images.
- This page will show all of the images you've selected to include in the Gallery with a set of options for each image. Here's what you'll want to add to each of them:
- Title - This is a title for the image file, which will be displayed according to the Gallery Settings options discussed above.
- Description - This is where you can add a description/caption information for the image.
- Tags - Tags are optional, and won't appear anywhere on the slideshow, but they will make it easier for searches (both from within your site and from search engines) to find the image. You can add as many tags as you like, separated with commas.
- License Settings for this Image - You can use this pull-down to choose what type of copyright permissions you'd like to assign to this image. You can opt either to reserve all rights, or choose from among the different Creative Commons licenses. For more information on Creative Commons, visit their site: http://creativecommons.org/
- Nivo Slider Link - Leave this option blank. (It's only for the Homepage Slideshow.)
- Fill out each field for all of your Gallery images, and click the Save button at the bottom of the page to see your finished Gallery.
Other useful things to know about the Gallery landing page
- You can rearrange the order of the Gallery images by grabbing the move icon (in the upper-left hand corner of an image) and dragging to reorganize the images.
- You can edit the title, description, etc. of an individual image by clicking on the gear icon (in the upper-right hand corner) and selecting Edit.
- You can remove the image from the Gallery by selecting Remove.


Comments
How to hide/disable galleries
It would be very useful to know how to hide or disable galleries on particular areas of the site
Slide Show behavior and image quality
Should images be prepared in any way other than limiting the size according to requirements? My issue is that the test images I upload are all blown up and pixelated or take just a part of the slideshow area. I tried different sizes but none displayed perfectly. (just started exploring Julio, sorry for the novice flavor)