Using node field data in emails using tokens (4.x)
With the introduction of token support in Webform 4.x, it is now possible to integrate content from the node with the webform without any programming.
Drupal provides many basic tokens, but you will need the Token module to provide an UI and basic field tokens.
The field tokens provided by the Token module are rendered by a special view mode called "Token". By default this new view mode this is not enabled and the rendered token is generated using the settings from the main default full view mode. To change this behavior, edit the content type that the webform is attached to and edit the default view mode. Under Additional view modes, ensure that Tokens is checked and save. After saving this page, a new tab will appear and this will define how the tokens are rendered. The image below shows what the page will look like after enabling the Token view mode.

Examples
Sending emails to an email address set on the webform
It is possible to set an email recipient from a node field. This means that the website administrator or content author does not need to edit the webform section to set the email recipient after the form is set up.
These are the steps required to achieve this:
- Create the field
Edit the content type that the node is attached to and add a new Text or Email field. - Hide the field
Edit the content type settings to ensure that the field is hidden when viewing the node. - Set the display mode to plain text
The email field is normally rendered as a link. This needs to be rendered using the display formatter "Email plain text". So enable the Tokens view mode and edit this to set the formatter to "Email plain text". - Add a new Hidden component
- Label, Field Key
- These are for admins, enter short descriptive values.
- Default value
- This is the field where you add the token to pull information from the container node. These follow the pattern:
[node:field_YOUR_FIELD_NAME] (Token module) - Display > Hidden Type
- To keep the email secure from web scrappers, you should select the Secure value option. These are never sent to the client.
- Token values
- If you have the Token module enabled, this fieldset contains a handy reference of the available tokens. Clicking any of the tokens will automatically populate the Default value field.
Your webform component list will look something like this once you have added the component.

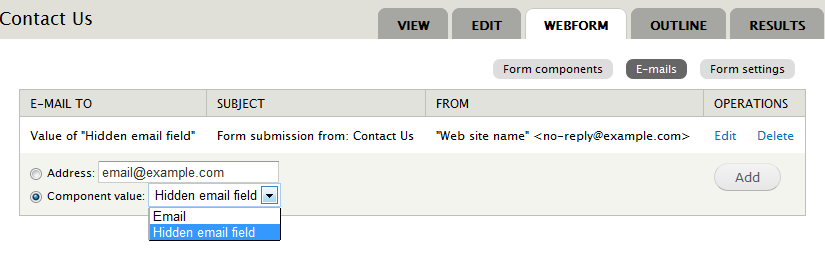
- Add an Email recipient
After saving the new component, visit the emails tab. Select the newly created component from the "Component value" select list and select add. The final results will look similar to this.
The Entity Tokens module (included with Entity API) provides 100's of additional field tokens, but it can have a significant impact on performance and can potentially break your site as it consumes available resources. Entity Tokens differ from the Token modules tokens in that they use a hyphen rather than an underscore in the token name. i.e. [node:field-YOUR-FIELD-NAME].
Help improve this page
You can:
- Log in, click Edit, and edit this page
- Log in, click Discuss, update the Page status value, and suggest an improvement
- Log in and create a Documentation issue with your suggestion

