
Panels 2 is a powerful tool that allows anyone to quickly create an easy layout, using all sorts of content. To learn how to create a basic layout, let's use the example of creating a standard 'about us' page. Normally, an about us page would be one long page. However, Panels 2 allows us to spice up the content with new looks and layout.
- First, make sure you have Panels 2 installed. You'll just need the core Panels module, as well as the Panel pages module, for this tutorial- however, as you progress in using Panels, you will find the other included modules very handy.
- Okay, now that you've got Panels 2 installed, let's get our hands dirty.
- First, click Panels on the menu. That will bring up an informational page, which you might find interesting to read. After you are done with that, click Panel pages, as that is the main tool we will be using in this tutorial. This displays all the panels you have made, so if you ever need to edit a panel in the future, come back to this page.
- Click the 'Add' tab at the top. That brings us to a page with all the possible layouts for a panel. Select the 'Three column 25/50/25' option.

- Set the Panel name to: about_us
- Set the Page title to: About Us
- Set the Path to: node/aboutus

- Click save. This will bring you to the Advanced tab.
- Click 'Provide Menu' under the 'Menu' part of the Advanced tab. This adds a menu item into Drupal. If you don't want this, or you want the link somewhere else, feel free to skip this step.

- Click save.
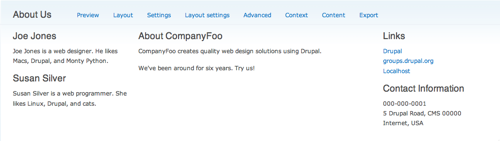
- Now, let's add some content to the page. Click the 'Content' tab at the top. It's time to think about what we want in our 'about us' page. Let's list what we want where. Let's presume we want some company information in the middle, employee bios on the left, some links on the right, and perhaps some contact information below them.
- Left: Employee Information
- Middle: Bio
- Right: Links, Contact Information
<a href="http://drupal.org">Drupal</a>
<a href="http://groups.drupal.org">groups.drupal.org</a>
<a href="http://localhost/">Localhost</a>

If you want to import a starting point, download the code and import it by clicking the import tab at the top of the Panel pages module.
| Attachment | Size |
|---|---|
| panels_2_basic_text_layouts_code.txt | 3.44 KB |


