 Come together with the global Drupal community in Rotterdam, 28 Sept – 1 Oct 2026. Sessions, contribution, connection, and Early Bird savings until 8 June.
On this page
- 1. Installation requirements
- Install Drupal 6.x and Magento
- Install Module Dependencies in Drupal
- Install Required Drupal-Magento’s Modules
- Install Required Modules In Magento.
- 2. Configure the Drupal-Magento connection
- Drupal Magento API settings (Drupal side)
- Magento API users (Magento side)
- Magento Drupal Integration
- Test Drupal-Magento API connection
- 3. Synchronize content
- 4. Configuring Store (Drupal side)
- Magento structure
- Magento Cart Quote
- Magento Cart Block
- Magento Customers
- Notifications
- Drupal XML-RPC Services
- Magento's Drupal API client (Magento side)
- Test Drupal-Magento Notifications
- 5. Create Order from Drupal
Magento 2.x installation guide
This tutorial explains, step by step, how to install and setup a Drupal + Magento e-Commerce solution.
The document goes through all of the steps needed to properly setup Drupal-Magento modules including downloading, configuring the Drupal part, configuring the Magento part, and setup and running of the content synchronization between Magento and Drupal.
The goal is to build a Drupal-Magento integration that allows you to run the Drupal site as a front end with the Magento site as a back end.
Name conventions:
- drupal.site = your Drupal site host name.
- magento.site = your Magento site host name.
1. Installation requirements
Drupal-Magento is distributed as a module package for Drupal. As such, installing Drupal-Magento requires you to have installed Drupal and any modules that Drupal-Magento depends on to work. The installation process may be broken down into the four steps listed below. Please ensure that you meet the minimum system requirements for Drupal and the Drupal-Magento specific system requirements before starting:
- Install Drupal 6.x and Magento sites (see Magento module page for compatibility information)
- Install required modules in Drupal
- Install Drupal-Magento modules package
- Install required modules in Magento
Install Drupal 6.x and Magento
Install Module Dependencies in Drupal
Drupal-Magento depends on the functions provided by other contributed Drupal modules to run and to provide some simple store configuration. Download and install the latest versions of the following modules for Drupal 6. Modules listed in parentheses are the only modules of a module package that must be enabled.
Required modules:
- CCK (Content)
- CCK (Node Reference)
- CCK (Number)
- CCK (Text)
- CCK (Option Widgets)
- Chaos tool suite
- Elysia Cron
- Date (Date)
- Date (Date API)
- Date (Date Timezone)
- Views Bulk Operations
- Views
- Services
Optional modules:
- Services (XMLRPC Server)
- Services (OAuth Authentication. NOTE: Key Authentication is no longer supported. See: #1335112: Key Authentication for Services 3.x)
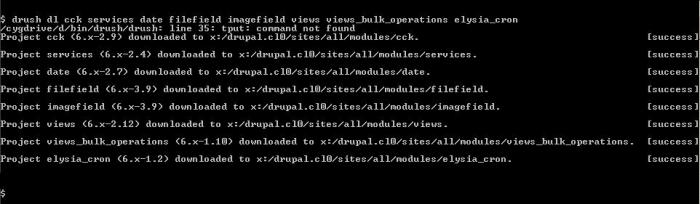
If you have drush installed, you can use the drush commands to download required modules:
$ drush dl cck services date filefield imagefield views views_bulkoperations elysia_cron
See the screenshot for more details
Install Required Drupal-Magento’s Modules
Download the Drupal-Magento modules package.
To prevent trouble caused by enabling multiple modules at the same time from different subdirectories, we recommend installing the 4 required Drupal-Magento’s core modules first. This means you should install (enable) Magento, Magento API, Magento Currency, Magento Stock from the Drupal-Magento core module group before installing any other Drupal-Magento related modules: see the screenshot
Enable the related modules:
- Magento Customers
- Magento Stores
- Magento Synchronization
- Magento Structure
- Magento Product
- Magento Cart
- Magento Cart Quote
- Magento Shipping
- Magento Check/Money Order
Click the “Save configuration” button and confirm the enabling of all dependencies.
Install Required Modules In Magento.
Install Drupal-Magento extension through MagentoConnect extension manager. Note: you should change your preferences to download Beta/Alpha packages to download the latest Drupal extension.
2. Configure the Drupal-Magento connection
After all requirements are installed in drupal.site and magento.site, the next step is to configure the connection settings between Magento’s and Drupal’s API.
Drupal Magento API settings (Drupal side)
Follow next steps:
- Open your Drupal site and navigate to site configuration -> Magento -> API http://drupal.site/admin/settings/magento/api
- Set `Magento host URL`, `API user`, `API key (password)`
- Click `Save configuration` button.
Magento API users (Magento side)
- Open the Magento site admin back end.
- Login as admin.
- Open menu 'System'-> 'Web Services' -> 'Roles'
- Create Web Service Role (set name `Drupal API User`, set Resource Access ‘All’). See screenshot for details.
Then
- Open menu 'System'-> 'Web Service' -> 'Users'
- Create an API user
- Set `User Name`
- Set `New Api Key` and `Api Key Confirmation`
- Edit Web Service’s User form in Magento
- Set `User Role` on User role tab.
Important! These parameters `User Name`, `Api Key` corresponds to http://drupal.site/admin/settings/magento/api
Magento’s `User Name` => Drupal’s `API user`
Magento ‘s `Api Key` => Drupal’s `API key (password)`
So these params should be the same in Drupal and in Magento.
Magento Drupal Integration
- Open “Drupal Integration” -> “Manage Ingegration” http://magento.site/index.php/integration/adminhtml_integration/index/ke...
- Click “Add Client”
- Set Drupal Integration client name and set Status = Enabled (See screenshot for details.)
- Open Tab “Drupal to Magento”. Select Web Service User: Drupal (The one you have created on previous step, see Magento API users). See screenshot for details
- Open Tab “Magento to Drupal” Set
- Event Notification
- XML-RPC host url
- XML-RPC username
- XML-RPC password
- Max event per time period count
- Event period duration in sec. See screenshot with details.
Note, this configuration parameters corresponds to Drupal Services configuration.
We will set Drupal Services configuration later in this tutorial.
- Open Tab “Magento to Drupal” SetClick “Save Client”. See screenshot.
Test Drupal-Magento API connection
- Open your drupal site and navigate to Site configuration -> Magento -> API http://drupal.site/admin/settings/magento/api
- Click `Test connection` button.
If the stored connection settings are correct, then you should see the msg “Connection Succeded”. This means that Drupal successfully established connection to Magento site.
See screenshot with example of configuration.
Success! You've completed a basic Drupal-Magento installation. You can now visit the administration back-end for Magento Synchronization in Drupal and begin configuring your new online store.
3. Synchronize content
Now it’s time to import Stores, Categories, Products, their Attributes and other content from Magento into Drupal:
- Open your drupal site and navigate to Content Management -> Magento -> Synchronization Console http:///admin/content/magento/synchronization
- perform Step by step synchronization:
- Synchronize Stores
- Synchronize Taxonomies
- Synchronize Product Types
- Synchronize Attributes
- Synchronize Products
- optionally you can also Syncronize Customers from Magento into Drupal
Magento Status table displays information summary for a content synchronization, where
- `Local count` shows counters for content objects in Drupal,
- `Magento count` shows counters for content objects in Magento,
- `For cron synch` shows how many Magento objects it needs to be imported/updated into Drupal
Note! If you have ‘Unknown’ in `Magento count` it means that Drupal can’t connect to and you need to check the Drupal Magento API settings.
After synchronization counters in Local count and Magento count should match (see screenshot.).
4. Configuring Store (Drupal side)
Enable Magento Product, Magento Cart, Magento Cart Quote, Magento Notifier, Magento Structure modules if you haven’t enabled them yet.
Open your drupal site and navigate to Content Management -> Magento Synchronization Console -> Manage Products http:///admin/content/magento/manage_products. You should see the list of products synchronized from Magento (see screenshot).
Magento structure
Magento Structure acts as a products filter. It allows you to set up what products in what conditions would be visible in Drupal. In Drupal each product belongs to one Store, one Store Group, and one Website. Think of Magento structure as a rules that define which Website, Store Group, Store are active following which conditions.
To configure Magento Structure, open your Drupal site and navigate to Content Management -> Magento -> Magento Stores http:///admin/content/magento/stores (see screenshot).
Edit each Website, Store Group, Store View levels and set `Magento Structure binding` field. We recommended to set:
- `Magento Structure binding` type = ‘Host’, value = the website host names for Websites (screenshot)
- `Magento Structure binding` type = ‘Always true’ for Store Groups (see screenshot).
- `Magento Structure binding` type = ‘language’, value = the enabled language codes for Store View (
see screenshot).
Magento Cart Quote
Configure allowed payment method in Drupal.
- Open http:///admin/settings/magento/magento_cart_quote
- Set `Enabled payment systems`
Magento Cart Block
Magento Cart block is used to display cart state summary. It shows how many product items are in cart.
To enable this block, open http:///admin/build/block and configure “Magento Cart block” to be displayed on the Left Sidebar region (screenshot 1, screenshot 2).
Magento Customers
Magento Customers allows to synchronize Customers information and Customers Addresses from Drupal to Magento and back.
- Open http:///admin/settings/magento/customers
- Set `User event synchronization enabled` option
- Save settings
Notifications
Magento Notifier module allows products in Drupal to be updated/deleted automatically on Product Change/Delete Event in Magento. To make it works correctly there are 3 steps to be done:
- Enable Magento Notifier module in Drupal
- Configure Drupal XML-RPC Services
- Configure Drupal Integration client in Magento
Enable Magento Notifier module in Drupal at admin/build/modules.
Drupal XML-RPC Services
Configure Services settings (screenshot):
- Open admin/build/services/settings/general
- Set Authentification settings:
- Authentication module: `Key Authentication`
- Use keys: ckecked
- Token Expiry Time: 36000000
- Use sessid: unckecked
Create new API key:
- Open admin/build/services/keys/add
- Set `ALLOWED DOMAIN:` ‘magento’
- Set `METHOD ACCESS:`
- magento_notifier.product_update
- magento_notifier.product_delete
- magento_notifier.category_update
- Click Save
See following screenshots for details:
Magento's Drupal API client (Magento side)
- Open magento site admin backend.
- Login as admin.
- Open 'Drupal Integration' -> 'Manage Integration' http:///index.php/clients/adminhtml_clients/index/key/9938be29fe47cd5c838b8c8f28877c9a/
- Click on `DrupalClient1` to open the `Drupal’s API` client settings in Magento.
- Open `Magento to Drupal` tab.
- Insert magento API key ( copied from Drupal on previous step) into XML-RPC password
- Check that Event Notifications are “Enabled”.
See screenshot for the details.
Test Drupal-Magento Notifications
- Checking that the synchronization of Drupal content from Magento is configured and works properly:
- Open magento site admin backend.
- Login as admin.
- Open `Catalog`->`Manage Products`.
- Click `Add Product` button. Create and Save a test product.
- Check that the test product has appeared in Drupal after the next 'magento_synchronize_products' cron run.
- To check open http:///admin/content/magento/manage_products and search by product SKU or by product Title
5. Create Order from Drupal
If you successfully synchronized content from Magento and configured Magento Structure in Drupal, then now is a good time to create your first test Order from Drupal to check that everything is configured and working correctly.
Open your drupal site and navigate to Content Management -> Magento -> Magento Products
http:///admin/content/manage_products (see screenshot).
Click on any product title to open product page (screenshot).
You will have got the message like “Product has been added”. Go to cart by clicking the link in Magento Cart block.
Processing an Order to checkout is implemented as going through several Cart State steps.
Once you‘ve got Cart Order Confirmation, put down the Order Number from Confirmation form (in our example on the screenshot Order Number is 100000016 ), and check the Order in Magento.
Check the Order in Magento (screenshot):
- Open magento site admin backend.
- Login as admin.
- Open `Sales`->`Orders`
- Find the order through filtering orders by Order #.
- Open the Order and check Order data. The Order data should be the same in Drupal and Magento.
Congratulations! You have configured Drupal-Magento e-Commerce solution.
Help improve this page
You can:
- Log in, click Edit, and edit this page
- Log in, click Discuss, update the Page status value, and suggest an improvement
- Log in and create a Documentation issue with your suggestion
