
Officially been merged into Tour - 2.0.x branch
Synopsis
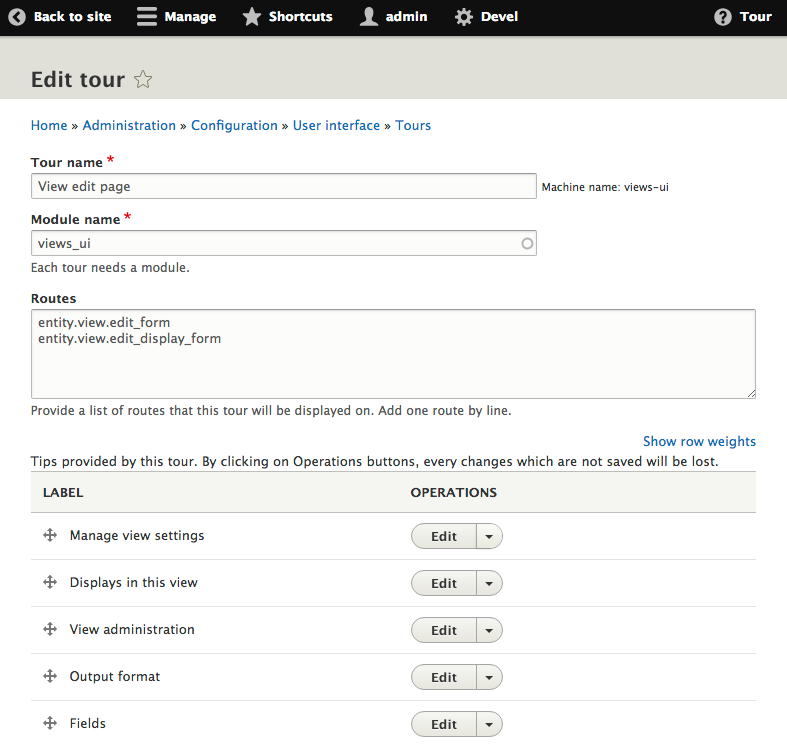
Tour UI module provides a user interface for Tour module in Drupal 8 core. The Tour API documentation provides information on how to create a tour, while Tour UI provides a user interface for doing so.
 |
 |
Note: When you find a bug it could also be a Drupal core Tour issue.
Requirements
- Core Tour module must be enabled.
- Users must be given 'Administer tour' permission in order to create, edit and delete tours.
Dependencies
Known Issues
None
Getting Started
- Install Tour UI module (`composer require drupal/tour_ui`)
- Enable Tour UI module (this will also enable core Tour module if not already enabled)
- Set permissions for 'Administer tours' and 'Access tours' at /admin/people/permissions
- Add and configure tours at /admin/config/user-interface/tour
- To configure a tour, give it a Tour Name and enter the Module Name. This controls where the exported configuration is stored if you are using Configuration Management. If you're not using Configuration Management, you can just enter tour_ui. If you are using Configuration Management, you should create a custom module and enter its name in this field.
- In the Routes field, enter the route of each page on which you want your tour to be available, one route per line. See "Determining Routes for Your Tours" section below for instructions.
- Create any number of steps for your tour by selecting Select a new tip>Text and clicking on Add.
- For each step, enter a Label and the Body text.
- Next, select a Selector Type under Attributes. For example, select Data ID and enter the id of the element where the tour step will be positioned.
- Finally, set Location to determine the position of the tour dialog relative to the id or class you entered above (e.g,. top, bottom, left, right).
- Save changes and repeat, creating as many steps as necessary.
- The order of the steps can be changed using the drag and drop feature on the tour edit page.
- Once order is set, Save your tour.
- Visit the page your tour is configured to run on and a Tour button in the upper right-hand corner of the screen should appear. Clicking this button starts the tour.
Determining Routes for Your Tours
Two methods for finding the route of a page:
Method 1: Find Route Using the Devel Module
- Install and enable the Devel module.
- Rebuild Drupal caches.
- Go to /devel/routes where you will see a list of routes. There you can search and find the specific one you are looking to target.
Method 2: Find Route Using Theme Function and Variable
- In your theme's .theme file, add a hook_preprocess_page function like the example below replacing the mytheme with your theme's machine name:
/** * Implements hook_preprocess_page(). * */ function mytheme_preprocess_page(&$variables) { $variables['route_name'] = \Drupal::routeMatch()->getRouteName(); } - In your theme's page.html.twig template, add the following code:
{{ route_name }} - Rebuild Drupal caches.
- Visit the page you are looking to target and you should see a route printed on the page an example would be view.news.page_1 or entity.node.canonical.
- Remember to remove the code above before committing your work!
Other Resources and Documentation
- Overview of Tours: use cases and general information.
- Tour Text Standards: style guidance for tour content.
- Tour Module Part 2: Creating a Tour for your module (PreviousNext)
- Set up a guided tour on Drupal 8 (Flocon de toile)
When enabled, the Tour module provides guided tours of the site interface via tooltips.
Similar Projects and How They Are Different
Tour (Core) - For using the Tour API to code tours see Tour project
Tour Builder - For cloning and exporting tours see Tour Builder project
Thank you to all Tour UI committers and Anne Bonham for writing this project page.
Supporting organizations:
Sponsoring co-maintainer + maintenance - smustgrave
Project information
 Minimally maintained
Maintainers monitor issues, but fast responses are not guaranteed. Obsolete
Use of this project is deprecated.- Project categories: Developer tools, Site structure
 535 sites report using this module
- Created by nick_schuch on , updated
 Stable releases for this project are covered by the security advisory policy.
Look for the shield icon below.


